Tuesday, February 28, 2017

Alien Collaborations!


I wanted to share a collaboration between my 3rd grade students and my colleague's jr. high students!
Previously, I shared a project called Joan Miro Monsters with 3rd grade.  Students were to create their own alien or monster creature using only 12 different shapes.  The details for the project can be found  in this link.

This year, the jr. high art teacher, Elizabeth Farnesi, and I joined forces.  Liz's eighth grade students were paired up with a few of my third graders to participate in a collaborative art project. 

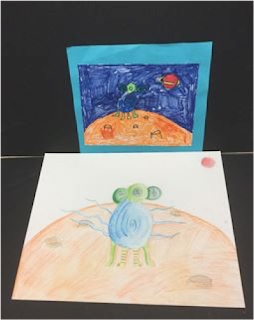
It began with my 3rd grade students designing their own aliens inspired by the art of surrealist artist Joan Miro.  Students created their alien creatures in their own environments, gave them a name, and imagined what special abilities the aliens would have (this was included in the students' artist statement about their artwork).  Once they were finished, the drawings were sent over to the junior high where the eighth graders were able to pick the drawing of their choice.

Mrs. Farnesi worked with the eighth grade students to design a plan for their alien. They figured out what colors they would need, how it would look from certain angles and how the monster was going to be portrayed.  The junior high students were also to choose whether they wanted to recreate the monster using clay, felt or render the alien as a realistic drawing.  

After creating their alien, the 8th grade students had to design the packaging for the alien to be transported in back to our school and to the 3rd grade student. All of the junior high students were generous enough to donate their project to their elementary partners. The students were so excited and loved every single one! 

Here are a few examples of drawings my 3rd grade students had created:


And here are a few finished creations!


Once the artworks were complete, the 3rd graders received a nice surprise!  These images were used on our publicity within our school district.


Thursday, February 23, 2017

Using Technology in Art on Digital Learning Day #DLDay

On February 23rd, our school took part in Digital Learning Day #DLDay.  Digital learning is any instructional practice that uses technology to strengthen  students' learning experiences.  This can include laptops, tablets, digital cameras, digital projectors, websites, and more.

Here's a video that explains a bit about Digital Learning Day.


This year, I was excited to get my hands on chrome books within the art room!  With the chrome books, students were able to enter their own artist statements, use Google classroom, and visit the many art website I saved on my Symbaloo.

I would like to share a few technology items we used within my art room for #DLDay!


With my kindergarten students starting their Henri Rousseau-inspired jungle pictures, we had fun creating masks on the Curious Corner website.  Students chose different animal parts to build their own mask design!


1st grade students also took part in designing their own masks as their extra activity when they finished their contour pictures.


In my 4th grade class, students were creating portraits using the Queekypaint app.  It's a very simple version of a "photoshop" program that helps students create a drawing using digital tools.  I felt it was an important site to assist them in understanding how to create drawings digitally instead of with a pencil. 


Our school has been wish Artsonia for over three years and this is the first year our students are entering their statements into their portfolios with the use of the chrome books.  I've written how Artsonia has made a huge difference with my art classes as a teacher as well as a parent in the past, and I highly encourage all schools with an art program to have a gallery of their own.


Since the beginning of the school year, the chrome books have been used with grades 4-6, but starting on #DLDay, 3rd graders can now visit their online Artsonia portfolios!


Do you have a ton of Powerpoints created over time for multiple projects and unit lessons?  You can easily transfer them over to Google slides in your Google drive, which has made life 100% easier for traveling art teachers.  Never again do you need to worry about leaving your thumb drive at one school as you travel to another.  

In my 6th grade class, I was able to share my slideshow of the history of Stained Glass for their tissue paper stained glass project.  The slideshow is refined over time, and students engage is active discussions about what they learned over time.


And we have finishers for the project already!


How did you participate in Digital Learning Day?

Wednesday, February 22, 2017

Claes Oldenburg Inspired Cheeseburgers with 2nd Grade!


Claes Oldenburg (born January 28, 1929) is an American sculptor, who is known for his installations of large sculptures of everyday objects. He is also known for making soft sculpture versions of everyday objects. Many of his works were made in collaboration with his wife, Coosje van Bruggen. Oldenburg, now 88 years old, lives and works in New York city.


His cherry on spoon fountain is located in Minneapolis, Minnesota.  


In 2nd grade, we focus on quite a few "pop" artists, and Claes is first on our list.  One of the most visited artworks for project inspiration is his sculpture "Two Cheeseburgers."  I have seen collages made in so many different styles for elementary projects, it's hard to narrow down the exact person who's started introducing Claes's projects in their classroom.  I would like to share a board from a fellow #Artsed #PLN member, Donna Staten, who organized many Pinterest boards for art teacher use.  This link goes directly to the board (created by Donna) dedicated to Claes Oldenburg.  


My 2nd grade students create two projects inspired by Claes Oldenburg's work.  The first project is a popular one, the stacked cheeseburger.  In creating this project, students learn how to stack, overlap, and add details to make the collage appear more textured.

Materials
-10.5" x 16" black paper
-12" x 18" colored paper for frame
-Each color paper cut down to 6" x 12"
      *Light brown or mustard (bun)
      *Brown (hamburger)
      *Yellow (cheese, mustard, and fries)
      *Red (tomato, ketchup, bacon)
      *Green (lettuce, pickles)
      *White (onion, bun seeds)
-Scissors
-Glue
-Pencils
-Crayons

Directions
This project takes about 2 40-minute class periods.

Day 1: Use the first 10 minutes to go over the artworks and biography of Claes Oldenburg. Once finished, demonstrate how to begin the collage.  Start with the bottom bun and work your way to the top.  The students want to see how you complete each step, and with the limited amount of time, I share how to create the bun, hamburger, cheese, onion, and lettuce.  Show students how to fold the paper in half, then draw a shape from the fold:

*The bun, hamburger, tomato, and onion will be a rainbow.
*The cheese will be a triangle
*The Lettuce will be a wavy rainbow.


After the shapes are cut out, show how to glue the pieces down.  Demonstrate how to stack halfway up and not directly on top of each other.  Use the crayons to draw in the textures of each layer.

Day 2: Use the first few minutes to go over what was started.  Continue to demonstrate how to create mustard/ketchup, pickles, bacon, the top bun, seeds, flag, and fries if needed.  Once students have completed their cheeseburgers, have them frame their paper to display.  Here are a few examples of the finished products!


Once the collages are done, we move into the second project, which is the sculpture!

Materials
-Primary classpack of Model Magic (red, yellow, blue, white)
-Pencils
-Baggies (to store unused clay)
-Small plates (students write their names on the plates)

Directions
This project is for one 40 minute class period. The size of the cheeseburgers will be small, almost like the students are making food for their dolls! The students will be mixing the primary colors to make their own green and brown.  Give each student a small plate to write their name on.  Once projects are dry, you can place the small plate and projects in baggies to hand back.

Start by having students mix their greens (blue and yellow) and browns.  The buns requires a little of each (red, yellow, blue, white) for the lighter color, and the hamburger requires just the three primary colors.

Next, show the students what forms need to be made for each layer of the cheeseburger.  Make sure you practice making the example beforehand.

Once students are done with the cheeseburger, they can use extra clay is available to make accessories, like fries, milkshakes, chicken nuggets, and more!

Here are a few finished examples!


Monday, February 6, 2017

Surviving Your Evaluations: February's Stepping Stones


For some educators, the most worrying times of your career can be your teaching evaluations.  Many of us have heard stories of miscommunication and misunderstandings between administration and educators, so it’s no wonder many become tense during times of observation.  As nervous as many of us can be, evaluations are an important element in your job.  Our evaluations reflect our professionalism in our career.  It helps administration understand our curriculum, measurement of student growth, and gives a chance to share how awesome we are in our classroom setting.

There are many types of evaluation tools used in all school settings and the most popular is the Danielson model.  With the Danielson framework, there are four domains that a teacher is evaluated on.  The first domain is planning and preparation.  A few standards within this domain reflect how you demonstrate knowledge and content, knowledge of students, setting instructional outcomes, and designing assessments.  The second domain reflects your classroom environment.  Even if you teach on a cart or temporary space, you still need to establish class procedures, manage student behavior, and organize your physical space.  Domain three involved your instruction.  The standards covered reflect engaging student learning, question and discussion techniques, student communication, and assessment in instruction.  The last domain covers professional responsibilities, which includes your own reflection on teaching, maintaining records, communication with families, participation in the professional community, and growth in your professionalism.

Another popular evaluation tool is the Marzano model.  The Marzano model also has four domains that chain together.  Domain one is classroom strategies and behaviors (which directly affect student achievement).  Domain two is planning and preparing, domain 3 is reflecting on teaching (awareness of instructional practices), and domain four is collegiality and professionalism.
Whether you are a first year or experienced teacher, here are some key tips in surviving your evaluations.

Gather your evidence.  Have you had communication with a parent over email?  Do you have a call log?  Save it.  Do you set up displays in the hallways or in the local community?  Take pictures.  Gathering your artifacts helps provide evidence of the hard work you put into your career and how much you support the students you teach.  It helps to get in the practice of documenting everything you do from day one.  Documents, pictures, newspaper clippings, and articles/blog posts are key evidence pieces to help develop your Evaluation portfolio.

Create a system to save the artifacts.  Many teachers create “binders” to save all their work within each standard to meet in the four domains, while others have folders or digital documents.  For print outs and physical artifacts, save a file folder for each domain.  Keeping your artifacts in one place makes it easier to find what you need if asked.  If you have a blog, Instagram, or social media site dedicated to your classroom and lessons, you have a huge percentage of your evidence shared digitally, which is easy to pull up if needed.

Prepare and study the ins and outs of your lessons for your observations.  I know it’s easier said than done, but prepping in advance will save you a ton of stress down the road.  If you know which lesson the administrator will observe, hand in a copy of your lesson plan in advance including standards and any photo document of the project.  Create your examples, rehearse your objectives, and prepare for any questions that may be asked.

Be prepared for thing to go wrong.  Nothing goes 100% perfect, but how you handle the flexibility reflects a lot on your teaching.  When you deliver a lesson over time, you instinctually reflect on your successes and failures, which help you to refine your delivery of instruction and enhance your projects. 

Don’t stress over it.  From personal experience, adding tension and stress causes more problems than needed.  As long as you feel prepared and focus on your tasks in front of you, your observations should run smoothly.  There have been a few times I was observed and I flowed around the room, forgetting the administrator was even there.  The evaluators are there to view how you move about your classes, deliver your instruction, and manage classroom behaviors.  Show them how awesome you can be.

Your class comes first.  The key thing to note is that you are there to educate your students, so they should always come first.  Think about their learning :  Are they understanding the objectives?  Are they engaged?  What are they taking away from your lessons to use outside of the classroom?   These are the elements your administrator wishes to observe, so put your focus on your class.

To all you wonderful educators, good luck with your evaluations.  I know you can rock it if you put your mind to it.  We are in this together to bring art to future generations.