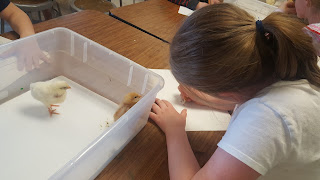
This Spring, we took on a new adventure in our school's art room: hatching baby chicks! Every year, our school takes part in a project to teach about the process of the egg to the bird. Many classes from Kindergarten through 6th grade take part in the project. With this being my 3rd year at my school, I was interested to see if a specials teacher could participate as well! I was very excited to receive approval and begin the journey of hatching chicks in the art room! Even with student allergies and sensitivities, this project was checked with parents prior to beginning the process.
Our Baby Chick Story
It all started with an incubator. The box contains a space for water (to keep the eggs humid for the 21 day incubation period), a metal rack, and a turner for the. We needed to keep the temperature at 99.5 degrees during the 21 day incubation.
Throughout the 21 days, students would take quick peaks inside the incubator to see how they were doing. I was giving a link to a Powerpoint containing pictures of the egg development over each day. You can find the Powerpoint at this link.
On around Day 19, we transferred the eggs from the turner right onto the metal rack (covered with a thin mesh to prevent egg pieces from falling through). This was the exciting part!
And when we walked in on a Tuesday morning, we had our first batch of baby chicks!!!
Students were invited to peak at the new babies while working on their art projects. They were so excited to see them, they were on their best behavior waiting for their tables to be called up!
That afternoon and the next day, I moved the hatch-lings from the incubator to the box prepared with the heat lamp.
In the end, we had over 15 hatch out of two dozen eggs!
Now that the eggs were hatched, I discovered that I had limited time with the babies. I only had them for one week before they were collected for a local farm. So why did I want chicks in the art room? I wanted students to document and quick sketch what they observed. I was able to have a few kindergartners draw the eggs in development, but my 3rd graders were the lucky winners to work with the chicks!
The Project
Students were to create a drawing of a chick. The challenge was how to draw a moving model. My students are familiar with drawing still life or pictures for inspiration, but this was their first time drawing a live animal!
On each table, I set up a bin with white paper at the bottom. Two chicks were carefully placed in each bin to be observed while drawing. The chicks were properly taken care of and students were given specific instructions prior to starting on handling the chicks.
Warning: If you attempt this in your room, chicks poop...a lot. Be prepared for students to laugh or comment on droppings while working on their drawings.
Students were given one class period (about 30 minutes) to create a drawing of a chick (or chicks). Once their drawing was completed, they were able to place their chick in any background they wished. The drawing was to be traced and colored using either crayon, colored pencil, or markers. After day 1, students were only able to complete their draw and begin tracing.
I couldn't help it, I wanted to draw a chick too!
After one week, we had to say goodbye to the chicks as they were adopted by a local farm. The following week, students completed their drawings with crayons, colored pencils, or markers.
Here are some of the finished examples from the experiment! The first drawing was made by a kindergarten student, and the rest are from my 3rd graders.
Overall, I loved having the experience of hatching baby chicks in the art room! Since this was my first time (and new to the time frame), the project was limited to drawing materials. Now that I'm familiar with the steps, the ideas are flowing for next year! thank you so much to my colleague, Mrs. Perino, for making this happen!


