Monday, June 29, 2015

Summer Workshop Series: George Rodrigue-Inspired Blue Dog Paintings


George Rodrigue was a Louisiana-based artist known for his trademark "Blue Dog" characters in all his paintings.  Sadly, George was diagnosed with stage 4 lung cancer in October 2013 and passed away in December 2013. He is known for his creation of the Blue Dog series of paintings, featuring a blue-hued dog. 

Wikipedia states that George used the shape and stance of his deceased dog named Tiffany and was primarily influenced by the loup-garou legend (the first painting in the series), which holds the title "Watch Dog," painted for Bayou, a book of Louisiana ghost stories.  The blue-hued, ghostly spaniel/terrier is often featured with a white nose and yellow eyes.

"The yellow eyes are really the soul of the dog.  He has this piercing stare.  People say the dog keeps talking to them with the eyes, always saying something different.  People who have seen a Blue Dog painting always remember it.  They are really about life, about mankind searching for answers.  The dog never changes position.  He just stares at you.  And you're looking at him, looking for some answers.  "Why are we here?," and he's just looking back at you, wondering the same.  The dog doesn't know.  You can see this longing in his eyes, the longing for love, answers."

-George Rodrigue on the Blue Dog


Materials
-Pencil
-11" x 14" canvas
-Acrylic Paint
-Brushes
-Water
-Water Container
-Paper Towels
-Images of George Rodrigue's Blue Dogs
-The book "Why is Blue Dog Blue?"

Objectives
The students will create their own paintings similar to the style of George Rodrigue's "Blue Dogs."  Students can choose their own background and their own color for the dogs.  The students will learn the term "monochromatic" while painting the dogs.

Directions
This project was created during one class which was 2 hours in length.  We began the project by reading the story "Why is Blue Dog Blue?" written by George Rodrigue, and went over the different colors the artist changed for his trademark dog image.  After reading the book, we started drawing the dog step by step.  Here are the steps I took in creating the dog:

Step 1: Draw the nose
Step 2: Draw the white spot
Step 3: Draw the eyes
Step 4: Draw the head
Step 5: Draw the ears
Step 6: Draw the front and back legs
Step 7: Add the details

The details consisted of adding fur to the ears, points in the eyes, and marking the different colors within the dog (where it would be light, dark, or the base color).  This step, with reading the book, took about 30 minutes.

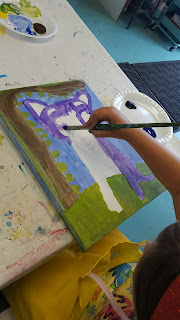
After drawing the dog design, the students began painting the background color.  The students were encouraged to choose their own background, and all three wanted the blue sky and green grass.  Once the background was painted, they were asked to fill in their dog with the color they chose.  The only areas they were asked not to paint were the eyes, inside of the ears, white spot, and the nose.  After applying their base color, we mixed the colors with a touch of black or brown to create the darker tone and added patches of the shadows.  Once finished, we added a touch of white to the base color for the lighter tones.  We then filled in the white spot on the face.  These steps took around an hour to complete

For the last half hour, students were asked to trace their dog with black paint, using a thin brush.  We filled in the eyebrows, cheeks, shadows, and ears, while tracing the entire dog's outline.  Once completed, students had time to touch up any areas needed!


Here's the finished example I made for students to follow along:


Here are my students' finished projects!


Wednesday, June 24, 2015

Summer Workshop Series: Watercolor Owls


The next workshop was titled "Watercolor Owls."  We invited students ages 6-9 to attend this one day,  workshop to create their own patterned owl design.  To kick it up, students created their owls in 3-D!  The above image was the example I had made for my students to use as a reference when creating their own owl project.

Materials
-11" x 14" watercolor paper
-13" x 16" illustration board for frame
-pencils
-markers
-Crayola watercolors
-Brushes
-Water
-Water cups
-Styrofoam
-Hot Glue Gun

Objectives
The students will create their own owl design (using black and white owl designs as references).  Through drawing the owls, students will practice their symmetry and patterns.  Their owls will also be placed in a background environment using a 3-dimensional method.

Directions
For this 2 hour class, we began by looking at different owl designs and having students practice drawing the design they liked the best.  All I did was Google "black and white owl clipart" in images and there's a ton of ideas to choose from!  Once students had their idea drawn out, the took one sheet of watercolor paper and began drawing the branch and owl design.  Once the owl was drawn out, they were encouraged to enhance the owl with patterns.  Some students preferred to keep their owls realistic,  so they focused on a feather pattern.  On a second sheet of watercolor paper, students were asked to draw a sun or moon, with any additional details for their background.  Once completed, they traced both papers with black marker.  This took about 30-40 minutes to complete.

Next, students began using the watercolor paint.  In tracing the owls with marker, students had fewer issues with paint colors blending together.  Students were given 60-70 minutes to paint both the owl paper and background.

Once students completed painting, the were asked to cut out their owl and branch.  For the final touch, I hot glued styrofoam to the back of the owls.  Before I attached the owls to the background, I hot glued the background paper to the illustration board first, then applied the owl on top.  The finished products were amazing and students loved their works of art!!!

Here are some of the finished examples created today!


These classes are taking place at Pastiche Studio in Mokena, Illinois.  To view details about the studio, classes available, and paint parties, please visit their site!

Tuesday, June 23, 2015

Summer Workshop Series: Modigliani Self-Portraits


This week, I held a 2-day workshop teaching students (ages 10-13) how to create a self-portrait in the style of Amedeo Modigliani.  Amedeo Modigliani (1884-1920) was an Italian painter and sculptor who is known for his elongated portraits with almond-shaped faces.  When he moved to Paris in 1906, he came across Pablo Picasso and Constantin Brancusi!


Since the studio I taught at was up and coming, not many students had heard about our classes, and with this being our first project, we had one student.  One is better than none!

Materials
-12" x 18" canvas
-pencil
-acrylic paint
-water
-water cups
-brushes
-paper towels

Objectives
Inspired by the style of Amedeo Modigliani, students will create their own elongated self portrait.  Students will also be learning painting techniques throughout the process of creating the painting.

Directions
Day 1: Each class was 2 hours in length.  We began by talking about Modigliani and identified elements of his style that stood out in his artworks.  After viewing images of his portraits, students began drawing their portrait sketch onto the canvas.  We started with the background first, them moved our way up each layer (background, skin color, shirt, hair.  After the 2 hours were up, the first layer of colors were placed down.

Day 2: When the student returned the next day, we worked on the details.  We started with the hair, adding highlights and shadows with different shades of blonde.  We then moved onto the skin tine, adding shadows and highlights to the chin and eyes.  Next, we covered the eyes and mouth, finalizing with tracing the facial features with raw umber.  Once the face was done, we moved onto the shades in the shirt, then finished up with re-tracing the outline of the portrait from the background.  Two hours flew by fast and we had a finished product!

Here's the example I had made to show the student(s):


Here's my student's project in progress and finished!


And while my student worked on hers, I started another one!


During the two days, we had multiple phone calls for more students signing up for future classes, so stay tuned!

These classes are taking place at Pastiche Studio in Mokena, Illinois.  To view details about the studio, classes available, and paint parties, please visit their site!

Wednesday, June 17, 2015

Split Class Success! Wayne Thiebaud Inspired Projects


Wayne Thiebaud is an American painter who is known for his colorful desserts: pies, ice cream cones, pastries, cupcakes, and gum ball machines!  It's no wonder why elementary students LOVE to make art inspired by Mr. Thiebaud's creations!

If you've seen my previous post about teaching split level classes, it can sometimes be challenging teaching projects to 2 different grade levels at the same time.  One of the methods I use is teaching the same artist and using two different projects.  It's also a bonus to use the same materials to save on prep!  The key is to focus on what concepts you want your students to learn.

The split level class I had this past school year was a 2nd and 3rd grade class.  In second grade, I normally work with Thiebaud's gumball machines, but for this project, I decided to have 3rd grade work with the cupcakes at the same time!

Here are the painting examples I had shown to 2nd Grade:


…and 3rd Grade!


2nd Grade Gumball Machines

Materials
-10.5" x 16" black paper
-12" x 18" colored paper (for frame)
-elmer's glue
-pencils
-chalk pastel

Objectives
The students are introduced to the art of Wayne Thiebaud for inspiration.  For the project, the 2nd grade students will create a resist project using elmer's glue to trace out their image, then chalk pastels to fill in with color.  The students will also demonstrate value by adding a shine to their created gum balls.

Directions
Day 1:  The students are first introduced the artworks of Wayne Thiebaud.  Next, they are asked to draw out a gum ball machine design and fill the bowl with circles for gum balls.  The trick is to try and draw each circles to be the same size, as well as a decent size to color in once the glue dries.  Also, demonstrate to the students how to squeeze the glue out of the bottle to trace a thin glue line.  This will save on major drips while the project dries on the drying rack.

Day 2-3: Since the projects will now be dry, demonstrate to the students how to fill in the spaces with the chalk pastels.  I allow the students to have a kleenex to blend their colors.  Try to show students how to stay within their glue spaces.  I noticed when students smear or attempt to blend the entire project at once, all the chalk mixes together and makes the project look messy and ghost-like.  Have the students glue a colored paper to the back to finish with a frame.Here are the finished examples!


3rd Grade Cupcakes

Materials
-10.5" x 16" black paper
-12" x 18" colored paper (for frame)
-elmer's glue
-pencils
-chalk pastel

Objectives
The students are introduced to the art of Wayne Thiebaud for inspiration.  For the project, the 3rd grade students will create a fun cupcake that demonstrates value (highlight and shadow).

Directions
Day 1:  The students are first introduced the artworks of Wayne Thiebaud.  Next, they are asked to draw out their cupcake designs using a pencil.  Instead of doing the glue tracing, students will begin filling in their artwork with chalk pastel colors.

Day 2-3: Demonstrate to students how to apply colors for highlights and shadows in the frosting, cupcake wrapper, and main shadow of the cupcake.  Once students have finished their pieces, have them glue a 12 x 18 colored paper to the back for a frame!

Here are the finished examples!


Tuesday, June 9, 2015

Putting on Your End of the School Year "Sassy Pants," You're Almost Done!


Happy end of the school year!  For many of you, I may be too late for this post, but thanks to snow days and finishing up online classes, I'm just now starting to close up my classroom during my last week!

And you know what?????  This is the first year ever that I can leave my posters up on the wall!!!!!

After doing this packing up routine for a few years, there are some tricks I have learned to save on  beginning of the year hassles.  Some of these tips took me a few years to nail down because I kept forgetting to organize when I closed up...so maybe writing it down here will help me and you both!

1. LABEL EVERYTHING!!!!  As much as you just want to throw that material in that box or on that shelf, mark where you're putting it.  This way, when you open up in a few month, you can find it easier, plus you'll be better organized for the start of the next school year!  Another reason why I label everything is because I kept forgetting about materials I ordered and they'd get lost in unlabeled boxes.  When it came time to write out a new order, I discovered I already had a huge stash of the material I over-ordered on, and I could have used that money for something else!

2. If you do not label boxes with your name, room #, or school, do not assume it to be there when you return.  Remember when I said to label everything?  If you pack boxes of personal items or materials, make sure to write your name, room # (or if you're on a cart, which space you store your materials), and even which school.  Sometimes boxes get shipped to different schools in district (or when a room is cleaned out to be waxed), and not putting blame on anyone (because it happens), just cover your stuff.

3. Create a map of your space.  During the summer months (if you do not have year-round school), the custodial staff are hard at work cleaning out the rooms, washing walls, and waxing floors.  If you communicate with your school's custodians, you may have a system worked out where you can "map" your furniture, so it's there when you return to set up in August.


4. Refresh your commonly used materials ahead of time.  As much fun as it is to open everything new in the beginning of the school year, I've found that sometimes teachers can't get into their classrooms until a day or two before the kids come.  Getting the small jobs done ahead of time makes for less time setting up and more time in the sun in August!


5. Get a thumb drive.  If you're a blogger or overachiever like me, you spend countless hours over the summer refining your curriculum and creating new slideshows for future projects.  Save all your documents to bring home and spend time preparing for 15-16.  Too often I'm home for the summer and wishing I saved that document from my school server!

To the many teachers who finished their year, enjoy!  To the many who are still in the home stretch, put on your sassy pants because you're almost done!


Monday, June 1, 2015

Ways to Become a Leader in Art Education: June's Stepping Stones


Congratulations, you have completed a year of teaching!  Now that you have the time to sit back and reflect upon the past school year, you may consider using new-found knowledge to help others in your field.  In sharing your experiences, you start your path in becoming a leader in art education and help mentor new teachers in our field.  There are many ways to be a leader without overdoing your workload.  Depending on the time you have and the obligations you carry, you can choose which avenue to take in becoming a leading teacher in art education. 

I've listed a few suggestions you may want to consider to improve your overall teaching, plus assist you in mentoring others.

Advance Your Education.  If you have your “licensure” and a bachelor’s degree, consider taking classes that would lead toward a master’s or doctoral level.  Depending on your district, you can not only advance on the pay scale, but also gain new knowledge and insight for your teaching strategies and curriculum development.  Do you have a family at home?  There is a way to take classes online to save you the hassle of babysitters.  Advancing your education helps you to stay on top of current trends in art education, which helps you to become a trailblazer in your school department or local community.

Consider Applying for National Board Certification. If you've been teaching for more than four years, you may also want to consider national board certification.    The national board is a process that assists you in fine tuning your teaching strategies and helps you to fully understand the “why” in what you teach.  To become a national board certified teacher, you must apply at www.nbpts.org.  From there, you will undergo a process of gathering evidence for a portfolio and testing your expertise in the arts and education.  Many districts offer full coverage for undergoing the process and offer incentives if you pass the NBCT process. 

Share Your Experience.  If you've been teaching for a few years, you may have a pile of projects that you created that you could share with the art education community.  There are many avenues to take to share the awesome work your students have made, such as creating a blog, website, or send in your project ideas to art education based magazines.  Blogs are a great way to share what you do in your classroom, plus you can post at your own pace.  Over time, you develop a following of readers that enjoy viewing what you do and create in your teaching environment.

Use Action Research to Your Advantage.  At times you have concerns or questions about an issue in your classroom, but your having a hard time finding accurate research to help support your inquiries.  I came across this a few times, especially when I was teaching art form a cart and couldn't find articles to help in managing my curriculum from room to room.  In sharing my personal research through blogs and articles, I met others in similar situations that were searching for the same answers.  Through networking, we've improved our teaching strategies and helped others along the way.

Be a Mentor.  Earlier this year, I shared the benefits of mentorship for teachers.  If you remember your first year of teaching, you probably remember the successes and failures within that time and how you learned to grow from them.  Mentors help ease the transition within the first year by offering sound advice and lead you in the right direction with your curriculum, teaching strategies, and classroom management.

Take a Leadership Position.  If you have the time, you may consider entering into a leadership position in an association or guild.  On an association board, you could take up a position to represent different regions in your state or nationally, be a chairperson for state art shows, become an advertising coordinator, and the list goes on.  When you lead in these positions, you are telling the community that you want to represent them as an advocate for the arts in education and help promote the importance of the arts in our nation.

Be an Advocate.  Even if you have little time to spare, you can still be an advocate for the arts in many ways.  On social media, you can simply share articles you find that represent facts on the arts, or blog posts that would help improve strategies and classroom managements.  In your district, you can voice your passion for the arts to your local community and administration.  Even the simplest act of sharing makes you an advocate for the arts.

This summer, consider your options on how you can be a leader in the art education community.  

To view the full article, please click here!