Showing posts with label Spring Projects. Show all posts

Friday, April 10, 2015

Simple Rainbow Sculptures with 1st Grade


It's Spring!  With April showers bringing on the May flowers, kids are looking up to the sky, hoping to see rainbows after a nice rain.  Since students are learning about rainbows and how they're made in their classrooms, why not visit the rainbow in art as well?

I like to look at this lesson as a re-visit in Primary and Secondary colors.  My kids already are introduced to color mixing in the fall with tempura paints, so mixing the clay is not as tricky as it would seem.  Since the students are in a primary grade level (and due to the limit of clay), I prefer to stick with the main 6 colors and exclude indigo.

BUT WHY??????  THAT"S AN IMPORTANT COLOR OF THE RAINBOW!!!!!!!  Well, indigo is a tertiary color and tricky to mix so young, so I prefer not to visit that color in a primary grade level.  It's not that I want to give false information to my students, but I can easily visit the color at another time.

Materials


-Depending on the number of 1st grade students you teach, order the box of primary color Crayola Model Magic clay from Nasco or Triarco.  One box can cover up to three classes of around 25 students.  The box is filled with four colors: red, yellow, blue, and white.  Each package of a color can be separated for four students total.

-Small white paper plates.  I prefer the thin plain white paper plates you can get at the store.  It helps the students to form their rainbow shape, and separates the projects once they're finished.

-Wooden stylus sticks.  This is used for the clouds only

-Pencil to write their names on the plate before starting.


Directions

Each student receives one chunk of each of the colors: red, yellow, blue, and white.  Tell the students to break up their chunks into pieces.

3 chunks of red
3 chunks of yellow
3 chunks of blue
2 chunks of white


1. Take one red chunk, roll it out on the table, and shape the first line of the rainbow on the plate.

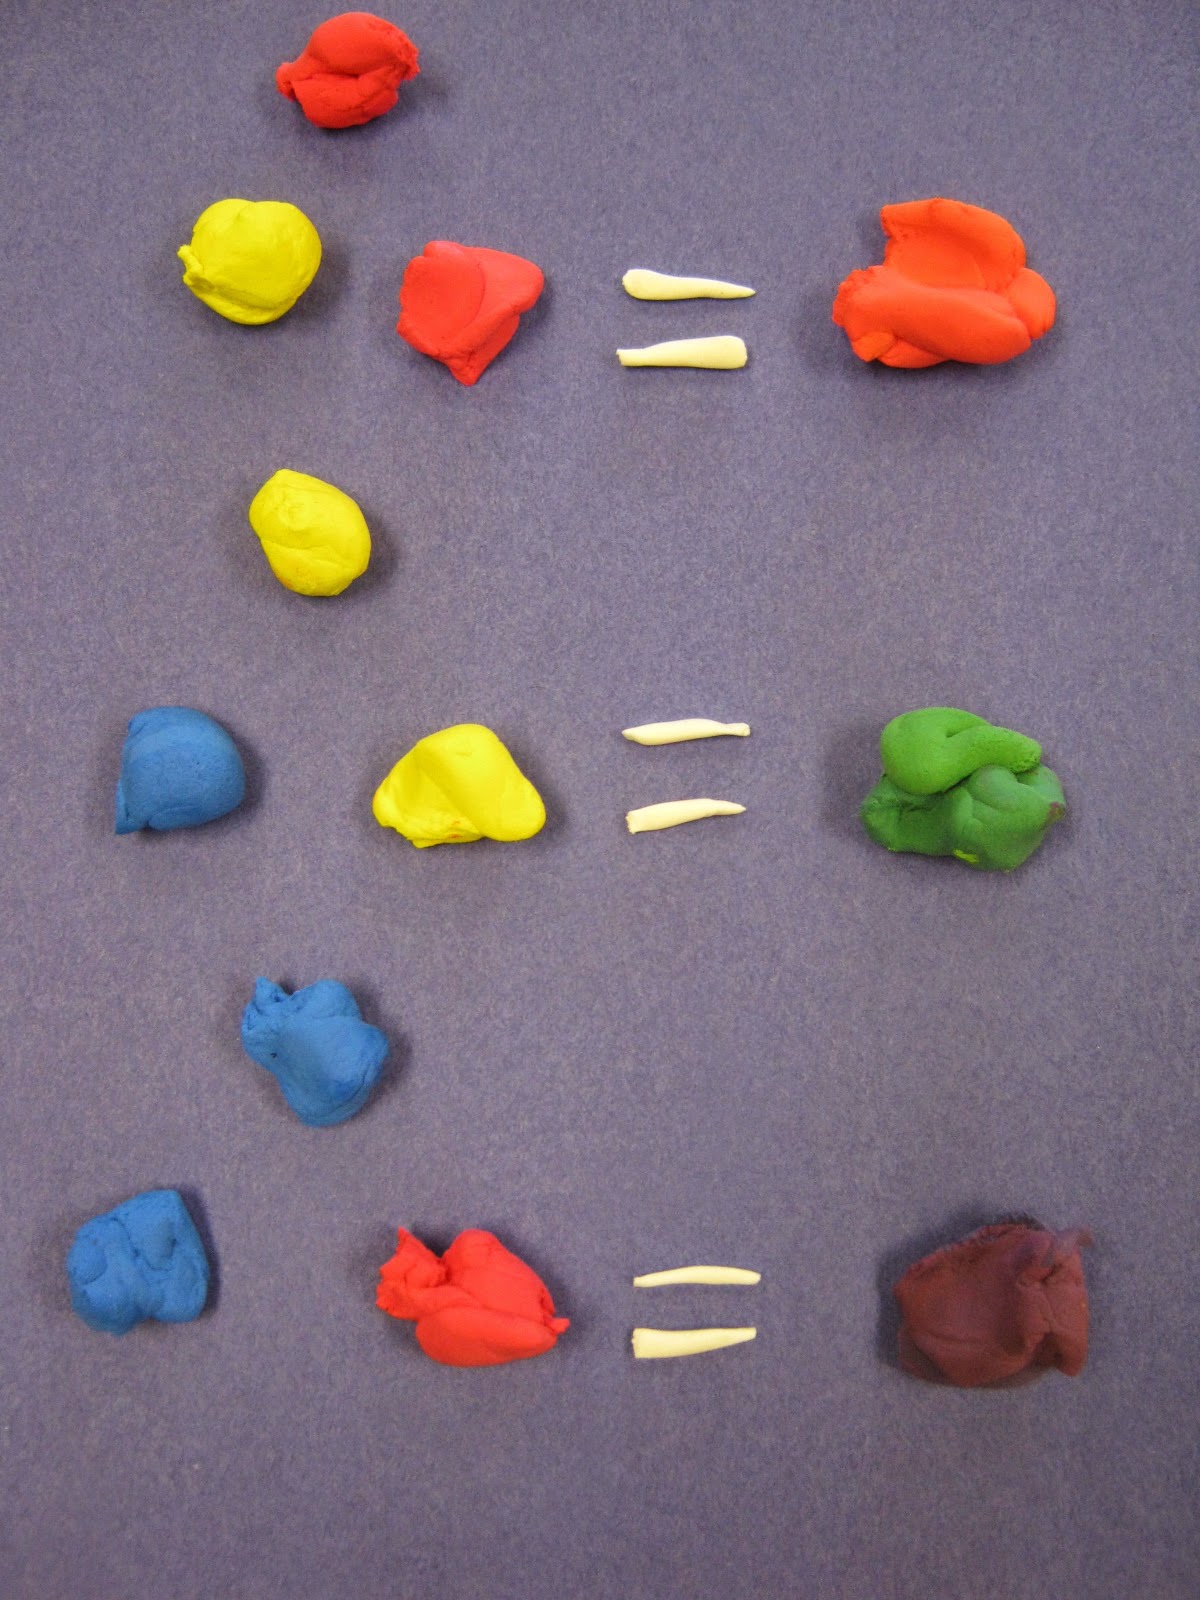
2. Take one red chunk and one yellow chunk, mix together until you get orange.  Roll it out on the table, and press against the red line on the plate.

3. Take one yellow chunk, roll it out on the table, and press against the orange line on the plate.  By now you'll notice that the lines are getting smaller, so students may have a little extra clay after each line.  Ask students to keep the extra to the side and to not press all the extra colors of clay together.

4. Take the last yellow chunk and one blue chunk, mix together until you get green.  Roll it out on the table, and press against the yellow line on the plate.  Put extra clay to the side.

5. Take one blue chunk, roll it out on the table, and press against the green.  Put extra clay to the side.

6. Take the last red chunk and the last blue chunk, mix together to make purple (violet).  Roll it out on the table, and press against the blue line on the plate.  Put extra clay to the side.

7. Take one white chunk, roll it into a ball, then flatten it.  Take the stylus stick and press it along the edge of the circle to make fluffy clouds.  Place cloud at one end of the rainbow.  Repeat on the other side.

8.  Once the student has finished, have then hand you the plate.  They can easily stack to the side until they are ready to take home.

9. Before passing out the materials, make sure you demonstrate to the students how to break up the colors and mix what is needed.

If you keep the rainbows until they are dry, you can easily hot glue a piece of magnet to the back, so families can hang them on the fridge at home!


You will have some extra chunks of colors leftover.  Make sure you seal them separately in ziploc bags for other projects you may need them for!


Here are a few final pieces!  I love how bright and colorful they are!


Saturday, July 5, 2014

Spring Science + Art Projects for K-2

At the end of the school year, I was packing up the classroom like everyone else, except I had to pack for a cart next year.  With so many materials to put away, I was brainstorming on what project I could make with the primary grades with minimal materials, exciting for the students, and tied into their curriculum.  I decided upon two projects that could adapt for grades K-2, integrating science and literature, with a Spring theme.

Kindergarten Grouchy Ladybugs
Inspired by the story "The Grouchy Ladybug" by Eric Carle


Kindergarten students are very familiar with the work of Eric Carle, especially since I like to create lessons inspired by many of his books.  For this project, I only used white paper, pencils, crayons, and tempura cakes (with paintbrushes and water, of course).

We started by reading the book together, then identifying the many insects and animals the ladybug encountered throughout the book.  We also talked about where the ladybug lived and what insects would live in the same patch of grass and leaves.  I demonstrated to the students how to draw the grass, some of the insects, the ladybug, and left the other animals to the kids' imaginations.  Some students chose to work with just ladybugs, while others added different insects to their pictures.  Once the students were done drawing, the colored with crayon and painted with the tempura.  Easy clean up!


1st Grade Insects Studies
Exploring insects in nature


Did you know that if you googled "bugs in a jar," you'll get more art project images that pictures of jars?  This is one popular project with students because they not only love drawing the insects, but their studying the insects in nature.  Through art, they're also learning science by identifying the parts of the insect, what they eat, and where they live.  Having the tempura cakes out from kindergarten made it easy to share materials between grade levels.  To prepare the project, I created a packet with pictures of insects for the students to draw from.

The additional materials are:

-10.5" x 16" white paper trimmed into a jar
-pencils
-black markers
-colored paper scraps for lids
-hole puncher
-tempura paint
-paintbrushes and water
-12" x 18" colored paper
-glue

We discussed together what insects we have in our own backyards and how we safely collect them.  Students like to take the time to identify the parts of the insect and what shapes are used to draw them.  Students had to draw at least 7 insects to fill their jar, watching their space and size of the insects.  Once drawn, they traced with black marker and painted in with tempura paint.  For finishing ouches, students glued their jars to colored paper, trimmed a lid, and punched holes in the lid before gluing down.


2nd Grade Insect Studies
The 2nd grade students were also introduced to the same project, but they were given a few extra responsibilities.  First, they were shown how to cut the jar shape themselves.  The 2nd grade students had previous knowledge of creating symmetrical designs with paper folding, so the task should not have been daunting.  The students also had to cut out their lids themselves to fit the top.

I don't always use one project for different grade levels, but since this one was introduced this past school year, the project will only be used for first grade in the future (so the next batch of 2nd graders will not have to do the project twice).


Thursday, June 27, 2013

Watercolor Still Life Flowers with 1st Grade


Whether you're pushing a cart or teaching in a room, the 1st graders love working with this easy materials: watercolor crayons.  They are fascinated with the fact that crayons can turn into paint just with the use of water.  I normally like to create this project as my own Mother's Day gift for students to give, but with curriculum and timing, it doesn't always work that way.  One thing's for sure...it makes a good spring project.

For this watercolor project, I introduce still life: creating a picture of objects that are not alive.  A popular choice is the flower pot, and with spring and summer, flowers are a good option.  When students first see my example, they comment that they can't draw it until I show them how simple it can be.

All you need is: white paper (50# weight or more to handle water), pencil, black permanent marker, water color crayons, paintbrushes, and water.

First, I start by drawing the flower pot.  I draw a rectangle for the top of the pot, and a square for the bottom of the pot.  I explain that the rectangle should not be higher than the middle of the paper so students have room for their flowers.

After the pot is drawn, students draw the ground line, starting from the middle of the square to the edge of the paper of both sides.  I give the students the option to draw squares for tablecloth or leave it looking like grass.

Next is the flowers.  I show the students a flower at a time, drawing anywhere around the top of the paper, as long as the stems they draw after reach the flower pot.  Some simple flowers to draw are the tulips (a "w" with a "u" underneath), a rose (a spiral with a "u" underneath), a tiger lily (three hearts, three stems, three circles), the morning glory (small circle, 5 sticks from the circle, and close it at the ends), and the typical pansies and sunflowers (circle center, circle or pointed petals around the circle).  Once all the flowers are drawn, students are asked to create two sticks for a stem that connect to the flower pot, and some added football-shaped leaves for decoration.  If the students still have empty space at the top of the paper, I ask for full circle suns, clouds, or birds in the sky.

After their picture is drawn with pencil, I ask them to trace with black permanent makers.  Not every teacher uses this step, but I feel at this age, student projects are crisper and neater when using the tracing method.

After the pictures are traced, I hand the students the watercolor crayons.  I have the students color in the entire picture first, including the full blue sky reaching the ground.  This step is mostly done on day 1.

For day 2, I remind the students on how they need to finish their coloring, then I show them how to use water and paintbrushes to change the crayon coloring into a painting.  I instruct how to paint one color at a time, then wash the brush before switching to another color to paint.  Once a students' entire picture is colored during class time, I place a bowl of water and paintbrush in front of them, and they go to town.

Here are some of the results from this year!


What's nice about this project (and another reason why I save it for the end of the year) is that it's not that messy.  Water is easy to clean up, and you don't have to worry about a heavy mess!

Monday, April 1, 2013

Handling Recycling Projects While Traveling

Recycling projects while I push a cart???  With what storage space?? How would I begin collecting materials?  How would I manage those materials with a cart and/or traveling?

These are just some of the questions I've heard asked by traveling art teachers and teachers with a cart.
It is possible to create projects out of recycled materials, and promote Earth Day at the same time.  We may not be able to handle full-on large scale amazing sculptures, but we can still get the message across to reduce, reuse, and recycle!

Design your lesson.  What project did you want to make with recycled materials?  Are you combining the project with Earth Day, or promoting using recycled materials to create year round?  Think about what materials are easy to collect, or use materials that have been donated to you.  Bottle caps make great murals, and they also make great bugs for Spring projects.


                                               Angry Birds made with toilet paper tubes!


                                                     Butterflies made with coffee filters


                                        Eric Carl Inspired Caterpillars made with egg cartons


                        DeBuffet Inspired Sculptures made with pantyhose wire, and styrofoam


Time out when you want to have your project.  Is your project based on a season of the year?  Think about where to place your project with the art curriculum.  Murals could last all year, so you can send out a letter at the end of the previous school year asking parents to collect colorful bottle caps for a fall mural.  Or...collect the caps at the end of winter for some Spring bugs.  Coffee filters are also great all year, and most used in Spring for the butterfly projects!


Figure out how to collect the materials for your project.  If you plan far enough ahead, you can have letters send home to parents asking for materials, such as paper towel tubes, newspaper, paper plates, coffee filters, washed out containers, 2-liter bottles, or more!  In the beginning of the school year, I ask for materials I know I use in abundance: paper plates and bowls, tablecloths, q-tips, and the typical baby wipes and kleenex ration.  Paper plates are used for projects, paint,and printmaking, and you can find them stacked in corners around my room for half a year.  The last thing I care about is aesthetic quality, as long as I have those materials!

One of the biggest issues to face though is storage of collected materials.  If you lack storage on your own, consider ways to collect materials that will work for you, such as collecting smaller materials. Coffee filters, cloth pins, toilet paper rolls, bottle caps, or any smaller objects work best in situations with little storage.

If you have the space for it, 2-liter bottles are good for many sculptural lessons, such as paper mache animals, Chihuly glass towers, and more.  Since most teachers are limited on their space, it would be wise to send out letters to the parents of students who wish to participate in an after school activity, or choose an entire grade level...depending on the size of your sculpture.


So you're looking at the above picture and saying, "I don't have the space to do that," I hear you.  Consider it an after school activity, and find a co-worker willing to share their space with you to make it happen.  I was able to, and with a full hour after school to work, it was much easier to set up and clean up than having an over-crowded 40 minute class on the cart.

Work with the space you have.  If you push a cart and lack the time for anything large, work small.  There are a few projects I enjoy every year, and one of them is Kindergarten's Chihuly Paper Sculptures.  It's been passing around on Pinterest all year, and I know quite a few teachers with no budgets who enjoy this project as well.  All you need is coffee filters, markers, spray starch, tape, and plastic cups.  I printed out pictures of Dale Chihuly’s glass flower sculptures, talked about how glass is fragile, and explained how the students will make their own sculptures with paper.  Have a coffee filter already colored to show them how much the filter should be colored, and spray the filter over a plastic cup to have students watch the colors blend together  (the tape is to mark the students names on the cup so they can be re-used for other classes).  It’s a neat, one day/40 minute lesson that the kids love, and the kids take them home the next day.  It’s easy because it is affordable, takes up less space, and the teachers love it.  It’s also easy because you’re pulling out fewer materials on a cart, and teachers can let the cups dry in their own classrooms.


Figure out how to promote your student's work!  Without spending all that time decorating the hallways and re-taping projects that constantly fall down, figure of a way for your students to be involved.  You can have students sell their work as a fundraiser (buttons, magnets, bookmarks, etc...).  If you have a bulletin board, display your work using staples or push pins to hold the work up longer. Did your students create classroom murals?  Have the class display the mural outside of their classroom doors!


Here are some great recycled projects I have found that I would like to share (besides the links I have posted above).  If you find a project that you enjoy (and can be managed while traveling or on a cart), please share it in the comments!

Kindergarten: Fish made out of used CDs

Kindergarten: Eric Carl Inspired Caterpillars made with egg cartons

1st Grade: Buggy Mobiles with egg cartons

Family Fun Crafts: Site with lots of recycled projects 

Giacometti Inspired Sculptures with aluminum foil

Skeleton with coffins (using used watercolor containers)

Masks made with lunch tray containers

Multicultural Milk Jug Masks

Donut Sculpture with Wayne Theibaud (newspaper)

Pour Paintings (to use with leftover paint)

What to do with leftover paper scraps

Painted Aluminum Cans


Wednesday, March 20, 2013

Attack of the Bunny Puppets! A Kindergarten Spring Project


It's that time of year!  Now that Spring has arrived, students start itching for projects that remind them of warm weather and Spring traditions!  What better way than to have your students create their own bunny puppet!

Here are the materials for the project:

-colored paper bags (I order mine from Nasco or Triarco)
-3" x 12" light blue paper for ears
-2" x 10" pink paper for ears
-Markers
-Scissors
-Glue

The following colored papers I cut in bulk so I don't worry about it for the next few years.  These items are good for art helpers to cut ahead of time and fill up ziploc bags full of squares and strips.  Hint...good for traveling or on a cart!)

-2" x 2" white squares for eyes and teeth
-1" x 1" black squares for nose
-1.5" x 1.5" blue squares for eyes
-4" x 4" grey or light brown squares for bunny cheeks
-thin strips of black for whiskers

I start by showing the students how to make the bunny ears.  Fold a piece of blue strip and a piece of pink strip in half.  Show the students how to cut off the folded side, not the talking side!  When they cut off the fold, they get two bunny ears!  Glue the pink strip onto the blue strip.  I also show students how to glue the ears on the back of the bag, not the front, which makes it messy!

Sometimes, I get students who glue their ears on the wrong side, which is easy to fix (even after you remind them to watch for the bag opening!).  Just tape the opening shut, and cute the bottom strip off the bunny for a new opening (see below for example).


After the ears are glued on, you now have an option: if you have students in your classes who are still challenged with cutting out shapes, special needs, or still struggle with scissors, the colored squares are perfect for students to finish on time.  The only shape I make ALL students cut out are the cheeks...you don't want the bunnies to look like robots!


I place a bowl filled with the white, blue, black and grey/brown squares on each table and have the students complete the assenblage themselves.  I encourage students to cut out the eyes, cheeks, and nose from the squares to challenge them, and most students do!


In the last 10 minutes of class, I walk around with the whiskers for the students to place three on each side of the bunny cheeks.  When the students finish, they can leave the art room with their bunnies on their hands, or have their bunnies placed in their mailboxes to go how if you're in their room.