Monday, April 8, 2013

10 Things a Traveling Art Teacher Will Always Do


1. A traveling art teacher will never get all the names of students correct.  We sometimes have over 800+ students we see a week, and half of them have siblings.  Yes, I will call you by your sister's name, or mis-pronounce your name, but at least we're close!  Do you know all your students' names, AND pronounce them correctly?  Congratulations, you have a great memory.

2. A traveling art teacher always forgets something when driving, walking, or flying from one school to the next.  There is no way on this earth we can remember every material we need for lessons, and as much advice as I or anyone can give, that jump drive will be left in that one computer at the other school.  It always hits me while I'm driving to that next school, and expletives with that little black box are inserted over the mouth.

3. A traveling art cart teacher will always leave a little something behind it your room.  At least your students are awesome enough to return that item back, right?  Like the magnets I leave up on your board, or my project examples, or those paintbrushes your students were washing as I was pushing the cart out of your room...

4. A traveling art teacher may not be able to attend an extra event.   The secret santas, surprise potlucks, treat days, gift exchanges, wedding/baby showers, and retirement parties...unless we're at your school that day, we may not be able to make it.  And if you're a traveller and you do make them all, give yourself a pat on the back.  Trust us, it's not that we don't want to get involved, because it would be nice to be part of the school family.  We just have a bit more to juggle on our plates.

5. A traveling art teacher will most likely miss the memo.  Sometimes, we will never know what special event is going on from one school to the next.  Oh, there's a surprise assembly?  Sorry...didn't get the memo, unless it was in the school bulletin. Just please don't get mad at us.

6. A traveling art teacher will always make room for storage.  You have to put those student projects somewhere!  Don't be surprised if you find a storage bin on top of your shelf or a portfolio of student work shoved in a closet space.  We gotta do what we gotta do!  Although, it is polite to communicate first with the teachers!

7. A traveling art teacher might turn down your extra crayons.  We are appreciative that you're thinking of us with the extra supplies (because sometimes it helps), but trust us...we really don't have the extra space to store it on top of all the projects we have to stash already.  You can still offer, because many of us are tight on budgets, but don't be mad if we tell you we have enough.

8. A traveling art teacher will tell you no.  You want us to make that special poster for your class project or special nightly event?  Sorry...we also have school musicals, displays, contests, shows, etc. that we also have to work on...for ALL the schools we travel to.  No offense, but we can't do all the visuals.

9. A traveling art teacher will always drop something outside of their car or down the hallway.  That's the nature of the game.  We only have two hands.

10.  A traveling art teacher will be jumping for joy at the end of the school year when all they have to do is push the cart back into the storage closet and lock the door!

Wednesday, April 3, 2013

Self Portraits with 5th Grade


"Expressive Self-Portraits" is a project I like to visit with my 5th grade students in the Spring.  It's a nice projects to work with on the cart since the materials are light, and your students do a bit of self-reflection of themselves.

All you need for the project is:

-White paper ( size to your liking)
-Pencils
-Markers
-Black Marker to Trace

My students are very self-consious about doing self-portraits, even thought we've been drawing them since kindergarten.  Students at this age are always afraid of being laughed at, yet at the 5th grade level, students have demonstrated throwing a very high amount of creativity into their work.  I'm amazed as to how well the 5th graders take in their projects and create some amazing works!

I start the students off by re-visiting the portrait; where parts of the face are placed, and especially the hair line.  I give the students the first day of art to draw their portraits, plus add drawn details to their backgrounds to make it more creative.  Since their classes with me are 40 minutes, I like to give them time to refine their drawings and add their details.  On day two, I go over color theory, and how colors can represent parts of their personality.  I write the colors on the board to help them with their decisions.  I also encourage them to use colors that could represent their favorite sports teams.

Here's the list of colors I list on the board with their meanings (although colors have many different meanings in other cultures, I stuck with the basic color psychology):

Yellow: Cheerful/Impatient
Orange: Cautionary/Outgoing
Red: Passion (reaching a goal), Anger
Pink: Compassion/Immature
Green: Growth/Greed
Blue: Sadness/Peacefulness
Purple: Creative/Immature
Brown: Lazy/Organized (I know...polar opposites!)
Gray: Neutral/Depressed
Black: Secretive

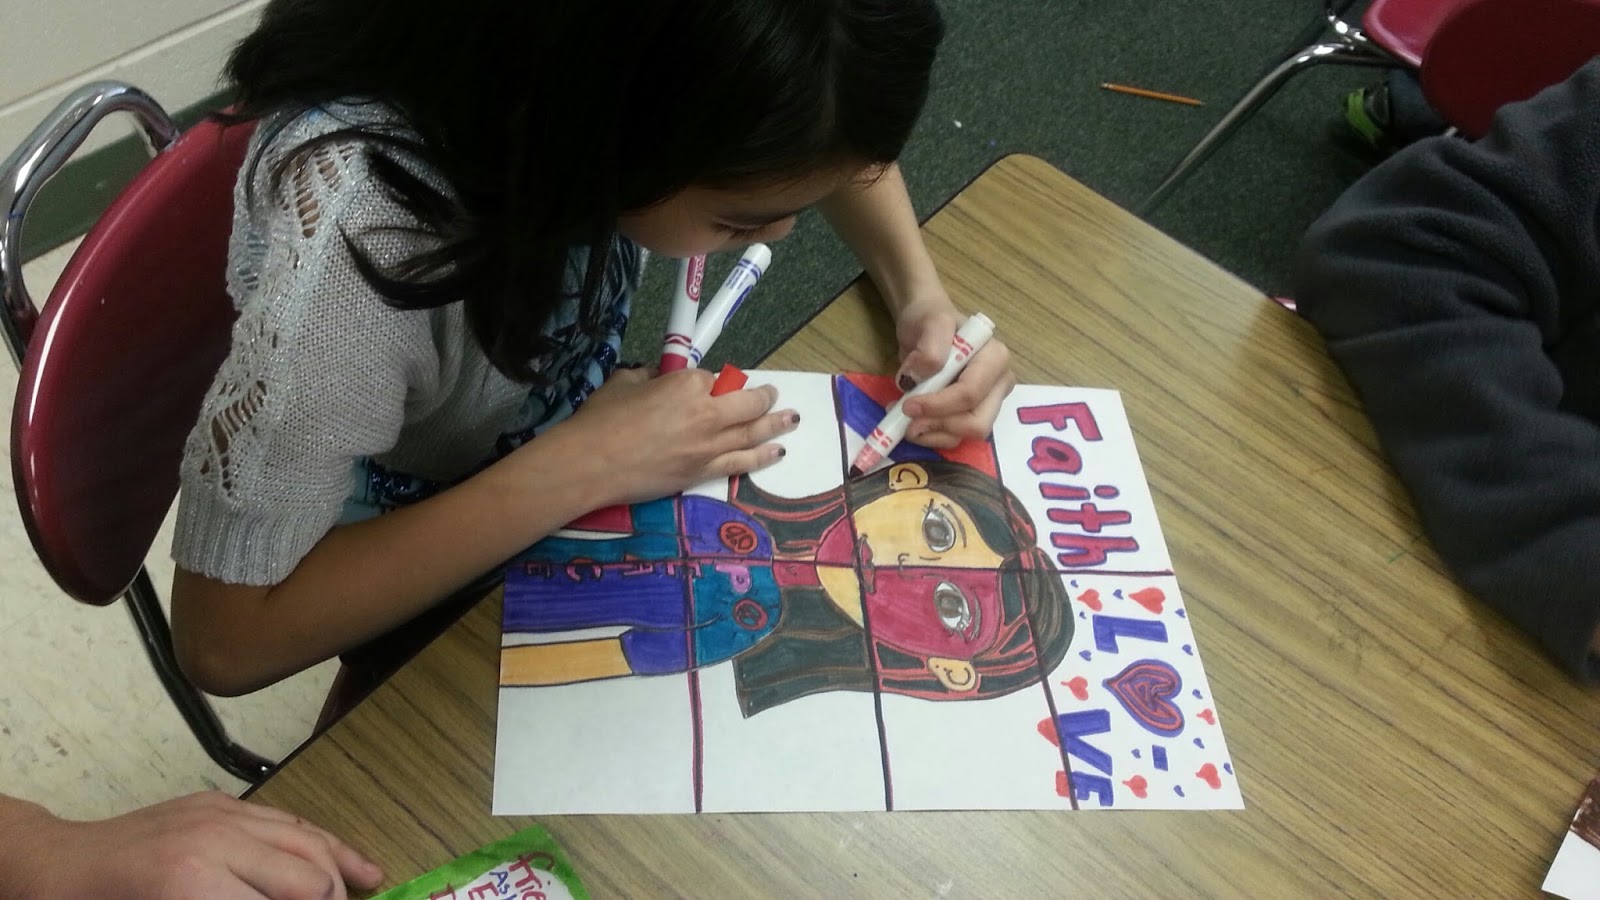
Besides going over colors, I also have students fold their paper into sections so they can color each section with a different part of their personality, like this:


Notice how the picture isn't colored realistically?  I didn't want the students to create their picture to look exactly like themselves, I wanted them to show their personality.  Each section is colored differently, and their face is also colored in.


I like how much students have been able to express their personalities in these drawings!  The tie it takes to complete can stretch depending on the details, but once finished, I'm amazed with how beautiful they look!


Monday, April 1, 2013

Handling Recycling Projects While Traveling

Recycling projects while I push a cart???  With what storage space?? How would I begin collecting materials?  How would I manage those materials with a cart and/or traveling?

These are just some of the questions I've heard asked by traveling art teachers and teachers with a cart.
It is possible to create projects out of recycled materials, and promote Earth Day at the same time.  We may not be able to handle full-on large scale amazing sculptures, but we can still get the message across to reduce, reuse, and recycle!

Design your lesson.  What project did you want to make with recycled materials?  Are you combining the project with Earth Day, or promoting using recycled materials to create year round?  Think about what materials are easy to collect, or use materials that have been donated to you.  Bottle caps make great murals, and they also make great bugs for Spring projects.


                                               Angry Birds made with toilet paper tubes!


                                                     Butterflies made with coffee filters


                                        Eric Carl Inspired Caterpillars made with egg cartons


                        DeBuffet Inspired Sculptures made with pantyhose wire, and styrofoam


Time out when you want to have your project.  Is your project based on a season of the year?  Think about where to place your project with the art curriculum.  Murals could last all year, so you can send out a letter at the end of the previous school year asking parents to collect colorful bottle caps for a fall mural.  Or...collect the caps at the end of winter for some Spring bugs.  Coffee filters are also great all year, and most used in Spring for the butterfly projects!


Figure out how to collect the materials for your project.  If you plan far enough ahead, you can have letters send home to parents asking for materials, such as paper towel tubes, newspaper, paper plates, coffee filters, washed out containers, 2-liter bottles, or more!  In the beginning of the school year, I ask for materials I know I use in abundance: paper plates and bowls, tablecloths, q-tips, and the typical baby wipes and kleenex ration.  Paper plates are used for projects, paint,and printmaking, and you can find them stacked in corners around my room for half a year.  The last thing I care about is aesthetic quality, as long as I have those materials!

One of the biggest issues to face though is storage of collected materials.  If you lack storage on your own, consider ways to collect materials that will work for you, such as collecting smaller materials. Coffee filters, cloth pins, toilet paper rolls, bottle caps, or any smaller objects work best in situations with little storage.

If you have the space for it, 2-liter bottles are good for many sculptural lessons, such as paper mache animals, Chihuly glass towers, and more.  Since most teachers are limited on their space, it would be wise to send out letters to the parents of students who wish to participate in an after school activity, or choose an entire grade level...depending on the size of your sculpture.


So you're looking at the above picture and saying, "I don't have the space to do that," I hear you.  Consider it an after school activity, and find a co-worker willing to share their space with you to make it happen.  I was able to, and with a full hour after school to work, it was much easier to set up and clean up than having an over-crowded 40 minute class on the cart.

Work with the space you have.  If you push a cart and lack the time for anything large, work small.  There are a few projects I enjoy every year, and one of them is Kindergarten's Chihuly Paper Sculptures.  It's been passing around on Pinterest all year, and I know quite a few teachers with no budgets who enjoy this project as well.  All you need is coffee filters, markers, spray starch, tape, and plastic cups.  I printed out pictures of Dale Chihuly’s glass flower sculptures, talked about how glass is fragile, and explained how the students will make their own sculptures with paper.  Have a coffee filter already colored to show them how much the filter should be colored, and spray the filter over a plastic cup to have students watch the colors blend together  (the tape is to mark the students names on the cup so they can be re-used for other classes).  It’s a neat, one day/40 minute lesson that the kids love, and the kids take them home the next day.  It’s easy because it is affordable, takes up less space, and the teachers love it.  It’s also easy because you’re pulling out fewer materials on a cart, and teachers can let the cups dry in their own classrooms.


Figure out how to promote your student's work!  Without spending all that time decorating the hallways and re-taping projects that constantly fall down, figure of a way for your students to be involved.  You can have students sell their work as a fundraiser (buttons, magnets, bookmarks, etc...).  If you have a bulletin board, display your work using staples or push pins to hold the work up longer. Did your students create classroom murals?  Have the class display the mural outside of their classroom doors!


Here are some great recycled projects I have found that I would like to share (besides the links I have posted above).  If you find a project that you enjoy (and can be managed while traveling or on a cart), please share it in the comments!

Kindergarten: Fish made out of used CDs

Kindergarten: Eric Carl Inspired Caterpillars made with egg cartons

1st Grade: Buggy Mobiles with egg cartons

Family Fun Crafts: Site with lots of recycled projects 

Giacometti Inspired Sculptures with aluminum foil

Skeleton with coffins (using used watercolor containers)

Masks made with lunch tray containers

Multicultural Milk Jug Masks

Donut Sculpture with Wayne Theibaud (newspaper)

Pour Paintings (to use with leftover paint)

What to do with leftover paper scraps

Painted Aluminum Cans


Saturday, March 30, 2013

Being an Advocate for the Arts While Traveling


This week is my Spring break, and now that I'm at the end of it, I realized how much I needed to empty my mind for a brief time and re-collect my thoughts.  After time with my daughter (and my feet up), I looked back at some previous article I had written and realized I did not post my Arts & Activities articles since December!

My January issue involved how to be an advocate while traveling.  I originally wrote the post to describe ways to promote your students' work and the importance of your art class with the school and local community.  One of the may negatives I have heard from teachers who travel is that they feel unappreciated and hidden away in their schools.  The reasons vary; some say it's because they do not feel like they have a place in their school, or that they are so overburdened with their schedule, they don't have time to share their curriculum.

In my Arts & Activities article, I focused on ways you can advocate for the arts without overdoing your schedule.  This article was based on one of my earliest posts in this blog, which you can visit here.

How are you an advocate in your schools?  What have you found to be the most successful in promoting your art program?

Sunday, March 24, 2013

Interested in a Sister School Match Up?


I wanted to help spread the word about this amazing project our state association is doing with schools in need.  If you're from Illinois, please consider participating in the Sister School Match Up!  If you're from another state, check with your state art education association to see if there's a program set up to help schools in need, or even if you're a school in need!  

The Illinois Art Education Association would like to help connect Illinois art educators who have surplus or donated materials with art educators teaching in schools who have little or no materials or equipment necessary for a quality art education program. This will be a teacher to teacher partnership and you do not need to be an IAEA member to participate (so please spread the word).
If you are interested in forming a sister school art educator to art educator partnership please fill out the appropriate form:

Click here–>Donating School (Example donation: Gently used student art supplies collected at end of school year such as watercolors, pencils, crayons)
Click here–>School in Need (Your school art program has little or no budget for supplies or equipment and are willing to pick up supplies)
Please contact Theresa McGee for any questions:  theresamcgee.iaea@gmail.com

Thursday, March 21, 2013

How Can You Host a School-Wide Art Contest?


Even if you travel to different schools in your district, it is possible to have an art contest for your students!  I would like to share how your district can start your own contest, and how our district has been able to host an annual art contest/art show every year.  It has been a successful event every year, with a high amount of students who enter. 

How will you be funded? In the past, our district had received a grant to pay for all the expenses of the contest that included: frames, t-shirts for the winners, treats and beverages for the art show, paper for the contest, stipend for after school hours, and more.  The grant did end, but since our district found the art contest and annual show so supportive, we have been able to allocate funding within our means.  If you discuss the idea with the district superintendant, create an example of what funds would be needed.  If other art teachers are involved, create the budget as a team.  Think about what is needed, like drawing paper, fliers, entry form print-outs, and other expenses with exposing a district-wide event.  If funds are not available, create a project on "Art Room Aid" or "Donors Choose" to help with funding of materials needed.  You can also add in easels and props for the art show through both sites!

Is there any local business willing to help?  We combined efforts with a local framing company in Orland Park called "The Great Frame Up."  The company graciously frames each of the student winners for minimal cost, and event present their own award for an overall winner.  Is there a local frame company in your area?  Consider walking in and talking about your project.  Some companies are already willing to help, they may just be looking for schools to work with!  Local cafes and shops are also willing to help out, sometimes all you need to do is ask!

What rules would there be for the contest? There are three elementary art teachers in our district, and two of us that travel to different schools.  At each school we teach at, we introduce the contest, rules, and present examples of past student winners.  Listed below are the guidelines for our district's contest, which you may use or change for your own needs:

1. Art pieces must be the original work of the student. 

2. Submitted work may not be traced from another piece of art.

3. There is no theme so use your imagination!

4. All entries must be FLAT.  No 3-D pieces accepted.

5. Entries must be 11x14 inches or smaller (entries larger than 11x14 inches will not be considered for judging because they would be too large for the frames).

6. There must be a one-inch border around the submitted artwork.

7. The name, school, and grade are written on the back of the work.

8. No photographs or computer-generated work accepted.

9. Entry forms need to be filled out for each artpiece to turn in.

What length of time would we have for students to enter work? We give about two months for students to enter projects for the contest, and even encourage students to enter completed class assignments if they wish.  Art teachers are also given a stipend for offering after school time for students to work with materials not available to them at home.  Work on a time frame that is best for your district.  With teh crazy amount of contests in our schools, our students begin the contest in January and projects are due in March, normally before ISATS.  Judging takes place in mid-March to give the frame company time to set up all the frames.

How should you judge?  After all the projects are collected, the art teachers judge each of the schools seperately.  Five pieces are chosen from each school, but if more than one piece chosen was created by the same student, the teachers will make sure that five different students are chosen.  The chosen artworks are then sent to The Great Frame Up to be professionally framed for the art show at the end of the school year. 

The teachers judge on quite a few things: composition (does the artwork fill the paper?), originality (was the drawing/painting the student's own work, or did they copy another cartoon?), and craftsmanship are the main points the judges look for.  Also, since I teach at Wilkins and Lyle, I cannot judge those schools.  This keep the student work anonymous and unbiased.  Below are the winners chosen from my two schools for the 2013 school year:

Winners from Lyle Elementary


Winners from Wilkins Elementary


When do you have the show?  Our district has the annual art show in May, which gives the frame company time to complete the artworks.  We also send out invitations to the winners families, and print certificates to all students who entered the contest.  Printing certificates shows that you acknowledge the student's effort in entering the contest, plus they enjoy the recognition.

There's more!  Is there a state art contest coming soon?  Consider offering to your students to re-enter into another contest.  Currently, IAEA is collecting artworks for the statewide Student Show, and I have been asking students if they would like another chance to enter.

Do you have contests in your district?  I'm interested in hearing what other schools do!

Wednesday, March 20, 2013

Attack of the Bunny Puppets! A Kindergarten Spring Project


It's that time of year!  Now that Spring has arrived, students start itching for projects that remind them of warm weather and Spring traditions!  What better way than to have your students create their own bunny puppet!

Here are the materials for the project:

-colored paper bags (I order mine from Nasco or Triarco)
-3" x 12" light blue paper for ears
-2" x 10" pink paper for ears
-Markers
-Scissors
-Glue

The following colored papers I cut in bulk so I don't worry about it for the next few years.  These items are good for art helpers to cut ahead of time and fill up ziploc bags full of squares and strips.  Hint...good for traveling or on a cart!)

-2" x 2" white squares for eyes and teeth
-1" x 1" black squares for nose
-1.5" x 1.5" blue squares for eyes
-4" x 4" grey or light brown squares for bunny cheeks
-thin strips of black for whiskers

I start by showing the students how to make the bunny ears.  Fold a piece of blue strip and a piece of pink strip in half.  Show the students how to cut off the folded side, not the talking side!  When they cut off the fold, they get two bunny ears!  Glue the pink strip onto the blue strip.  I also show students how to glue the ears on the back of the bag, not the front, which makes it messy!

Sometimes, I get students who glue their ears on the wrong side, which is easy to fix (even after you remind them to watch for the bag opening!).  Just tape the opening shut, and cute the bottom strip off the bunny for a new opening (see below for example).


After the ears are glued on, you now have an option: if you have students in your classes who are still challenged with cutting out shapes, special needs, or still struggle with scissors, the colored squares are perfect for students to finish on time.  The only shape I make ALL students cut out are the cheeks...you don't want the bunnies to look like robots!


I place a bowl filled with the white, blue, black and grey/brown squares on each table and have the students complete the assenblage themselves.  I encourage students to cut out the eyes, cheeks, and nose from the squares to challenge them, and most students do!


In the last 10 minutes of class, I walk around with the whiskers for the students to place three on each side of the bunny cheeks.  When the students finish, they can leave the art room with their bunnies on their hands, or have their bunnies placed in their mailboxes to go how if you're in their room.