Saturday, January 18, 2014

Representing the Arts: Combining Elements of Art with Core Subjects

This week, I was given a great opportunity to present the importance of the arts to our district.  I did this during our Teacher Institute Day, which was broken down into a group of small sessions for teachers to attend.  I was also very excited to have my fellow art educator co-worker presenting on combining art with language arts as well!!!  Two art teachers presenting for the first time in our district!

I titled my presentation "Arts Integration: Ways to Combine Elements of Art Within Our Curriculum."

The session was to align with our district's mission statement:

     "...to provide every student with a quality education that will instill a desire and ability to achieve their maximum potential as self-supportive, independent, productive citizens for the 21st century through offering a positive atmosphere and a variety of quality learning experiences."

In designing my Power Point, I wanted to discuss 5 key points in advocating our department:

1. The visual art department's mission
2. Our state and national standards
3. The development of the core arts standards
4. Ways the art teachers incorporate common core subjects in our own lessons
5. Ways the teachers and specialists can incorporate the arts into their own lessons

At the end of my presentation, I gave teachers a chance to choose one of 6 projects (four are listed below) they could use within their own classes!  Since there was a 20 minute break between sessions, many teachers stayed until the last minute to complete their artworks and gather lessons from other tables!

Here's a breakdown of a few key points I wanted to share with my attendees.  If you feel I missed any key factors on the importance of the arts in a well-rounded curriculum, please let me know in my comments!

The Visual Art Departments Mission

1. Art History: The art department discusses how artists are influenced by (and influence) the times and places in which they live and work. 

2. Art and SocietyThe art department discusses how art is needed and used in everyday life (careers, leisure, activity).  In other words, an appreciation of the importance of the arts in our society.

3. Culture AwarenessWhen students learn through the arts about people and civilizations, they learn about others and themselves.

4. Motor Development: Through creating and performing, students improve on fine motor skills, which improves craftsmanship in many areas, including visual design and writing.

5. Community Engagement: Through the arts, students advocate to the community.  This is done by presentations (art shows and displays), charity activity, after school programs, and media.

How Teachers Can Connect Arts Into Their Lessons 

1. Dance and theater are artistic ways to combine the arts and physical education.  With an emphasis on “body movement,” students exercise imagination and creative skills.

2. Have students draw what they hear while listening to music.

3. Create projects they could interact with!  Instruments, Rube Goldberg projects, etc…

4. Instead of writing out our answers in graphic organizers, why not draw what we are saying?

5. Writing can be more than just sentences!  Instead of coloring pictures, fill the images in with words!

6. Create a visual demonstration of the math problem.

7. Use grids to encourage measurements and proportions.

8. Are your students presenting?  Have the students be the presentation.

9.When teaching history (or any subject), pick an artist that reflects the time or theme. 

10. Encourage creative practice through technology .

11. Have students practice their compositions through photography.

12. Encourage visual literacy!

I wanted to also share with you the mini-projects I had my attendees create at the end of my presentation.  I borrowed the projects ideas from other blog posts, so here are the links!


I regret that I did not take any photos of my presentation.  I was having so much fun interacting with the attendees, it didn't even occur to me to pull out my camera!

Thursday, January 9, 2014

City Skylines: 3rd Grade and Symmetry

I love looking at pictures of city skylines reflecting on water...


...and then one day, I noticed that symmetry was a big unit in the 3rd grade's math curriculum.  Being inspired, I decided to reinforce the "balance" principle of design by creating an art piece demonstrating the use of symmetry.  What better way than to include choice-based ideas and our local city, Chicago!


When creating the Powerpoint of examples, I wanted to encourage students to use their imagination when designing their cities.  Some examples I gave were:

                                                                Buildings in Chicago…


                                                                          Dubai...


Disney World…


Candyland…


Bikini Bottom…


Mario World…


...and the Taj Mahal, one of the most known symmetrical structures in the world.


Materials
-10.5" x 16" blue paper
-5.25" x 16" white paper
-5.25" x 16" black paper
-Pencils
-Black Markers
-Colored pencils, crayons, or markers to color
-Scissors
-Glue
-12" x 18" colored paper for frame

Objectives
The students will demonstrate balance in their artworks by creating a symmetrical city.  The city will show symmetry with a shadow, or reflection made with black paper.  The students will have their choice of what cities they would like to design for their project.

Tips for Demonstration

-When showing the students how to design the city, explain how the paper needs to be horizontal to show the skyline.  You will get the goofy student who wants to try and make the world's tallest building instead.

-Explain to the students that each building must be connected.  Since you're cutting out the sky to show the reflection, you need a line of buildings, not a bunch of puzzle pieces to glue down.

-If students draw their buildings separate, simply connect the buildings with a road they cannot cut past.

-Tape the black piece to the back of the white piece before trimming out the sky.  It will save you a headache.

-When gluing down, explain to the students to make sure the black shadow is symmetrical!  Too often I get students that glue down their reflection the wrong way!

Here are some finished projects that have gone above and beyond what I expected!


Friday, January 3, 2014

Working Artists in the Classroom: January's Stepping Stones


One of the misconceptions that art teachers face from students is that we are just teachers and not professional artists, which is far from the truth.  A huge percentage of art teachers are active artists outside of their education career.  Many teachers display work in galleries, shows, create murals, commissions, and community work, plus many are active participants in artist guilds and online communities.


My students are surprized when I tell them I am a working artist and I know professional working artists.  They are used to learning about artists in history and they know there are famous artists today, but the idea of their own art teacher displaying artwork in galleries and personally knowing working artists sparks their interest.

For January's Stepping Stones in Arts & Activities Magazine, I wanted to focus on how to bring working artists to the art class.  Since I create artworks outside of the classroom and actively participate in online artist communities, I've met many great artists in the field, and they are always willing to share their work with the students.

More more highlights on bringing artist to the classroom, please visit a previous post of mine, Bringing Artists to the Classroom.


Wednesday, December 18, 2013

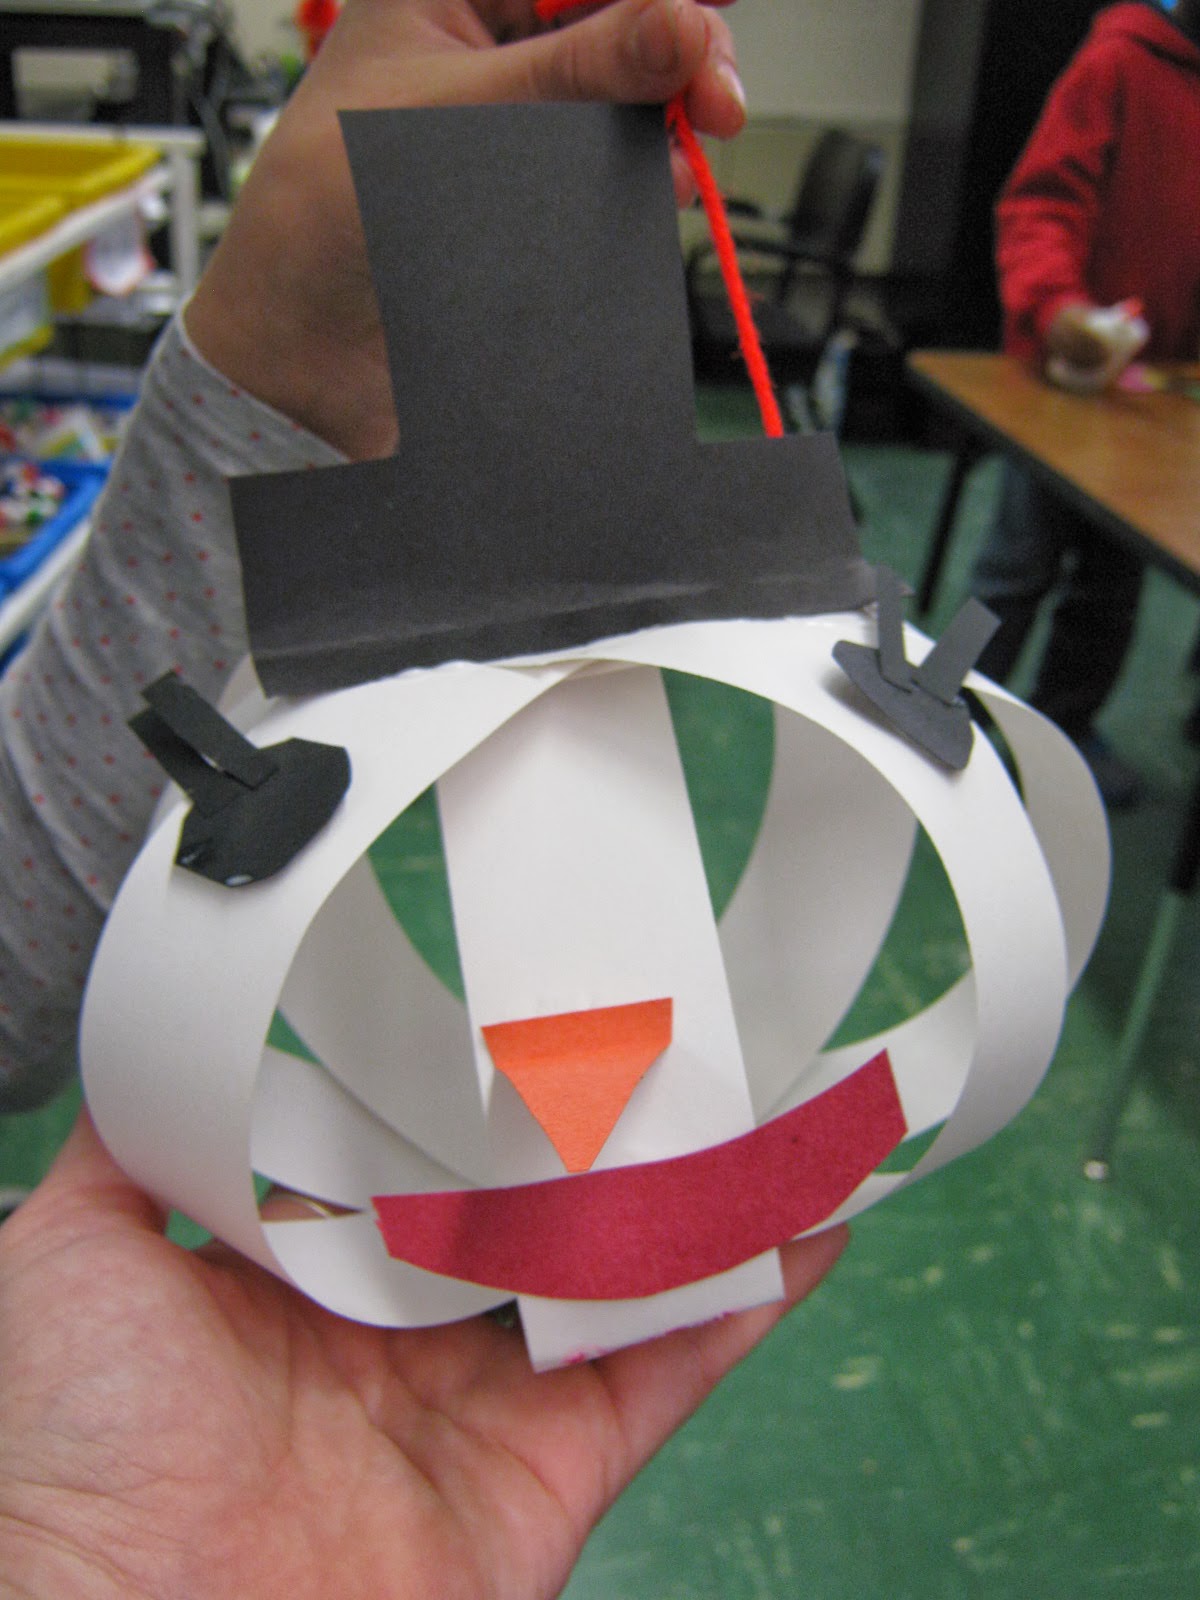
3D Snowmen Heads!


In the last week of classes before winter break, I come across many students (in grades 1-4) who need a simple catch-up day to wrap up their work.  The rest of the class is always in need of a "filler" project to keep them interested.  The nice thing about this project is that you can dedicate an entire lesson for younger grade levels, or use it as a filler project for older students!

Materials
-Strips of white paper cut 1.5" x 18"
-Black paper 
-Orange paper
-Red Paper
-Green Paper
-Scissors
-Glue
-String
-Pencils

Objectives
The purpose of this lesson is to have students understand the difference between 2-dimensional and 3-dimensional artworks.  Students will create a 3-dimensional sphere using paper, and create 2-dimensional features for the face and top hat.  With the time of year, I chose snowman heads as the subject, which leaves no holiday/seasonal objections with other faiths and cultures.  This lesson is intended for a one day, 40 minute project.

Step 1: Place 4 white strips of paper in a star.  I tell grades 1-2 to make two plus signs, then glue them together.


Step 2: After creating your star, take two opposite ends and connect them together to create an "octopus."  


Step 3: Begin gluing the remaining strips on top of each other until a ball is made.


Step 4: Using the black, orange, green, and red paper, start drawing shapes for the nose, eyes, mouth, and holly.  Cut the shapes out, and glue them down.  Explain to the students to start with the mouth and nose first (this way they have room for the eyes!)


Step 5: String a piece of yarn through the ball to hand the snowman head!


Here are some finished examples!  I created these with my 4th grade class (during a clay catch-up day)


Yay!  We get to take them home!


Sunday, December 8, 2013

Joan Miro Monsters with 3rd Grade


Joan Miro was a surrealist painter (1893-1983) from Barcelona, Spain.  Miro was known for his painted creature made from random shapes, and even made his 2-dimensional work into sculptures. Miro's work is imaginative, using geometric and organic shapes to create unusual characters.

What better way to exercise the student's creativity?

Materials

2-D Work:
-Worksheet
-8 x10 white paper
-Pencils
-Markers
-12 x 14 colored paper for a frame

3-D Work:
-Crayola Model Magic or similar air dry clay (depending on your project time, you can use primary colored clay or white clay to paint later)
-Pipe cleaners
-Sandwich size ziplock baggies

If using white air dry clay:
-Tempura paint
-Paper plates
-Small brushes
-Newspaper
-Water and bowls

Objectives
The students will create 2 projects. The first project will be a 2-dimensional drawing of a Miro-inspired creature.  The students will read together and use the following worksheet to "exercise their creativity." The point of the activity is to have students use a limited amount of shapes to create elaborate creations.


From the worksheets, students can create their own creatures using the 12 shapes presented!


The drawings should only take one 40 minute class period, fully colored and framed.  I also attach grade sheets on the back for students to see their entire grade of the project.

Day 2 is for 3-dimensional construction of the drawings.  I give students pipe cleaners that match the colors of the antennas, legs, and arms from the drawings.  If students do not finish, I store projects in baggies with students names so clay doesn't dry out.

Day 3 is to complete the construction of the sculpture.  If you are using colored clay, the will be the last day of your project.  If you use white clay, you can use an additional day to paint the creatures any color you wish.

Here are some projects completed with primary colors (students mix secondary themselves) and black model magic!


Here are some completed sculptures with just white model magic and paint!


As a final wrap up, I have students fill out a reflection.  Here is my worksheet, but you can change it up as you wish:


Overall, the project is fun to do on a cart or in an art room, and from my own experience, easy to adapt in any situation.