During the fall season, I like to tie in our love for pumpkins while reinforcing the idea of perspective! In the beginning, I share with the students a picture that demonstrates foreground, middle ground, and background.
Objective
The main objective is for students to demonstrate their knowledge of perspective using foreground, middle ground, and background within their pumpkin patches. Adding Halloween elements are optional since not all students celebrate the holiday.
Materials
-10.5" x 16" dark blue paper
-5" x 16" dark green paper
12" x 18" orange paper for frame
-thin cut black paper strips
-orange paper for pumpkins
-green paper for leaves
-yellow paper for stars
-brown paper for stems
-black marker for pumpkin lines
-pencils
-glue
-scissors
-brown or green yarn
Directions
On the first day, I start by explaining to students how to start with the background first. Students add the dark green paper (ripping the edge for a rough, grassy hillside or cutting a wavy line), then add the black strips for fencing. Students can create whatever style fence they wish. We end the class by adding stars in the sky and a moon to shine on the pumpkins.
On day 2, students start adding the pumpkins. I inform the students that we need at least 6 pumpkins in three different sizes to show perspective, small, medium, and large. Students should place the pumpkins where they would show near or far in their projects. Once pumpkins are complete, students can add the yarn for vines and leaves to cover the vines and pumpkins.
Day three is to add final touches, drawing the lines on the pumpkins, or adding additional decorations, such as ghosts or pumpkin faces.
For October's Stepping Stones in Arts & Activities magazine, I wanted to focus on the benefits of having a mentor, even if you've just transferred to a different school. What is a mentor?If
you’re entering a new school, it’s good to have someone with prior knowledge to
help you adjust to your new environment.A mentor can be a co-worker, a fellow art teacher in the district, or a
group of teachers, such as an art team.There
are many benefits to having a mentor when you begin at a new school.Even if you’ve been teaching for years, it’s
always good to have a helping hand when learning a new school environment.
A mentor should
welcome you to the family.When
you’re working in a new school, you are starting off with new faces, both staff
and students. He/she can introduce you to the staff, give
you a tour around the school, and show you the ins and outs of where everything
located.
A mentor will be one
of your go-to people with questions.When setting up in a new school, you will have many questions that need
to be asked, such as where the closest copy machine is located.Visual art mentors are especially handy to help you with idea exchanges,
where to get supplies, and where to look for professional networking.
A mentor can guide
you with curriculum design. If you've been teaching for some time and
already have lessons in place, a mentor can inform you on what concepts students
have previously learned(which saves you
from teaching a project the students may already know).
A mentor should
inform you of your responsibilities as the art teacher.Sometimes when you enter a new school, your
mentor should be the one to inform you of any additional responsibilities as an
art teacher, such as monthly displays for the district or props for school
musicals.
A mentor reduces your
feeling of isolation. With so much to plan and projects
to prep, we can easily become isolated in our instructional spaces.A mentor should be able to talk with you
during your challenging times and offer construction advice for when we feel
isolated throughout the school year.
A
mentor can offer wisdom and learning from past experiences.As a
mentee, you may benefit from listening to the lessons that your mentor has
learned along the way through their past experiences…both their successes and
failures. A
mentor can help you with reflecting on your art practice.Having a mentor helps you to test your ideas and discuss your points of
view in a safe and confidential environment, outside of the fears of
evaluations. Working
with a good mentor actually enables you to develop good mentoring behaviors and
become a guide for others in the future. To view the complete article, please visit October's Stepping Stones.
"International Dot Day", a global celebration of creativity, courage and collaboration, began when teacher Terry Shay introduced his classroom to Peter H. Reynolds’ book The Dot on September 15, 2009.
"The Dot" is the story of a teacher who challenges a doubting student to trust in her abilities to “make her mark”. What begins with a dot on a piece of paper becomes a breakthrough in confidence, which has gone on to inspire countless children and adults around the globe.
To celebrate, each grade level has created a project that is "dot-like." Once projects are completed, they will be displayed in the halls of our school!
Some projects took at least 3 class periods to complete, but by the end of September, our school will be filled with dots galore!
This is just the start of the many dots to display!
Kindergarten Dot Paintings
Inspired by the artist George Seurat
Materials
-white paper (any size you wish to cut)
-paint dots (can be found in Nasco, Triarco, or Michael's Arts & Crafts in a hurry)
After showing the painting "Sunday Afternoon" by George Seurat to kindergarten students, I shared how pictures can be made just by using dots. Using "paint dots," students filled their paper with colorful spots!
Total time: 1-40 minute class period
1st Grade Mandala Paintings
(Thank you, Cassie Stephens, for your project idea!)
Materials
-small paper plates
-black permanent marker
-neon tempura cakes
-paintbrushes
-water cups
-table clothes
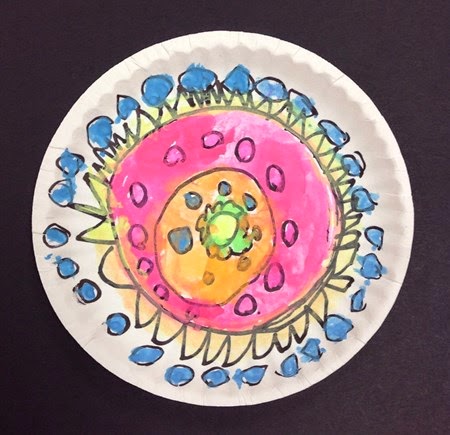
After sharing mandala designs with 1st grade students, we created our own mandala-like designs within a plate and painted with bright colors!
Total project time: 1-40 minute class period
2nd Grade Abstract Drawings
Inspired by the art of Wassily Kandinsky
Materials
-pencils
-white paper (cut to square)
-black markers
-colored markers
-scissors
-glue
-a round container for center circle
Students were introduced to the art of Wassily Kandinsky. Wassily used many geometric shapes and creative lines to fill his artwork. 2nd graders were asked to do the same, all while listening to music to inspire movement in their drawings!
Total project time: 2-40 minute class periods
3rd Grade Mandala Drawings
Inspired by sand-made mandalas
Materials
-white paper
-pencils
-a round container to trace circles
-black markers
-colored markers
-scissors
-glue
-square colored paper for frame
Students were introduced to sand mandalas. As nice as it would have been to actually make one with sand, we stuck with drawing our designs and adding bright colors instead.
Total project time: 2-40 minute class periods
4th Grade Metal Relief Dots
(Cassie, I thank you for this idea too! I had to try it!)
Yes, you can use coins as examples!
Materials
-cardboard or poster board circles
-foam shapes (when I order them now, they are stickers)
-aluminum foil
-spray glue
-permanent color markers
Students were shown examples of metal relief, like coins and jewelry. Relief is when you have dimension within a flat piece, which creates texture. When creating their relief, students used foam shapes for the dimension, then (once covered in foil) colored on top with patterns and designs.
Total project time: 1-40 minute class period
5th Grade Radial Symmetry
Inspired by Stained Glass Window Designs
Materials
-black paper (cut into a circle)
-foam shapes (with or without stickers)
-pencil
-colored paper for frame
Students were introduced to radial symmetry. Examples were shown of many stained glass window designs, as well as kaleidoscope patterns. Students created their own radial designs (split into four quadrants) using the foam shapes to demonstrate their understanding.
Total project time: 2-40 minute class periods
6th Grade Zentangle Patterns
While searching on Google, I came across tons of zentangle patterned circles. This was not my image, but I'm using it as an example of what I wanted my students to create. So to the original artist, you inspired us! Thank you!
Materials
-white paper circle
-pencil
-skinny black marker
-zentangle pattern packet with examples
-colored markers
-colored paper for frame
Students were shown zentangle pattern examples and where they may find patterns in the commercials they watch or the clothing they wear. Students create their own zentangle pattern circles, teaching them patience and care with overlapping patterns.
Total project time: 3-40 minute class periods. The students LOVED their work!