Monday, April 20, 2015

Creating a Mission Statement: May's Stepping Stones


For the full article in Arts & Activities magazine, please click here.

Creating a Mission Statement

As a teacher, you should have specific goals in mind for your students to achieve, and as a school, a mission statement helps give meaning to student learning.  As a team, you and your art colleagues should be open to defining your department’s mission how to share that mission with your students, colleagues, parents, and community.

For years, our department didn't think to have a mission statement in place.  Our group knew what had to be done, what standards to follow, and what the district expected of us with our lessons, assessments, and community engagement.  When we were asked to present to our district how the arts played a part in our district’s mission, we were determined to have a set statement in place that tied in with our district’s mission and reflected how important we were within our district’s core curriculum. After our presentations, we had wonderful reviews, plus teachers in attendance were communicating more on how they could incorporate more visual art into their own classes.


What is a Mission Statement?

A mission statement is a declaration of the core purpose of your program that remains unchanged over time.  You can include your department’s reason for existing, and your intended overall goal.  Your mission statement should assist in guiding the actions of your art team, such as providing a path for an overall goal.  Your mission statement should tell the public what your core intent is in educating the students within your community and how the arts play an important part in a child’s development.


Why Have a Mission Statement?

Without a mission statement, your department may not be taken as seriously as you would hope.  Your students may not see the purpose of having an art class, and your parents could possibly just see you as “one of the side classes,” meaning not as important as the core classes.  As the advocate for the arts in your schools and district, you need to shine your light and share why we are there and why the arts are important in a students’ education.  According to Jessica Balsley from The Art of Education, “Leaders need a mission.  Teachers are leaders. It would only make sense for teachers to have a mission for their work.”

When parents and community members visit a school website, they want to see right away how the school plans on making the future generation model citizens and creative innovators.  In the top of any school page you visit, the first thing you see is the mission statement.  If you have a web page of your own, why not share your intended purpose for advocating for the arts in your classes?


What Should I Include in an Art Department Mission Statement?

Begin with these 5 basic questions that define your mission:  Who are the teachers in your department?  What do you do in your classes?  How do you deliver the instruction? Whom do you deliver instructions to?  What value are you bringing to your students?

Once you have answered those questions, combine your answers into a few sentences that define your mission.  For example, for the first sentence you may say, “The Indian Springs School District art department teaches visual literacy skills with the intention of preparing our students for a lifetime of creativity.”  That sentence answered who we were, what we do, whom we delivered instruction to, and what value we brought to our students within a short span of words.

If you want to dive further into what it is that you teach and how your lessons further develop a child’s progress, consider going more into detail of why you teach the visual arts.  Do you assist students in becoming critical and creative thinkers and problem solvers?  Do these skills help students make personal or professional choices to become successful?  Do your projects assist in improving physical development, such as fine motor skills and craftsmanship?  Do you incorporate cultural awareness and social-emotional learning goals?  Take a sentence or two to describe how the arts are important in a child’s education.


How do I share our mission statement?

Once you have your mission statement created, share it anywhere that your art department is advertised.  If your school or district has a webpage, add your mission to the top of your page if one is created, or ask if you can add a page for the art department.  Do you manage a blog or a school-based page on social media?  Be sure to add your mission statement to any page created.  Any viewers that visit your sites will know that you have a mission in place and determination to have students reach their academic goals.

For those teachers who have their mission in place, thank you for being leaders in art education!


Friday, April 10, 2015

Simple Rainbow Sculptures with 1st Grade


It's Spring!  With April showers bringing on the May flowers, kids are looking up to the sky, hoping to see rainbows after a nice rain.  Since students are learning about rainbows and how they're made in their classrooms, why not visit the rainbow in art as well?

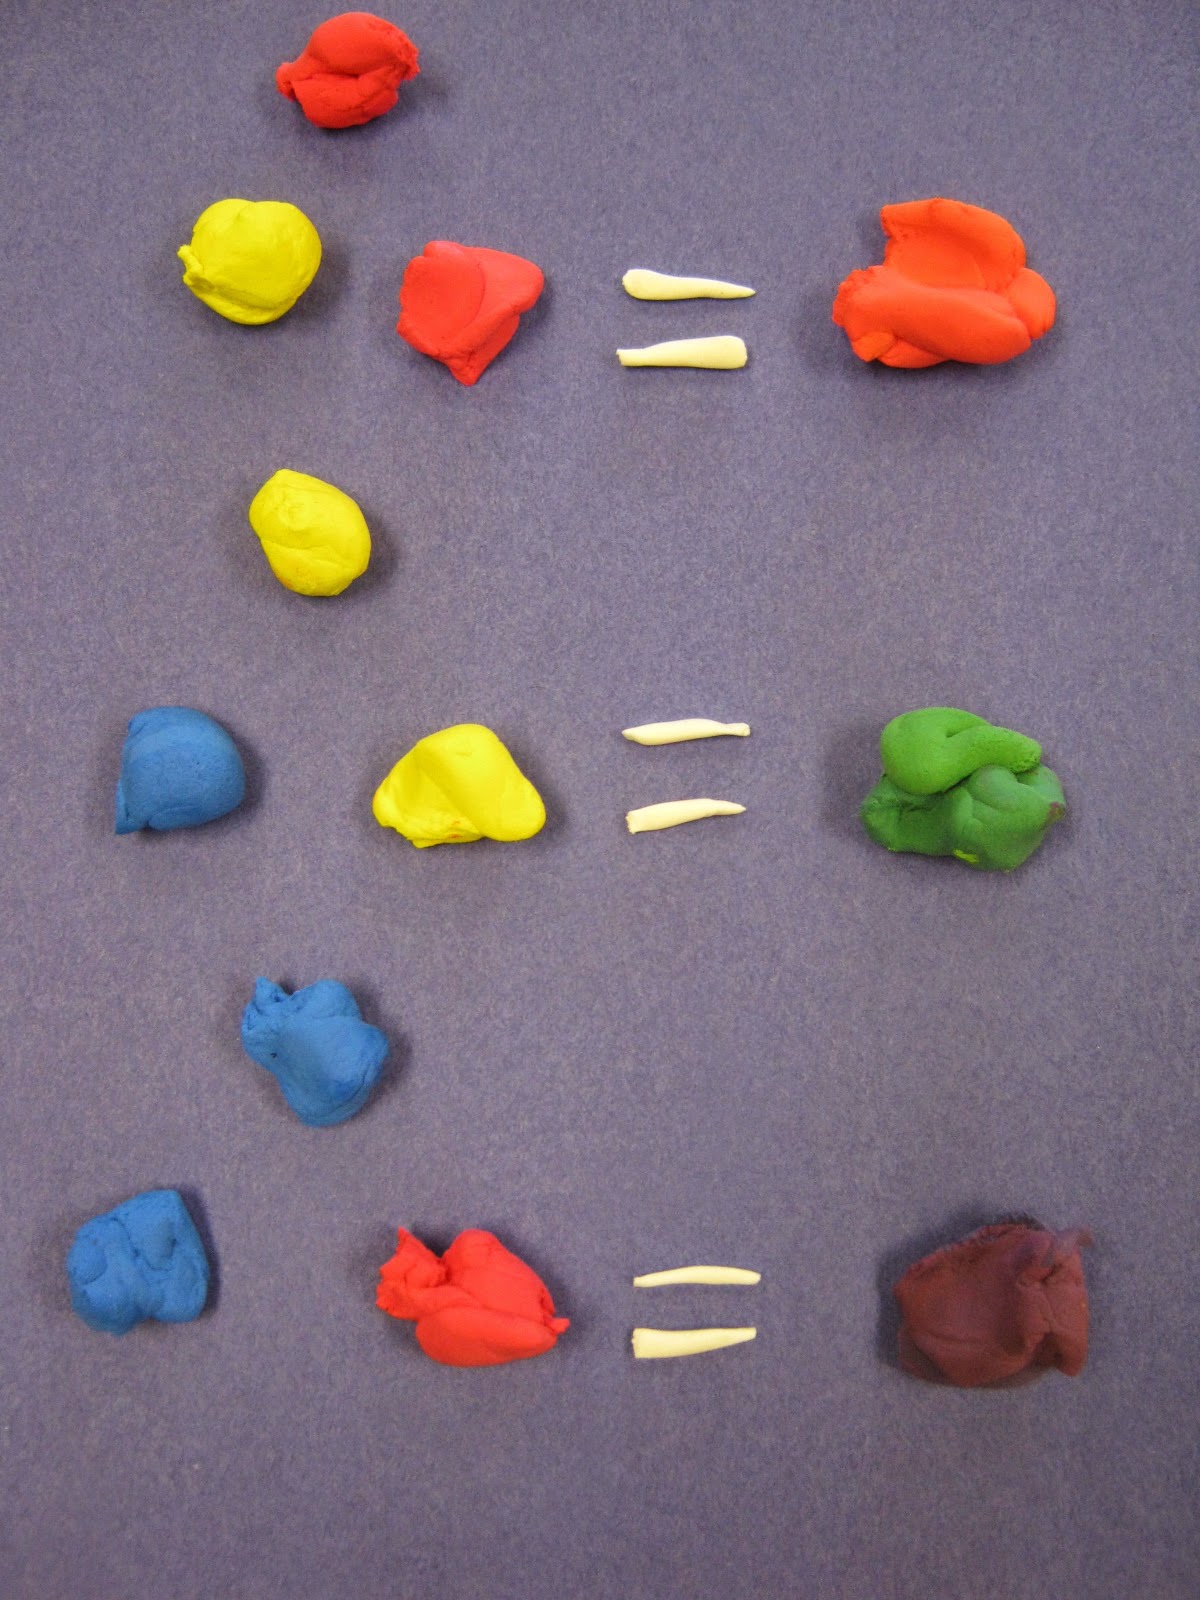
I like to look at this lesson as a re-visit in Primary and Secondary colors.  My kids already are introduced to color mixing in the fall with tempura paints, so mixing the clay is not as tricky as it would seem.  Since the students are in a primary grade level (and due to the limit of clay), I prefer to stick with the main 6 colors and exclude indigo.

BUT WHY??????  THAT"S AN IMPORTANT COLOR OF THE RAINBOW!!!!!!!  Well, indigo is a tertiary color and tricky to mix so young, so I prefer not to visit that color in a primary grade level.  It's not that I want to give false information to my students, but I can easily visit the color at another time.

Materials


-Depending on the number of 1st grade students you teach, order the box of primary color Crayola Model Magic clay from Nasco or Triarco.  One box can cover up to three classes of around 25 students.  The box is filled with four colors: red, yellow, blue, and white.  Each package of a color can be separated for four students total.

-Small white paper plates.  I prefer the thin plain white paper plates you can get at the store.  It helps the students to form their rainbow shape, and separates the projects once they're finished.

-Wooden stylus sticks.  This is used for the clouds only

-Pencil to write their names on the plate before starting.


Directions

Each student receives one chunk of each of the colors: red, yellow, blue, and white.  Tell the students to break up their chunks into pieces.

3 chunks of red
3 chunks of yellow
3 chunks of blue
2 chunks of white


1. Take one red chunk, roll it out on the table, and shape the first line of the rainbow on the plate.

2. Take one red chunk and one yellow chunk, mix together until you get orange.  Roll it out on the table, and press against the red line on the plate.

3. Take one yellow chunk, roll it out on the table, and press against the orange line on the plate.  By now you'll notice that the lines are getting smaller, so students may have a little extra clay after each line.  Ask students to keep the extra to the side and to not press all the extra colors of clay together.

4. Take the last yellow chunk and one blue chunk, mix together until you get green.  Roll it out on the table, and press against the yellow line on the plate.  Put extra clay to the side.

5. Take one blue chunk, roll it out on the table, and press against the green.  Put extra clay to the side.

6. Take the last red chunk and the last blue chunk, mix together to make purple (violet).  Roll it out on the table, and press against the blue line on the plate.  Put extra clay to the side.

7. Take one white chunk, roll it into a ball, then flatten it.  Take the stylus stick and press it along the edge of the circle to make fluffy clouds.  Place cloud at one end of the rainbow.  Repeat on the other side.

8.  Once the student has finished, have then hand you the plate.  They can easily stack to the side until they are ready to take home.

9. Before passing out the materials, make sure you demonstrate to the students how to break up the colors and mix what is needed.

If you keep the rainbows until they are dry, you can easily hot glue a piece of magnet to the back, so families can hang them on the fridge at home!


You will have some extra chunks of colors leftover.  Make sure you seal them separately in ziploc bags for other projects you may need them for!


Here are a few final pieces!  I love how bright and colorful they are!


Monday, March 30, 2015

Paint Instruction Without the Sink: April's Stepping Stones


For April's Stepping Stones in Arts & Activities Magazine, I focused on how to deliver paint instruction without the use of a sink.

Not every art teacher has a comfortable environment to deliver his or her art instruction.  Many teachers travel from room to room, school to school, set up a temporary space and pack their supplies in car trunks or mobile carts.  With painting being a key material to teach in a visual art curriculum, many teachers learn ways to adapt to their situation.

In my situation, I have a room, but no sink. Although I’ve been teaching for a number of years, this is my first year in this environment and I am quickly learning to adapt to the situation, even in emergencies.  In my years of teaching from a cart and traveling to different schools, I’ve learned that many times instruction does not always go as planned, so we must be flexible and understanding.

No matter what your situation may be, here’s a few tips to help with painting instruction in most teaching environments. 

Art on a Cart: In the past, I would push a cart from room to room.  Although the situation was not ideal, I refused to take paint out of my curriculum simply because of inconvenience.  Since storage was an issue, I used paper plates as palettes and recycled butter containers as water bowls.  When I developed a better method of storage, I started using plastic cups with lids to store my paint and prevent waste.  If a room had a sink, I asked students to fill the water bowls to a line I drew on the bowl and gave them the responsibility to pass the water out.  If the room did not have a sink, I needed to adapt.  If you have space within a cart you’re pushing, consider a water jug with a spout for quick refills, and an empty bucket for dirty water.  With a lack of storage space, I had collected 5 gallon plastic jugs with handles to fill with clean water.  At the end of each class, I would have students take the dirty water buckets to the bathroom to dump in the sink. 

School to School: If you travel from school to school, you may have carts or classrooms.  I would highly recommend keeping your paint supplies at each school, and making sure you have a space to keep the supplies without worry of them disappearing when you’re not there.  Make sure you communicate with your administration about the importance of your co-workers leaving your materials alone when you’re not there.  So many times educators feel they can use the materials because it’s school property, when in fact, art teachers not only purchase consumable materials from their own funds, but order just enough for their own classes.

Classroom Without the Sink: Since I am new to this situation, I would like to share what I have done to work with what I have.  One way to keep water in the room was to purchase a portable sink.  The sink holds a 10 gallon bucket of water to run through, and another bucket to dump out at the end of the day.  As nice as this is to have, I learned quickly that it does not last for more than two painting classes.  Have a table or cart set aside to hold a water jug or buckets of water, as well as a bucket for dirty water and brushes.  Become acquainted with the layout of the school and find any water closets or bathrooms that are close by for refills.  In my case, I have a water closet a few doors down that I use to refill buckets in the morning and wash brushes in the afternoon.  I have also assigned classroom helpers in each class to help in refilling the buckets and dumping the dirty water if needed.  For spills, I asked for donations of paper towels from the parents and staff.  Hand washing is done with sponges that I keep in the room that are pre-soaked.  In any case, being prepared helped in preventing many painting catastrophes. 

Mobile Instruction: Some mobile units have sinks while others do not.  In these cases, I would use the water jug with spout for faster distribution of water for paint projects.  Find your closest water source (ex. hose, nearby bathroom, or water closet).  If you’re in an outside unit and you have worry of the carrying of water buckets in colder climates, communicate with your custodial staff on how water is needed in your situations.


With any situation where you deliver your instruction, keep open communication with your administration, co-workers, and custodial staff on your needs for your teaching.  Painting can be fun, but in some circumstances very challenging to instruct.  Just be flexible, understanding, and open to new possibilities with your paint projects!

Monday, March 16, 2015

How to Follow the 2015 NAEA NOLA Convention from Home

The NAEA 2015 convention will be taking place this year in New Orleans, Louisiana from March 26-28. Alas, this is my second year in a row missing the national convention due to finances.  I, like many of you, will be continuing our daily routines while thousands of lucky art educators attend this amazing convention.  Did you know that Tim Gunn will be there?  Yeah…jealous!!!

Even though we're stuck at home, there are still many ways to keep up with the national convention.  Thanks to the awesome superpowers of social media, live streaming, and online resources, we can keep up with our professional development the best way we can!  These links are not to make us jealous, but to offer any resource we could use for our own professional growth.

#1 Twitter

If you follow #NAEA15 on twitter, you can see all the posts from the many art teachers attending the conference.  They will be adding photos, details, and online links to help followers catch a glimpse of what will be happening during the convention and what they have learned from their experiences.  There will even be a "Tweet-Up," where you can see the fellow tweeters in this year's shirt design of a fleur de lis as a paint palette.  Here's one of the awesome shirt designs:


The #artsed #PLN always create the most amazing Lego displays to hype everyone up for the conference!  Here's this year's display created by member Stacy Lord!


#2 Watch for Articles from the Art of Education

The Art of Ed will be in New Orleans!  They will be posting articles with the sights and sounds throughout the convention on their site.  Please visit The Art of Education to view their updates!


#3 Download the NAEA New Orleans 2015 App for Your Phone

So you can't go to the convention, but did you know that many presenters will have their resources and handouts uploaded in the app?  Just go ahead and download it from your app store or google play to view what resources are available!


#4 Instagram

Like Twitter, there will be many instagram followers posting their pictures of the convention.  Just use the #NAEAELEM if you are part of the elementary division to follow many photos that will be taken!


#5 Follow the #NAEA15 Tagboard

NAEA's tagboard is the quickest way to gather all the #NAEA15 tags from different sites.  Just go to https://tagboard.com/naea15 to view all the posts and follow what's happening!

If you're staying home this year and you know other ways to stay involved from the comforts of your computer, let me know how you plan on following the convention!  Next year's convention will be in my home city of Chicago, so there's no way I'm missing that one!

To my #artsed friends, have fun in New Orleans!

Saturday, March 7, 2015

Learning About Art Careers: Puzzle Designs with 3rd Grade


So I was poking through the art supply catalogs and came across the design-your-own puzzles in the craft section.  With the puzzles being such a simple project to make, I thought about how students could  tie the puzzle-making together with real life skills.  Then the lightbulb clicked on: How would students learn about jobs that require creative skills learned in the art room?  From there, I developed my lesson to include make-believe scenarios that reflect how artful creations could be sold by commission.

We pretending we were working for a graphic design company.  In our scenario, we were asked by Toys R Us to design puzzles to sell at their stores.  Toys R Us wanted to see multiple ideas for puzzle designs and asked our designers to explain why their puzzle designs would appeal to customers.


Materials
-5.5" x 8" compoz-a-puzzle
-5.5" x 8" white paper
-transfer paper (trimmed down to the 5.5" x 8")
-pencil
-black marker
-colored markers 
-masking tape
-small ziploc baggies.


Objectives
The students created a puzzle design that they felt customers would want to purchase.  They started with a concept design, then had their design approved by me before having it transferred to the puzzle template.  Once the puzzle was complete, the students write a pitch to "sell" their designs.


Here's the Plan:
Day 1: I introduced the scenario.  I explained to students how they needed to come up with an idea drawn out for a puzzle design, then have it approved by their boss (a.k.a. me).  Once student designs were approved, I attached their drawings to transfer paper and the puzzle (secured with two little pieces of tape) and asked the students to transfer their images by tracing their designs.

Day 2: Students continue to see me for approval of images.  Once the image was transferred to the puzzle, students re-traced their drawings n the puzzle with black marker, then used color markers to finish the design.

Day 3:  Students use the final day to complete the puzzles.  Once finish, they were asked to write out an explanation of their puzzle and why they thought customers would way to buy their design.  For the remainder of the class, the students teamed together to pitch their ideas to each other.  If students agreed to purchase their design, they were allowed to piece the puzzle together.  As nice as it would be to do trades, the students were quite possessive per their original designs!  Ziploc baggies were provided for the students' puzzles to be brought home securely since they had so many loose pieces.  Their descriptions were then used as artist statements on Artsonia!

There's so much we could do with this idea in the future!  Contact local toy stores to go along with our scenario?  Bring in a guest artist to explain how their company sells designs?  There's room to improve in the future!

Here are some finished examples along with their descriptions:


"My picture is a horse. I think customers would buy it because it is fun for children. So buy it for 4.99 plus tax!"


"I chose a panda because panda's are real and you can watch them play."


"It is a picture of the word ART. I think customers would buy this because people like art"


"My picture is a peacock. I think customers would want to buy my puzzle because they like birds."


"My picture is Feniken and Swiley and Pokeball from Pokemon. Customers would buy this because Pokemon is fun, colorful, and creative."


"My picture is Spongebob. I think customers are going to buy my puzzle because a lot of people like to watch Spongebob."


"My picture is super red (angry birds). Angry birds is so popular, so customers would buy this."


"This puzzle is Batman and his batmobile in Gotham City. I think that customers would like the details."

Friday, February 27, 2015

Making Mistakes in the Art Class: March's Stepping Stones


For March's Stepping Stones article, I focused on how students learn from their mistakes in the art room.  

We always tell ourselves that it’s human to make mistakes, and as adults, we’re used to them happening, big or small.  We fall down, pick ourselves back up, brush off the dust, and carry on.  As children, we felt horrible when we made mistakes and thought our worlds were upside down because things did not go as they planned.  In school and at home, children learn from watching others, and over time as they develop into adult citizens, they develop the ability to cope with ups and downs.

Many times we have students in art that shut down or give up after making a simple mistake.  As part of social emotional learning (SEL), we’re equipping students with the knowledge they need to be able to get back up when students fall down, and teaching students to learn through their mistakes is a key component in developing those skills.

Making mistakes teaches students that they are not perfect.  Too often I hear students saying their work “must be perfect” and cry when one little thing goes wrong.  When a student learns to shrug it off and work through their mistakes, they understand that they are not flawless and carry on.

Making mistakes teaches students to face their fears.  In art, we teach our students to be risk takers and to think outside of the box.  If a student is too afraid to push themselves in their creative abilities, they will always be coming to you asking to do their work for them.  Students who face their fears are more likely to try new things on their own, even if they succeed or fail at their attempts.

Making mistakes teaches students to keep moving forward. How do we know what is successful without a few failed attempts?  When making mistakes in art, we learn what can go wrong and how to avoid making the same mishap again.  

Making mistakes teaches students to take responsibility for their own actions.  Sometimes when students make mistakes, they are quick to blame another.  Taking responsibility for our own actions is not fun, but students learn to grow from accepting their own faults.

Making mistakes teach students about integrity.  Students make more mistakes with their art when their goals are too high.  It’s good to encourage students to take risks, but if their risks are beyond their capability, they will be let down with constant failures and give up on their projects.  When students accept the truth of their own abilities, they can push their limits at their own pace.

Making mistakes teach students that there are multiple solutions to one problem.  There’s a very good reason why Elliot Eisner added this sentence in his top ten reasons why the arts are important in education.  If you’ve observed your students at work, some students have what many art teachers call “happy accidents,” which are good changes that happen from little mishaps in art projects.  One book I like to read to my younger grades is Beautiful Oops by Barney Saltzberg.  In the book, students see how simple coffee stains, smudges, or ripped paper can become another beautiful piece of artwork.  When students make simple mistakes in my art class (such as a smudge or line that can’t be erased), peers throw out ideas on how artworks can be altered.  It’s a great opportunity for students to be a team and share ideas, or for individual students to use their creative thinking skills on a whim.

Making mistakes allow students to inspire others.  When students react to their errors, others are watching.  Kids can be great role models for each other when they react to any situation in the classroom.  They observe how we as teachers respond to their choices, and react in a positive or negative way.  If a student works through their “happy accidents” or “beautiful oops’s,” congratulate them for thinking around their obstacles.  Classmates are inspired when they see other being brave and taking risks.


Mistakes are powerful lessons in every part of our lives.  As art educators, we teach children how to embrace their faults and to work with what we have.

Monday, February 23, 2015

After School Art Projects: Butterflies for Lurie's Children's Memorial Hospital

In Springtime, Ann & Robert H. Lurie's Children's Memorial Hospital hosts an annual memorial service for families and staff to come together to honor and celebrate the lives of children they have cared for and who have pass away.  Elementary and High Schools in the past have created over 200 ceramic butterflies as gifts for the families.  The butterflies have become a special tradition at the service where families are able to pick out a butterfly that uniquely "speaks" to them.  

According to the hospital, butterflies are commonly used as a symbol in a child' death, paralleling that even though it was for a brief moment, we feel blessed to have known them.

Back in 2012, I was asked by a dear friend of mine if I could take on a charity project for Lurie's Children's Memorial Hospital in Chicago, Il.    At my previous school, I joined together with the Jr. High teacher to have students from grades 4-8 create and paint butterflies for the memorial service.  I shared our previous experiences in last year's post:

A Charity Project: Butterflies for Children's Memorial Hospital


Now that I am teaching in a new school, I needed to figure out how to implement the project without having a kiln.  Joining with another art teacher in our district we decided to create our own ceramic butterflies.  We each set up an after school club for 6 weeks to create, glaze, and package the butterflies.  Since I do not have a kiln in our school, I needed to transport the butterflies to the Jr. High to be fired in between after school classes.

Below are images from the first part of the project: creating the butterflies.  Students used cookie cutters to form the butterfly shapes, while others drew designs within each cut out.They were so determined to make the quota, they surpassed the amount in just one day!


After the firing a few weeks later, we started glazing the butterflies, one by one.  Since this is my school's first time working with glazes, I needed to remind students not to paint the backs of the butterflies!


And now the finished products!  During our last meeting, we carefully packaged the completed butterflies and shipped them to the hospital for their service!


Thank you to our students for their help with the charity project and for the support from our school!