Tuesday, February 23, 2016

Preparing for NAEA's National Convention: March's Stepping Stones


I’m so excited for this year’s NAEA convention because it’s taking place in my home city!  My first convention was back in 2006 (which was also in Chicago), and my eyes were opened to a world of endless ideas for my classroom and curriculum!  Since then I’ve attended the event almost every year in other cities and have learned some tricks to navigating this amazing national convention.  I’d like to offer some tips in preparing for the national convention and visiting the city of Chicago.


1.     Be prepared for strange weather!  Chicago has been known for its odd weather patterns, so keep a close eye on the forecast!  Prepare to dress warm in case of strange pop-up snows in March, but hope for warmer sweater weather.  The lake front (which is close to the hotel) is the best place for morning jogs, especially near the museum campus!


2.     Don’t forget your walking shoes!  Even if you’re not a morning runner, the Art Institute of Chicago is walking distance from the hotel, and two miles straight north is the Museum of Contemporary Art.  There are plenty of artistic experiences to be had within Chicago, and plenty of ways to get to where you need to go!  There will also be shuttles available from the hotel to the convention center!
3.    


      Utilize the NAEA Chicago convention app!  When NAEA started using their convention apps a few years back, it was a huge help with planning out all the sessions I wanted to see by divisions, workshops, connections with friends, and super session speakers.  The app is available for your phones and ipads, and I highly recommend downloading it!  You can also use the app to write and store notes while attending presentations, which can be stored within the app.


4.     Make room in your luggage for the vendors!  A few times when I flew to attend a national convention, I packed a suitcase within a suitcase to bring back all the free samples and giveaways received.  I even remember a year when I shipped boxes back!  In other words, don’t over pack before you head to the conference!  Save some room for those samples and goodies you want to take back to your classroom!  The vendors consist of companies that supply your art materials, magazine subscriptions, art fundraisers, books and posters, and much more!  You can even order supplies while at the convention to be shipped to your school!


5.     Print labels with your address for raffles and giveaways!  Every year that I forget to print labels with my school address, I regret it.  The vendor area is like an art teacher’s toy store: you have multiple vendors with giveaways, mailing list sign-ups, and prizes.  Labels make it much easier for you to place a sticker and go instead of spending time hand writing your entire address and phone number. 


6.     Plan some time to visit the city of Chicago!  There’s plenty to do off site from the convention.  You will be close to plenty of museums, such as the Field Museum of Natural History (a great place to sit back and sketch), the Shedd Aquarium, and Adler Planetarium (all three museums known as the “museum campus”), to the Art Institute of Chicago, and even further down to the Museum of Contemporary Art.  There are also plenty of sculptures up and down the walking path of Lake Michigan, as well as cultural centers in Chinatown, Little Italy, and more.  Monuments by famous artists are located in Graceland Cemetery on the north side, and gallery districts lay all over the west and south side of the loop.  There are also plenty of architectural tours within the city and outskirts in Oak Park.  In other words, you will have plenty to do and see.

      Did you know there's a Van Gogh exhibit going on at the Art Institute of Chicago during the convention???!!!!


7.     Make a stop at the information booth!  The volunteer committee will be available to help direct you to where you need to go!  From local restaurants, workshop locations, cultural attractions, and more, members are around to help you with any assistance you need! 


8.     Attend the social media “meet-ups.” If you’re on Twitter (#artsed), Facebook (Art Teachers Group), or any other social media outlet, there will be plenty of meet-ups, brunches, and events around the convention.  Keep an eye out on your preferred social media network for extra gatherings to meet people face to face! 


If this is your first convention, I hope you have a wonderfully artistic experience!  There’s so much to do and see on and off site, you will leave will a head full of ideas and inspiration for your classroom, curriculum, and art department.  The convention is one of the best professional development opportunities available for art teachers!  Have fun and be inspired!

Monday, February 1, 2016

Children’s Book Series that Inspired Great Art Projects: February's Stepping Stones


Click here to view the entire article in Stepping Stones in the Arts and Activities magazine.

With the ELA common core standards, more art educators are attempting to incorporate literature within their curriculum.  From artist series to popular fictional characters, art teachers have tons of creative ways to promote visual literacy and help design lessons to include supplemental materials or project inspirations.  You can create a lesson from any book you pick up in your classroom, but since we’re visual artists, many of us like to focus on “art” specific topics.  You may find a story about “Uncle Andy’s Cats (inspired by Andy Warhol),” or read about artistic inspiration from “Bridget’s Beret.”  You could also use books to explain elements of art, such as “Mouse Paint” or “Lines That Wiggle.”  Among all the books I use, I like to refer to a few series I’ve collected for my art library in my classroom.


Getting to Know the World’s Greatest Artists:  This artist series (written and illustrated by Mike Venezia) is a wonderful one to use with the elementary level.  The pictures are bright and colorful, and the stories are very informative and to the point.  Students are able to learn about the artists’ place of origin, how they became artists, what famous works they made, and how the artist impacted the art world.  I like to use this book series when introducing an artist and his/her style of art.  There are currently over 30+ artists featured in the series.  If you go to the website www.gettingtoknow.com,  there is a list of artist books available, as well as teacher resources for specific artists!


Peter Reynold’s “Creatology” Series: Many schools celebrate “International Dot Day,” which is inspired by the book titled “The Dot,” which promotes students to “make their mark.”.  The 2nd and 3rd books, which are “Ish” and Sky Color,” explore more about keeping your eyes open to possibilities and having the freedom to express yourself.  When our school celebrated International Dot Day, I had each grade level (from K-6) create a “dot” to be displayed around the school.  There are numerous project ideas that you can find with a Google or Pinterest search, thanks to many art teachers who blogged their student creations.  Lesson ideas and resources can also be found at www.thedotclub.org, which is the site dedicated to International Dot Day.


Eric Carle’s Children’s Book Collection: Most children are familiar with the designed picture books written and illustrated by artist Eric Carle.  His most known work, “The Hungry Caterpillar,” has been translated into 62 languages and sold over 40+ million copies.  Eric Carle’s style of art is very recognizable. His style has inspired many Early Childhood and Kindergarten projects.  Eric’s themes of his stories revolve around his love for nature, which is an interest of most children at the primary grade level.  I’ve enjoyed working with “The Grouchy Ladybug” with my kindergarten students!  We’ve created paintings filled with ladybugs and different characters from the book, and it’s quite funny when a student attempts to draw the whale in the sky!


Scholastic’s stories written and illustrated by students: I love when we have Scholastic book fairs because I like to see what the next young author series may be.  It all started when I found the book “Van Gogh’s Cat” written by 2nd grade students from Muncie, Indiana.  Each page was an artwork created by each student in the class, while the story itself was written by the students!  The following year I picked up “September 12th,” which was written by 1st grade students after 9/11.  After reading these books over and over again to my students, I thought how interesting it would be to create artwork inspired by books written and illustrated by students at the same age!  In my second grade classes, I have students create their own masterpieces with a cat jumping, walking, or pouncing out of their paper, just like the 2nd grade students who wrote the book!  My students are always shocked to see that books made by other kids their age can make it in print.  And funny enough, there is another art-inspired Scholastic book in our fair this week called “Masterpiece” to add to my collection!


Artist Series by Laurence Anholt: While browsing through your school library, you may come across an artist story by the author Laurence Anholt.  There are currently 8 titles in the series with new stories being created.  Anholt’s stories are about real children who actually met great artists.  The material is based on actual research.  To learn more about this artist series, please visit www.anholt.co.uk.


Books can be a very essential part to your art curriculum, and this list is only a small handful of what you can use within your lessons.  I encourage you to explore what art-inspired books you can use within your classes!

Sunday, January 3, 2016

Mouse Paint with Kindergarten


It's time to start color mixing with the Kinders!  Painting with Kindergarten is scary, but with teaching responsible behaviors, it can be one the the best classes ever.  Kindergarten students always ask in the beginning, "When are we gonna paint?????"  After careful planning and explanation of care, it's finally time!

I like to introduce the project and activity by reading the book "Mouse Paint" by Ellen Stoll Walsh.  In the book 3 white mice find the primary colors in paint jars and dance around, discovering different colors mixed on their feet.

After reading the book, I go over how yellow, red, and blue can make the secondary colors.  Before I get ahead of myself, here's the list to set up:

Materials
-Mouse Paint by Ellen Stoll Walsh
-This amazing activity sheet that I found within Pinterest, and a huge thanks to whoever designed it!


-Yellow, Red and Blue Tempura Paint
-Styrofoam plates
-Black marker
-Pencils
-Medium brushes
-Water containers and water
-Pre-cut paper towels
-Tablecloths

-white paper
-pink paper
-scissors
-glue

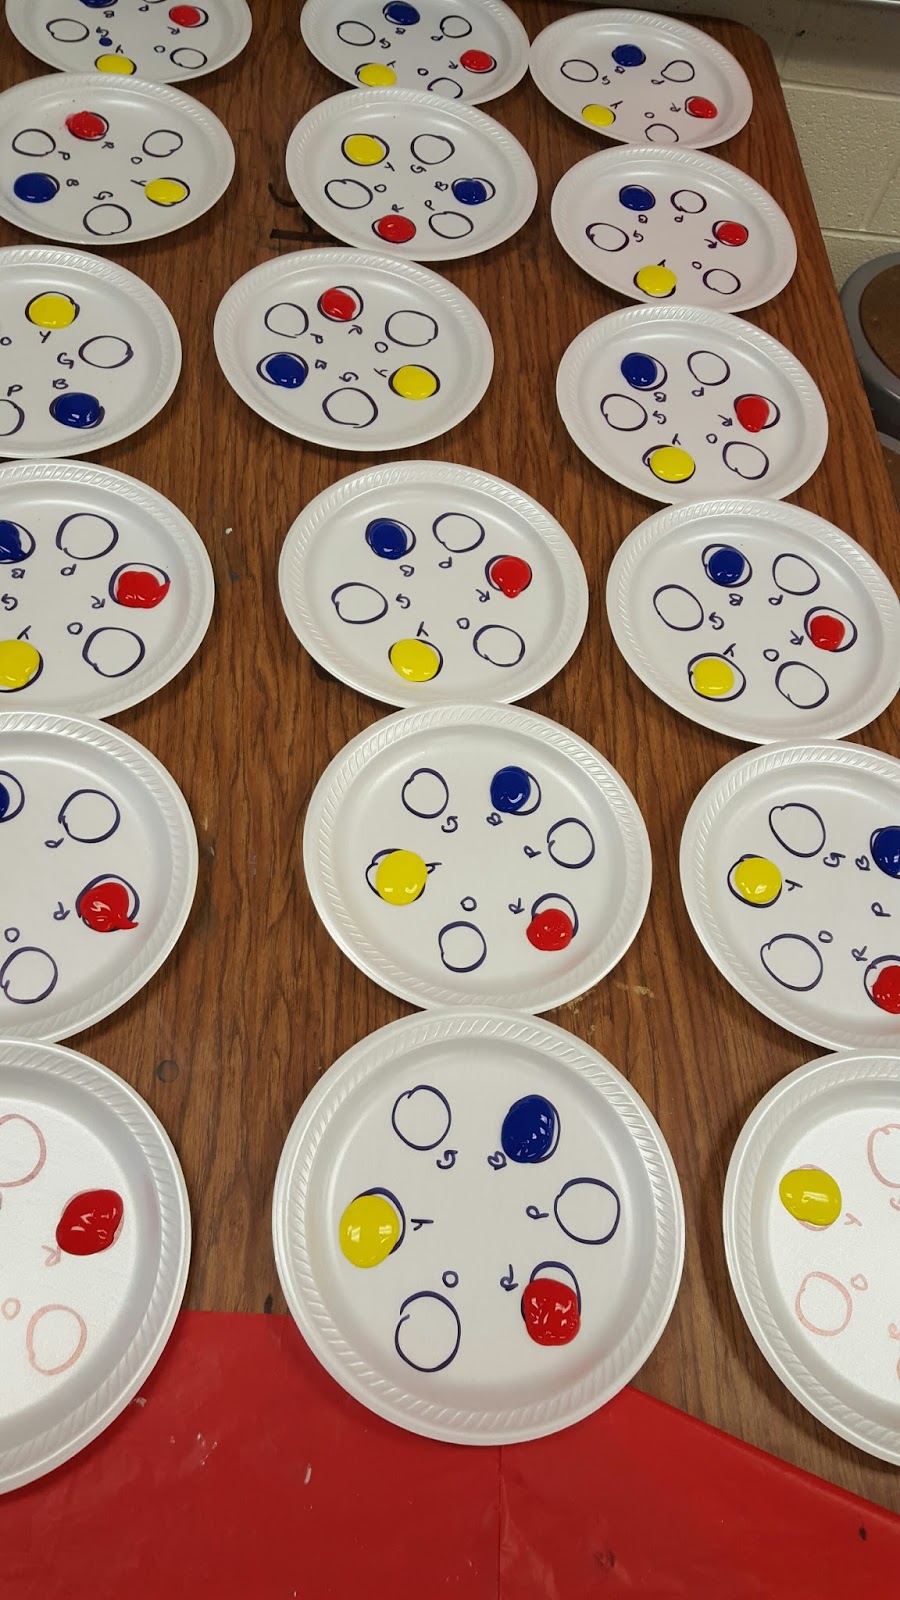
Here's how I set up the plates in advance.  I do not have much room to store in advance, so I started setting this up in the previous class.  I also drew circles and added the first letter of the color word on the plates to help the Kinders with their color identification.


Objectives
Students will not only learn how to be responsible with painting materials, but also explore how to mix colors to create other colors.

Directions
This project took approximately 2 40-minute class periods to complete.

Day 1: Start off by reading Mouse Paint to the students.  Once finished, go over the colors that were mixed by the mice in the story.  Show the students the activity sheet to help in mixing colors.  Demonstrate how to properly take a small amount of paint to mix the secondary colors between the primaries (if you don't, students will mix the entire plate).  Have students complete the activity sheet.  Once activity sheet is complete, collect sheet and place a white paper in front of the students.  Inform students to create their own painting with the colors they mixed.

Day 2:  Since the paintings are now dry, today they'll start making their mice!  I created a template of 3 ovals (ran through the copy machine for the amount of students) and had students cut out the ovals.  Using pink construction paper scraps, students drew and cut out the ears, and cut a thin strip for the tails.  Using a black marker, they drew in the eyes.  As easy as this step seemed, you will having students finishing in 10 minutes and others finishing last minute.  Have students glue their mice wherever they want on their painting, as if the mice are making the painting!

The one step I would still like to add on is a paintbrush.  Since this was my first time with the lesson, I wanted to see the length of time it took to create the mice alone.  If I were to add on paintbrushes for each mouse, I plan on having the brown strips pre-cut to save on time with construction.


 Here's some finished example by the Kindergarten students!  


(This is one of my special needs students.  He doesn't normally like cutting, drawing, or gluing, but he LOVED painting!!)

(This student remembered that at the end of the book, the mice left a spot white because of the cat!)


Friday, January 1, 2016

Art History Strategies: January's Stepping Stones


To view the full article from Arts & Activities magazinepluck click here.
As art educators, we do our best to squeeze in as much as we can within our curriculum in the time we have in the classroom. From process to product, elements of art, principles of design, culture, integration and history, we ultimately bridge the gaps between all the subjects, no matter what grade level. One of the most integrated subjects we teach relates to social studies and how the arts played an important part in documenting and preserving our human history.
There are many ways to incorporate art history into our lessons for all grade levels. Projects can be an imitation of an artistic style or a practice of a specific method used in creating. Here are only a few of many ways you can incorporate art history into your curriculum.

Ancient Civilizations 
In ancient history, we’ve discovered how pictures came to be after finding art on cave walls and ceilings (Prehistoric). We’ve learned that art remained unchanged for thousands of years in certain civilizations because of an obsession with order and precision (Egyptian). We’ve also learned that art had been a way to document past events throughout history.
In my district, our sixth-grade students learn about ancient civilizations in their social studies curriculum. Within the school year, they study the Prehistoric time period through the Renaissance, and there’s a huge portion of how art helped to create and document our history in that time frame.
In planning my lessons, I decided to combine my projects with the ancient civilization curriculum. My Prehistoric art include symbols and story, and I enjoy using pastels to create the images. I’ve seen students create “cave” paintings/drawings on paper under desks or tables, or they can crunch paper to create the “stone” effect while drawing their images.
Egyptian art includes learning about hieroglyphs, the style of profile drawings, and the decorative motifs on their sarcophagi. You can create jewelry, embossed scarab beetle drawings on copper or aluminum, or even scratch-art portraits on gold scratchboard.
In Greek history, I share the creation of theater and students make clay faces depicting characters. I’ve also seen various grade level lessons on clay vessels and column designs created by other art teachers. With medieval art, we create stained-glass window designs, but I’ve seen castle constructions, shield emblems, and tapestry-inspired lessons. In the Renaissance, we visit the creation of the printing press (printmaking) and finish the school year with a Mona Lisa parody drawing. There are so many projects you can create inspired by the Renaissance that incorporate process and artistic understanding.


World Cultures 
In studying world cultures, you are also looking into how art documents the history and traditions of each culture in different countries. I like to visit cultures throughout the school year, especially the cultures of many students in my district. We have a high population of Polish, Arabic and Hispanic students, and they love it when they create an artwork inspired by their own culture.
You can tackle world cultures in many ways. One way would be to create your entire curriculum inspired by different cultures. Each grade level can “visit” a country in each project throughout the year. You can also dedicate one entire month solely on cultural projects and host a “multicultural faire” with all the finished projects. If you feel you do not have the time to tackle that amount of work, try to fit one cultural project in each grade level at least once throughout the year. Over time, you may develop a variety of lessons inspired by different cultures.

Art Time Periods 
When moving through art history, we start to break down into different art “eras” that influenced the times they existed. From Baroque to Rococo, Art Deco to Constructivism, Surrealism to Dada, there’s a wide list of styles of art through time you can incorporate into your lessons.
In my Primary grades, I like to work with artist examples from different art styles. I stay within the range of Modern to Contemporary art because students find more of the colors and styles exciting and love to try out the artistic styles themselves. Many art-supply companies offer art history “timeline” posters that can be hung around the room. In the past, I’ve attached artwork examples next to the art styles for students to see what time period they’ve learned about while creating their projects.
A great way to display your art history-inspired examples is with displays. Have fun with creating your own timeline on the school walls and having students fill in the art eras with their own project examples. You can also have students reflect on their work in their artist statements attached to their projects. Your school walls can turn into your own art museum, with you as the curator!

Friday, December 18, 2015

Navajo-Inspired Rugs with 2nd Grade

     (photo found in Google images)

(an example of a Navajo rug)

Navajo rugs are textiles created by the Navajo people of North America.  The rugs have been a  highly sought after item of trade for over 150 years.  When I worked in textile restoration (before teaching), I enjoyed restoring Navajo rugs and woven pieces from private collectors.  Before the 19th century, Navajo weaving coloration was mostly natural brown, white, and indigo. Over time, the colors expanded to include red, black, green, yellow, and gray.  

I came across a project from a book created by Denise Logan called "Amazing Art Projects for Children."  In the book, Denise shows step by step instructions on designing the rug patterns on paper.  I adapted by own methods for creating the rugs with my schedules and materials, which I list below:


Materials
-9 x 12 70 lb. or greater white paper
-Black permanent marker
-Colored washable markers
-Hole punch
-Various colors of yarn
-Ruler
-Pencil
-Examples of Navajo patterns
-Scissors

Objectives
The 2nd grade students learned about Navajo culture within their classrooms.  For the project, students are introduced to the tradition of Navajo weaving and attempt to create their own design.  With the yarn, students learn how to loop and fringe their finished paper "rugs."

Directions
This projects takes about 3-4 40-minute class periods to complete.

Day 1:  I started with a discussion about the myths and traditions of weaving with the Navajo people.  I found this description that I share with my students:

         It is said that Spider Woman taught Navajos of long ago the art of weaving. She told them, "My husband, Spider Man, constructed the weaving loom making the cross poles of Sky and Earth cords to support the structure; the warp sticks of sun rays, lengthwise to cross the wool; the heddles of rock crystal and sheet lightning, to maintain original condition of fibers. For the batten, he chose a sun halo to seal joints, and for the comb he chose a white shell to clean strands in a combing manner." – Spirit of the Weaving Comb

I created a pattern example sheet from scrounging around my Pinterest boards:


Hand out the 9 x 12 white paper and have students create their own designs using the Navajo patterns as examples.  Once students are done drawing, have them trace in black permanent marker.  Use washable markers to color in the spaces.

Day 2:  Review the steps to create the patterns.  Finish tracing and try to have students finish coloring the entire page.  On your own, crumble the paper, dip in water, and un-crumble to create a tie-dye effect.  If you have a spray bottle, that will work too!  I lay out the wet paper on larger sheets of paper on the drying rack for support.  Once dry fold the paper in half and poke a total of 7 holes on the edge, so there are 14 holes total.

Day 3:  With most of the projects ready and hole-punched, Demonstrate to the students what length of yarn to cut, how many, and how to tie the fringe.  You may have students still finishing their coloring this day, as well as taking their time to fringe.


Day 4:  All projects should be tie-dyed (pre-dipped and hole-punched) and ready for fringe.  Have students complete the fringe and hand in their work.  I have students write their artists statements on a separate sheet of paper with their rubric.

Here are some finished examples!