Showing posts with label 5th Grade. Show all posts

Friday, November 18, 2016

Masks with 5th Grade


There are so many different ways to create a mask in your classroom, but this project is among one of my favorites.  I enjoy it because students have freedom to choose their own designs.  This particular project is known throughout my school and students look forward to reaching 5th grade so they can finally create their own!  I've heard more than once on the first day of class, "We're making masks this year, right???"

I've adapted this project many times over the years due to the spaces I've worked in and the student climate.  Recently, I've been using pre-made pulp masks to save on time (this project can take quite a few weeks depending on how challenging you create the lesson).

Although this particular project was made with pre-made masks, I've also created this project with plaster wraps and mask molds.  It's another step your student can take in making their masks from scratch if you have the time.

Materials

-Mask examples (printed out)
-Mask template
-Pencils
-Black tracing markers
-Color markers
-Scissors
-Glue
-9 x 12 colored frame paper
-pulp paper mache masks (found in Nasco or Triarco)
-Paintbrushes
-Cups for water
-Tempura paint
-Paper towels
-Accessories (beads, gems, feathers, cord, etc.)
-Glitter pens (your choice)
-Hot glue gun (your choice, depending on the classes you teach)

Objectives

From learning about the uses of masks and designs from many cultures, students will create their own mask design.  Students are to develop an idea on a mask template by drawing and coloring in their own designs.  From that idea, students re-draw their design on the mask form, then apply tempura paint to their masks.  Accessories can be adding at the end of the unit.

Procedures

This unit lesson takes approximately 5-6 weeks to complete.  Each class period was approx. 40 minutes in length, meeting once a week.

Day 1: I share a Powerpoint I created of many masks from different cultures to help inspire students for their designs.  Afterwards, I begin the demonstration by showing what materials are available for creating the mask drawing over the template.  Students are encouraged to decide on their own design, and to help students who can't think of ideas, I provide a folder of different mask images to help spark the light bulbs in their heads.


(Please note:  I do not know how to share a pre-made Powerpoint on here.  I've tried many times, but I can't seem to figure it out.  Once I do, it will be up!)


(Another note:  I found mask images on Google.  Very easy to create your own printouts copy/paste in Microsoft Word.  You can also have students research on their own if you have the time and technology!)


Day 2: Students will be encouraged to complete their drawing designs, frame them with colored paper, then start their rough sketch on the masks.


Day 3-4: Students will continue to draw and paint their designs onto the masks.


Day 5: Once masks have finished, students can use hot glue guns (at designated stations in the room) to glue on accessories.  I encourage students to find their own accessories if they have something specific in mind.  When I was on a cart and in smaller rooms, I did not create a station and instead asked the students to hand me their accessories, which I glued on during plan time or after school.


Day 6: Wrap up accessories and artist statements.  At our school, we have chromebooks!  I have the students bring the chromebooks into the art room and enter in their artist statements straight to Artsonia.  The students reflect on their designs, the process, and how they felt about creating their artwork.


Drawing Examples


Finished Examples


"My mask design was inspired by how I am half Polish and American. I like this project because it was fun."


"My mask design was inspired by tigers. I liked it because I could create what I want to be"


"My mask design was inspired by my native country which is America, and the bald eagle, our country's symbol. I liked this project, although it got a little messy. I do like working with paint though. I liked this project because we got to pick something representative that we would like. This shows our creativity."


"My mask design was inspired by my thoughts and favorite things. I like this project because my favorite designs are zigzags and rainbows."


Wednesday, December 16, 2015

Monochromatic Trees with 5th Grade


Have you seen this project floating around in the Pinterest pages, or have you been to a paint party/wine and canvas?  I've pinned the project for awhile and started trying it out with my 5th grade students last school year.

At the 5th grade level, I feel that students are "responsible" enough to work with acrylic paint.  I explain to students that the paint does not wash out of clothes (even though it does to an extent, I want students to understand the responsibility with the paint).  My classroom is also tight with no sink, so I use fewer colors for a smoother pass-out/clean-up.

With paint parties being all the rage, I want students to have the experience of working with canvas! Since I have over 100+ 5th graders, I work with canvas boards.

This can be a winter project, so you have a range of time to work with!

Materials
9" x 12" canvas boards
Acrylic paint (blue, white, and black)
pencil
paint cups (with a table of 4 students, I pass out 2 cups of each color to share)
water containers
water
flat edge and fine point paint brushes

Objectives
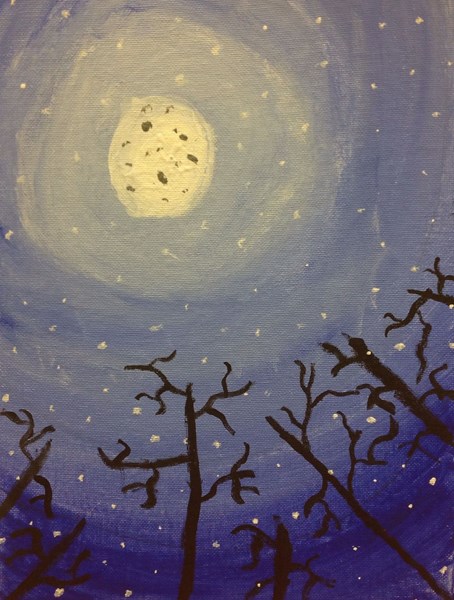
The students will be introduced to monochromatic colors.  They will practice mixing the blue and white paint to create tints and shades of blue for the nighttime sky.

Directions
This project takes approximately 3 40-minute class periods.

Day 1: Explain the element of value and how colors can be created with white/black to make tints/shades.  I recommend finding your way of introducing the class.  Maybe to want to warm them up with a value activity sheet?  The canvas is passed out and students are asked to draw 5 circles total, which expand to the edge of the canvas.  Students are only given blue and white paint to fill in the inner moon and outer edge.  If you have time, explain how to mix the blue and white in each space to paint.

Day 2: Depending on how far you have made it with the blue and white painting, explain the color mixing technique again.  If students finish the sky, have them use black paint to draw in the tree branches.

Day 3: All students should be done with the sky at this point.  Re-explain the tree branches, as well as the moon craters and snow drops.  I have students use a fine small brush to dot the snow instead of splattering...especially in my small art space!  Students also write in their artist statements, which include their thoughts on the project and what they had learned.

Here's a few finished projects!


Friday, September 12, 2014

Celebrating International Dot Day!


"International Dot Day", a global celebration of creativity, courage and collaboration, began when teacher Terry Shay introduced his classroom to Peter H. Reynolds’ book The Dot on September 15, 2009.
"The Dot" is the story of a teacher who challenges a doubting student to trust in her abilities  to “make her mark”. What begins with a dot on a piece of paper becomes a breakthrough in confidence, which has gone on to inspire countless children and adults around the globe.

To celebrate, each grade level has created a project that is "dot-like."  Once projects are completed, they will be displayed in the halls of our school!

Some projects took at least 3 class periods to complete, but by the end of September, our school will be filled with dots galore!


This is just the start of the many dots to display!


Kindergarten Dot Paintings
Inspired by the artist George Seurat


Materials
-white paper (any size you wish to cut)
-paint dots (can be found in Nasco, Triarco, or Michael's Arts & Crafts in a hurry)

After showing the painting "Sunday Afternoon" by George Seurat to kindergarten students, I shared how pictures can be made just by using dots.  Using "paint dots," students filled their paper with colorful spots! 

Total time: 1-40 minute class period


1st Grade Mandala Paintings
(Thank you, Cassie Stephens, for your project idea!)


Materials
-small paper plates
-black permanent marker
-neon tempura cakes
-paintbrushes
-water cups
-table clothes

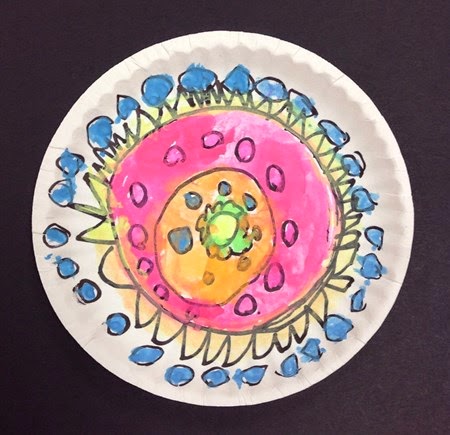
After sharing mandala designs with 1st grade students, we created our own mandala-like designs within a plate and painted with bright colors!

Total project time: 1-40 minute class period


2nd Grade Abstract Drawings
Inspired by the art of Wassily Kandinsky


Materials
-pencils
-white paper (cut to square)
-black markers
-colored markers
-scissors
-glue
-a round container for center circle

Students were introduced to the art of Wassily Kandinsky.  Wassily used many geometric shapes and creative lines to fill his artwork.  2nd graders were asked to do the same, all while listening to music to inspire movement in their drawings!

Total project time: 2-40 minute class periods


3rd Grade Mandala Drawings
Inspired by sand-made mandalas


Materials
-white paper
-pencils
-a round container to trace circles
-black markers
-colored markers
-scissors
-glue
-square colored paper for frame

Students were introduced to sand mandalas.  As nice as it would have been to actually make one with sand, we stuck with drawing our designs and adding bright colors instead.

Total project time: 2-40 minute class periods


4th Grade Metal Relief Dots
(Cassie, I thank you for this idea too!  I had to try it!)


Yes, you can use coins as examples!

Materials
-cardboard or poster board circles
-foam shapes (when I order them now, they are stickers)
-aluminum foil
-spray glue
-permanent color markers

Students were shown examples of metal relief, like coins and jewelry.  Relief is when you have dimension within a flat piece, which creates texture.  When creating their relief, students used foam shapes for the dimension, then (once covered in foil) colored on top with patterns and designs.

Total project time: 1-40 minute class period


5th Grade Radial Symmetry
Inspired by Stained Glass Window Designs


Materials
-black paper (cut into a circle)
-foam shapes (with or without stickers)
-pencil
-colored paper for frame

Students were introduced to radial symmetry.  Examples were shown of many stained glass window designs, as well as kaleidoscope patterns.  Students created their own radial designs (split into four quadrants) using the foam shapes to demonstrate their understanding.

Total project time: 2-40 minute class periods


6th Grade Zentangle Patterns


While searching on Google, I came across tons of zentangle patterned circles.  This was not my image, but I'm using it as an example of what I wanted my students to create.  So to the original artist, you inspired us!  Thank you!

Materials
-white paper circle
-pencil
-skinny black marker
-zentangle pattern packet with examples
-colored markers
-colored paper for frame

Students were shown zentangle pattern examples and where they may find patterns in the commercials they watch or the clothing they wear.  Students create their own zentangle pattern circles, teaching them patience and care with overlapping patterns.

Total project time: 3-40 minute class periods.  The students LOVED their work!


What did you do for International Dot Day?