Showing posts with label Painting. Show all posts

Sunday, February 11, 2018

Elementary Projects for Valentine's Day

Looking for projects inspired by Valentine's Day?  Check out the lessons I created with K-3!  Some projects were inspired by other lessons I have found over the years, so I tried to share the blog posts from other teachers who inspired my lessons.

Romero Britto Heart Paintings with Kindergarten


Materials: Pencil, Paper, Black Marker, Tempura Cake Paints

Duration: 1-40 minute class period

Directions: Start by sharing pictures of Britto's art with your kindergarteners!  Share how he created designs in each space of his art, such as dots, lines, colors, etc...now's the fun part!  Have your binders practice drawing hearts!  Some may struggle at first, but once they get the loop and points, they'll go crazy with their hearts!  Using pencils, have students create one or more hearts to fill their paper, then draw in lines and shapes.  Once done, use a black marker to trace, then tempura cakes to paint in the spaces!


Contour Hearts with 1st Grade

Materials: Heart Templates, Pencils, Paper, Oil Pastels, Tempura Cake Paints

Duration: 2-40 minute class periods

Directions: For Day 1, start by talking about how the hearts can overlap (one in front of the other).  Have the students use heart stencils to trace out about 10 hearts (overlapping to fit them in the paper).  Once traced, have students use oil pastels to trace, color in, or add patterns to each heart.  On day 2, have students finish filling in the hearts with oil pastels and fill in the rest of teh paper with tempura cake paint!


Symmetry Hearts with 2nd Grade

Materials: 9 x 12 colored paper, 12 x 18 colored paper, pencils, scissors, glue

Duration: 1-40 unite class period

Directions: As a one class project, the object is to have students achieve the illusion of symmetry with the heart design.  Using the 9 x 12 paper, draw half of a heart, cut the shape out, then glue the outer piece to the edge of the 12 x 18 paper.  Draw another heart inside of the already-cut heart, cut it out, and glue on the opposite side.  Draw, cut out, and glue down about 3 more heart shapes and you have a finished piece!


Positive/Negative Space Hearts with 3rd Grade

Materials: 9 x 12 colored paper, 12 x 18 colored paper, small baggies, pencils, scissors, glue

Duration: 2-40 minute class periods

Directions: On day 1, talk about positive/negative space in art.  Using the 9 x 12 colored paper, draw and cut out a heart shape.  On each side of the heart, draw and cut out shaped that will be reflected in the finished artwork.  Please Note:  Use the baggies to store the pieces once they are cut out.  This prevents any lost pieces, plus it's 100% easier with clean up.  Once all pieces are cut out, glue down the big heart.  On day 2, show the students how to glue the pieces down to reflect the empty space.  Not all students will finish right away, you will see that it may take the entire time for many students.

This project was also achieved by many other schools and can be found here for 5th grade and here for 6th grade.


Love Paintings (Inspired by Robert Indiana) with 3rd Grade
Image result for robert indiana love

Materials: LOVE Stencils, 10.5 x 10.5 white paper, Pencils, Black Markers, Tempura Paint

Duration: 2-40 minute class periods

Directions: On day 1, we discussed the artwork of Robert Indiana, then folded the white paper to make 4 squares.  We then began tracing stencils to spell out L-O-V-E in each square.  Students then began painting colors in the letters and in the backgrounds.  On Day 2, students finished up on painting.  If they finished on the first day, each letter was traced with marker to cover any loose paint lines.


Heart-Shaped Coil Pottery with 3rd Grade

Materials: Ceramic Clay (or air dry clay), Water, Canvas, Desired Paint (Glaze or Acrylic)

Duration: 2 40-minute class periods

Directions: On Day 1, discuss how to create a coil pot using ceramic clay.  Start with rolling a small amount of clay into a ball, flattening it down then rolling coils to wrap around the flat base.  Use the water for the slip process to make the coils stay together once dry.  Once the pot is completed, pinch the top and bottom of the top of the pot to form the heart shape.  On your own, fire the pottery for your next step.  On Day 2, (depending on your resources) paint the pots using either glaze (if kiln is easily accessible) or acrylic paint (if you can't fire again).  


SaveSave

Saturday, April 8, 2017

There's a Paint Party in the Art Room! April's Stepping Stones


For the past few years, there has been a rise in art studios opening up across the country, and many of those studios specialize in “paint and sip nights.” From what I’ve observed, many of these studios offer open studio time as well as structured canvas paintings.
Parents and children flock to these studios for birthday parties, scout-badge achievements, and various other events that gather friends and family in the spirit of enjoying painting and being creative. You can also take part in creating a “paint party” within your own classroom! Here are some steps to keep in mind if you decide to throw a paint party of your own.

Choose your objectivesWhat would you like your students to learn? What standards would you like to meet? Before starting with the subject(s) you wish to paint, figure out why you want to have your students participate in the painting project. Maybe you wish to visit perspective, color theory, painting techniques, or value!

Choose your grade levelWhat age level do you think your project would be the most successful? Would you like to try tempura paint on paper? Younger grade levels would benefit from working with washable paints with just as much fun. I like to create the paint project with acrylics, so my classes start their paint party projects in 5th grade. Since acrylic is difficult to wash out of clothes, we take baby steps each year and work out way up to acrylics.

Choose your themeEvery painting project is different, and there is no right or wrong way to deliver the lesson. The main two questions are: What would catch the students’ interests and what structure do they need to accomplish the objectives? Depending on your class, they may enjoy what is traditionally called a “cookie cutter” project where everyone makes the same subject and follow step by step to complete the project. Popular subject examples are trees, snowmen, flowers, or animals. Other classes may enjoy a choice-based project where the subject is their own, but the objectives are met in different ways.

Prep your materialsYour materials may vary depending on the grade level. If you can swing it, use canvas frame or boards. Many art studios include canvas frames with their costs and supply the materials, but if you have a strict budget, work with what you have. With our budget, we’re able to order canvas boards for each student creating the project (about 100 fifth-graders). If you are teaching a high school class, you can incorporate how to create a stretched canvas. If you can’t swing the canvas, use heavyweight paper.

Practice your lessonAlways make your example before delivering your instruction. Depending on the subject or materials you use, there are steps to follow and layers to add when creating the paintings. Creating the painting is like making a paper collage, only instead of paper layers, you’re dealing with wet paint! Once you have your example made and your steps in order, you will be more confident in the delivery of your project.
If you plan on setting up food or beverages at your “paint party,” check for food/drink allergiesIt sounds like fun to try to throw a complete paint party with your class, but if you have students with food allergies, you need to be aware for their own safety. Many schools no longer work with food for special events and parties, so this option may not be available. If you are a school that still accepts food for parties, make sure you notify parents and staff what you plan to do.
Prepare for things to go right or wrongIf this is your first time throwing “paint party” project, be prepared for things not to go 100% your way. My first time teaching a paint party was a character builder, but each time after, delivering the lesson became easier. You may also come across pleasant surprises if your students think outside of the box while creating their paintings! I noticed that when one student adds a little something extra to a painting, the students around them are inspired to add a little something extra as well, which enhances the projects!

Have funThe point of a paint party is to have fun! Paint nights have been popping up around the country because adults and kids are enjoying taking the time to create. It doesn’t matter if it’s a “cookie cutter” project or an open paint time, people are having fun being creative and actively taking the time to make their own art!  
My co-workers attended our own "paint night" event just to have fun, how about planning one with your co-workers too?
If you decide to do a paint party project during class time, after school, or an evening event, I hope you have the best time with your students, parents, and staff! 

Friday, November 18, 2016

Masks with 5th Grade


There are so many different ways to create a mask in your classroom, but this project is among one of my favorites.  I enjoy it because students have freedom to choose their own designs.  This particular project is known throughout my school and students look forward to reaching 5th grade so they can finally create their own!  I've heard more than once on the first day of class, "We're making masks this year, right???"

I've adapted this project many times over the years due to the spaces I've worked in and the student climate.  Recently, I've been using pre-made pulp masks to save on time (this project can take quite a few weeks depending on how challenging you create the lesson).

Although this particular project was made with pre-made masks, I've also created this project with plaster wraps and mask molds.  It's another step your student can take in making their masks from scratch if you have the time.

Materials

-Mask examples (printed out)
-Mask template
-Pencils
-Black tracing markers
-Color markers
-Scissors
-Glue
-9 x 12 colored frame paper
-pulp paper mache masks (found in Nasco or Triarco)
-Paintbrushes
-Cups for water
-Tempura paint
-Paper towels
-Accessories (beads, gems, feathers, cord, etc.)
-Glitter pens (your choice)
-Hot glue gun (your choice, depending on the classes you teach)

Objectives

From learning about the uses of masks and designs from many cultures, students will create their own mask design.  Students are to develop an idea on a mask template by drawing and coloring in their own designs.  From that idea, students re-draw their design on the mask form, then apply tempura paint to their masks.  Accessories can be adding at the end of the unit.

Procedures

This unit lesson takes approximately 5-6 weeks to complete.  Each class period was approx. 40 minutes in length, meeting once a week.

Day 1: I share a Powerpoint I created of many masks from different cultures to help inspire students for their designs.  Afterwards, I begin the demonstration by showing what materials are available for creating the mask drawing over the template.  Students are encouraged to decide on their own design, and to help students who can't think of ideas, I provide a folder of different mask images to help spark the light bulbs in their heads.


(Please note:  I do not know how to share a pre-made Powerpoint on here.  I've tried many times, but I can't seem to figure it out.  Once I do, it will be up!)


(Another note:  I found mask images on Google.  Very easy to create your own printouts copy/paste in Microsoft Word.  You can also have students research on their own if you have the time and technology!)


Day 2: Students will be encouraged to complete their drawing designs, frame them with colored paper, then start their rough sketch on the masks.


Day 3-4: Students will continue to draw and paint their designs onto the masks.


Day 5: Once masks have finished, students can use hot glue guns (at designated stations in the room) to glue on accessories.  I encourage students to find their own accessories if they have something specific in mind.  When I was on a cart and in smaller rooms, I did not create a station and instead asked the students to hand me their accessories, which I glued on during plan time or after school.


Day 6: Wrap up accessories and artist statements.  At our school, we have chromebooks!  I have the students bring the chromebooks into the art room and enter in their artist statements straight to Artsonia.  The students reflect on their designs, the process, and how they felt about creating their artwork.


Drawing Examples


Finished Examples


"My mask design was inspired by how I am half Polish and American. I like this project because it was fun."


"My mask design was inspired by tigers. I liked it because I could create what I want to be"


"My mask design was inspired by my native country which is America, and the bald eagle, our country's symbol. I liked this project, although it got a little messy. I do like working with paint though. I liked this project because we got to pick something representative that we would like. This shows our creativity."


"My mask design was inspired by my thoughts and favorite things. I like this project because my favorite designs are zigzags and rainbows."


Sunday, January 3, 2016

Mouse Paint with Kindergarten


It's time to start color mixing with the Kinders!  Painting with Kindergarten is scary, but with teaching responsible behaviors, it can be one the the best classes ever.  Kindergarten students always ask in the beginning, "When are we gonna paint?????"  After careful planning and explanation of care, it's finally time!

I like to introduce the project and activity by reading the book "Mouse Paint" by Ellen Stoll Walsh.  In the book 3 white mice find the primary colors in paint jars and dance around, discovering different colors mixed on their feet.

After reading the book, I go over how yellow, red, and blue can make the secondary colors.  Before I get ahead of myself, here's the list to set up:

Materials
-Mouse Paint by Ellen Stoll Walsh
-This amazing activity sheet that I found within Pinterest, and a huge thanks to whoever designed it!


-Yellow, Red and Blue Tempura Paint
-Styrofoam plates
-Black marker
-Pencils
-Medium brushes
-Water containers and water
-Pre-cut paper towels
-Tablecloths

-white paper
-pink paper
-scissors
-glue

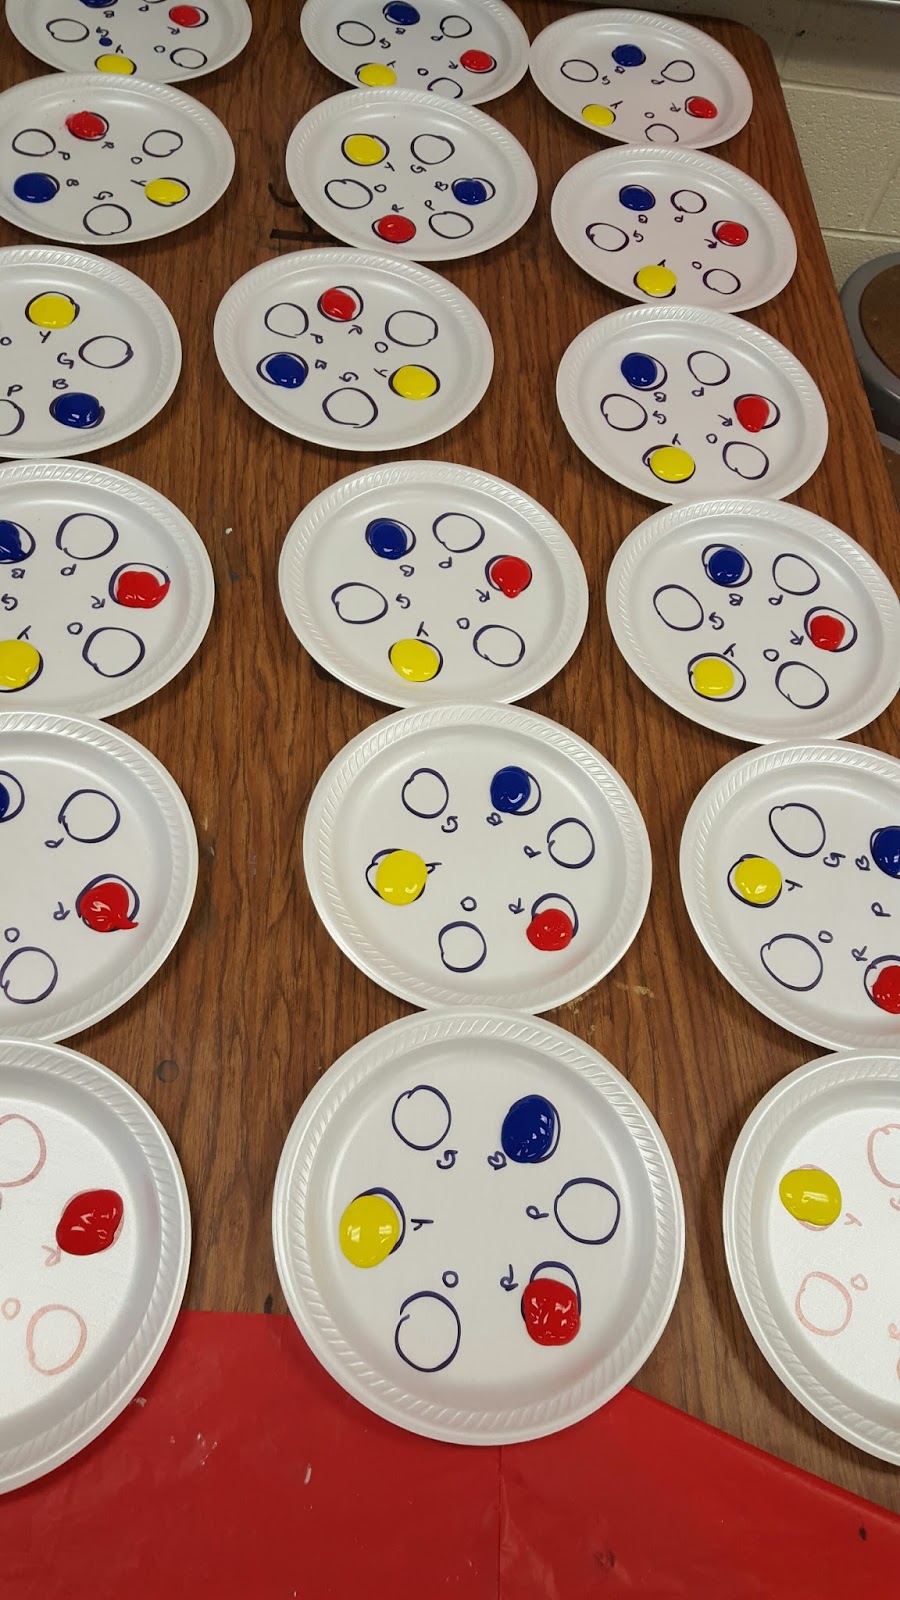
Here's how I set up the plates in advance.  I do not have much room to store in advance, so I started setting this up in the previous class.  I also drew circles and added the first letter of the color word on the plates to help the Kinders with their color identification.


Objectives
Students will not only learn how to be responsible with painting materials, but also explore how to mix colors to create other colors.

Directions
This project took approximately 2 40-minute class periods to complete.

Day 1: Start off by reading Mouse Paint to the students.  Once finished, go over the colors that were mixed by the mice in the story.  Show the students the activity sheet to help in mixing colors.  Demonstrate how to properly take a small amount of paint to mix the secondary colors between the primaries (if you don't, students will mix the entire plate).  Have students complete the activity sheet.  Once activity sheet is complete, collect sheet and place a white paper in front of the students.  Inform students to create their own painting with the colors they mixed.

Day 2:  Since the paintings are now dry, today they'll start making their mice!  I created a template of 3 ovals (ran through the copy machine for the amount of students) and had students cut out the ovals.  Using pink construction paper scraps, students drew and cut out the ears, and cut a thin strip for the tails.  Using a black marker, they drew in the eyes.  As easy as this step seemed, you will having students finishing in 10 minutes and others finishing last minute.  Have students glue their mice wherever they want on their painting, as if the mice are making the painting!

The one step I would still like to add on is a paintbrush.  Since this was my first time with the lesson, I wanted to see the length of time it took to create the mice alone.  If I were to add on paintbrushes for each mouse, I plan on having the brown strips pre-cut to save on time with construction.


 Here's some finished example by the Kindergarten students!  


(This is one of my special needs students.  He doesn't normally like cutting, drawing, or gluing, but he LOVED painting!!)

(This student remembered that at the end of the book, the mice left a spot white because of the cat!)