Showing posts with label Summer Art Projects. Show all posts

Tuesday, June 12, 2018

Developing Your Summer Art Classes!


Hello teachers!  For many of you, we are on summer break!  Most of us take the time to chill out and catch up on our PDs and make time for our own art.  Some, like me, continue to teach summer classes.  For the past few years, I've offered summer classes at a local art studio.  Some have been successful, while others were low attendance.  If you're interested in offering classes over the summer, I would like to offer some advice with planning and prepping.

1. Plan your projects in advance.  I find that picking and choosing classes can be very tricky while you're heavily involved during the school year, but the earlier you plan what you wish to teach, the better prepared you are for your classes.  If you're working with a studio, park district, or gallery, your collaborator would also want your class descriptions to plan their next few months as well.  Park districts especially want their classes listed a few months in advance in order to notify the community of upcoming events.

2. Prep your materials in advance.  If you're borrowing non-consumables (like brayers or brushes) from your classes, make sure to pack them up and return them once you're done in the beginning of the school year.  I normally create a checklist before closing up my room and return everything when I head back to set up in August.


3. Prep your examples in advance.  My summer art classes normally take about two hours each day, so projects are more involved than my 40-minute classes during the school year.  As your first year teaching summer classes, you may be spending quite a bit of time creating al the examples, but over time, you will find yourself creating fewer since you may be repeating projects.

4. Decide what you want to charge.  Most paint party classes range from $25-$35 for a two hour class, which covers materials, space rental fees, and a little for you to cover your time (or babysitter). It's good to try and keep a consistent amount so parents know what they can spend.

5. Figure out what time you wish to offer your class.  Classes can be offered any time throughout the day, depending on when you're available.  I was only able to do morning classes, and our studio owner held afternoon classes.  We've discovered that it really depends on when parents are available to bring their children in, so sometimes I have full classes and other times I have 2-3 students.

6. Don't overdo yourself!  Remember this is your break too!  Teaching summer classes is a great way to explore new lesson options with multiple age levels.  It can be fun to teach to a different crowd, but remember not to overdo yourself.

Have fun with your summer classes and PDs!

Here are a few successful classes I've offered in the past!


 This post is a part of The Art Ed Blogger's Network: Monthly Tips and Inspiration from Art Teacher Blogs. On the second Tuesday each month, each of these art teacher blogs will post their best ideas on the same topic.

Participating Art Teacher Blogs:

Wednesday, May 24, 2017

End-of-the-Year Project Solutions: June's Stepping Stones


Congratulations! You are almost finished with the school year. It’s time to start wrapping up the remaining projects and finalize the portfolios. On top of wrapping up the final lessons, it’s also time to pack away everything you will need for the next school year. 
We all have different scenarios when it comes to closing up our spaces. If you’re on a cart, you might be doing an inventory on stock before that final push of the cart into your storage space. Some teachers are reassigned to new spaces and need to pack away everything they use for instruction. Others have multiple schools to pack up, and some teachers just close and lock the classroom door. No matter where you teach or what you need to do to wrap up the school year, it’s nice to have projects at the end of the year that are less complex. 
 Here are a few ideas for the end-of-the-year projects that can help with the extra duties of packing:

1. Work with simple materials that are easy to pack away. From personal experience, the last thing you want to be working with on your last day of school is any project that requires heavy liquid paints, beads, gems, feathers, glitter or clay. All your bigger materials should be ready to be packed away for easier cleanup.
There was a year I worked with acrylic paint on the last day of school, and the students had a difficult time bringing their artwork home with their full bookbags. It was an early mistake I do not wish to make again, so please make sure the materials you work with can be something they can take with them on that last day of school.

2. Use tempera cakes or watercolors for easy cleanup and quick dry. My younger grade levels are normally bouncy and excited at the end of the school year. Many times, drawing projects will not be enough to catch and keep their attention in those last few classes. If you even say the word “paint,” kindergarten students will jump for joy. My favorite paint to use at the end of the year is tempera cakes. They are easy to set up and clean up before and after projects. The paint also dries quickly, so even afternoon classes on the last day can take their projects home.

3. Create drawing lessons focused on principles of design. A good majority of my end-of-the-year projects are drawings. You can use up the last of the pencils, rulers, markers and coloring materials to complete your projects. There are plenty of projects you can create with these simple materials—from sketching to still life, portraits to perspective, symmetry to “zentangle” designs. You can have students complete their end-of-the-year project with simple materials.

4. Use up the scraps. Do you save a ton of colored scrap paper for projects? Do you have glue bottles that need to be emptied out? Consider a paper collage–type project to use up all the scraps! What better way to talk about Matisse’s paper cutouts or create paper sculptures while using up what materials you have left!

5. Create simple Op-Art projects. In my upper grade levels, students work with op-art designs to exercise their brains in the last weeks. It’s almost as if they are working toward solving a puzzle within their own work. Op art is a form of abstract art that gives the illusion of movement by using patterns and colors. Using limited materials, students can create amazing optical illusions!

6. Utilize the technology. Are there Chromebooks available? Do you have tablets? Do you have a projector? Whatever you have, you can work within your technology to give the students experiences without all the materials. Create an online Jeopardy game to revisit prior knowledge learned throughout the year. Do you have a Symbaloo (www.symbaloo.com) account? My students visit my art-game Symbaloo table to play games once they’re done writing artist statements.
(Image shared from Parentmap.com)
7. Have a playground or courtyard? Work with your space! On warm days, you can take students outside and work with the environment. You can do sidewalk chalk drawings, or earth art/nature-object art inspired by artist Andy Goldsworthy.

8. Collaboration Days. On those last days of school, you can have students work collaboratively with art games or mini projects. It will help keep students active in those last few classes.
If you are ever stuck on finding quick and simple ideas for the end of the year, visit your social media art-teacher groups and just ask. Many educators are willing to share their knowledge to help you along the way. 
Enjoy the rest of your school year with your students, and stay positive! Summer is almost here!

Tuesday, July 7, 2015

Summer Workshop Series: Wayne Thiebaud-Inspired Cupcake Collages

This week I entered new territory in my teaching career.  For the first time since student teaching, I worked with high school age students, and it was a wonderful experience!  

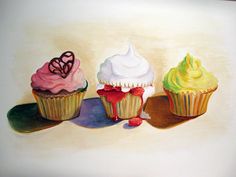
The project we created was a "cupcake collage."  To take a quick step back, when the studio owner and I sat to plan our summer projects, she had the idea to create cupcakes with magazine paper.  I immediately thought of Wayne Thiebaud's dessert creations and thought it was a good tie-in with artist-inspiration!

Wayne Thiebaud is currently 95 years old!  Here's a few pictures of him and his artworks:


Materials
-16" x 16" illustration board
-A ton of magazine pages (it's best to separate the pages, and if you have time, the colors)
-Mod podge
-Brushes
-Pencils
-Scissors
-To water down the mod podge, add a hint of water to about a 1/4 cup of mod podge.  It helps the glue spread and soak into the magazine paper.

Objectives
This project was designed for ages 14-16.  Students will create their own cupcake collage using magazine paper.  They will demonstrate value by showing highlights and shadows within their artwork.

Directions
The project was completed in a 2 day summer workshop (2 hours each class) through Pastiche Studio.

On day 1, we began by looking at images of Wayne Thiebaud's paintings and identifying how the artist created highlights and shadows within his dessert designs.  We especially looked at the cupcake designs to see how Wayne had emphasized his colors to create the values.  I also shared my finished example with the students and explained how the magazine photos can help in creating the highlights and shadows needed for their artworks.


Each students was given an illustration board as their canvas.  We went over how to draw the cupcake wrapper and icing step by step and sized our drawings within the board.  I especially loved how each students chose a decoration for the tops of their cupcakes!  When they were ready to start gluing down the pieces, I explained how we needs to start with the background first and add the layers on top.  I explained to first brush the glue onto the illustration board, place the paper on top of the glue, then spread another layer of mod podge on the paper to flatten down.  Sometimes the magazine paper curls up and needs to be flattened!

Since this was my first time teaching this age group in a few years, I under-estimated the amount of time it would take to complete the background.  I was observing the students and how they paced their time gluing around the cupcake and finding the exact colors needed for the table and the back color.  During the second hour on the first day, I was tearing out pages with colors the students needed to save them time on searching for colors.  So, if you decide to create this project with your students, a huge time saver is having the magazine pages ready in advance!  Sometimes we learn the hard way!


This was the stage we were at after the first day of class.  Table completed, background not as much, but we pushed harder on day 2!


On day 2, the students completed the background within 20 minutes (after I pulled out the colors needed from the magazines).  We then started on the cupcake!

I demonstrated to the girls how to find a magazine image they liked for their wrapper.  They placed the magazine paper on top of their cupcake wrappers and sketched an estimate of size around the space they needed.  I mentioned to the students to trim out the shape larger than they needed in case they traced too small.  Next they glued the entire shape down, as seen below:


For the next step, they found another image that would represent the highlight or shadow of the cupcake.  The students were asked to cut the image into strips with points, then glued down spaced apart.


Now time for the icing!  The students were asked to find a highlight, medium, and shadow of the same color hue.  In most cases, white worked as the highlight.  We trimmed out and glued down the shadow first along the bottom of each icing layer.  Next, the students used the "estimation" trick I shared with the wrapper to cut out the icing medium color for the entire layer.  Once the oval shapes were cup out, they were able to trim down to fit their space.  Lastly, they drew and cut out a skim my teardrop shaw for the highlights of the icing.


For the last step, students filled in their cupcake topping decorations and viola!  Finished cupcake collages!  And they all finished right on time!  I was SO proud of them!!!!


I can't wait to do it again!  If you collect Art News magazines, they have tons of artworks and painting that can be used as textures in your collages!

I went through Pinterest and found that this process has been done before, and I'd love to share what pins I have found.  I would love to try a similar project with the younger grade levels I teach.  I also found a contemporary artist from Texas named Nancy Standlee, who creates cupcake collages too!

Thursday, July 2, 2015

Summer Workshop Series: Winslow Homer-Inspired Pirate Ships


Winslow Homer (1836-1910) was an American painter known for his seascape paintings.  When looking through his artworks, we see cloudy, windy skies, waves in motion, and dulled colors.  When we browsed through project examples, I came across a project from Deep Space Sparkle that inspired the summer workshop project for this lesson.


Materials
-14" x 16" 70# white paper
-10" x 16" white poster board
-Blue, black, and white tempura paint
-Brushes
-Water
-Water containers
-Your fingers
-Colored construction paper
-Scissors
-Glue
-Pencils
-String
-Images of ships for reference

Objectives
The students will create their own mixed media sea scape using paint and assemblage of paper.  They will create foreground, middle ground, and background in their seascapes.  This project was created for students ages 6-9.

Directions
This project was completed during one studio class in a 2 hour length of time.  We started with creating a paint wash sky on the 14" x 16" paper.  We used blue for the sky, then painted in white and black strokes to blend in for cloudiness.  Once the paper was finished, we put it aside to dry.

Next, the students created wavy texture on the poster board using their brushes, then their fingers! These two steps took about a 1/2 hour to complete.


Once the poster board was painted, we put it aside to dry.

We then created our pirate ships/sailboats using colored construction paper.  Here are a few examples I found on Google and shared with my students for ideas in creating their ships:


Construction of the ship took around 45-50 minutes to complete.  Once the main body of the ship was completed, the students took their "mostly dry" sheet of poster board and cut four strip apart.  Each strip was sit to resemble waves in the water.  We then glue down each layer, placing the boat in between the wavy layers.


Once the layers were glued down, students created the mast, sails, and glued down the roped using string or yarn!

Here was the example I made to share with the students:


And here are my students' amazing creations!


Wednesday, July 1, 2015

Summer Workshop Series: Gyotaku Fish Prints


Today I had the opportunity to teach one of my favorite projects, gyotaku fish prints!  Since I had a three hour class and only one student, I introduced three different projects during the two hour class.

Gyotaku (gyo=fish, taku=rubbing) is a traditional Japanese method of printing fish.  This practice dates back to the mid-1800's, when fishermen wanted a way to document the fish they caught at sea.


(images found on Google)

Gyotaku Fish Bowls

We started off with the first project, which is a simple gyotaku print fishbowl.  The directions for creating this project can be found here.


For the other two projects created, we used these silicon rubber fish purchased from Nasco, Triarco, Dick Blick, or any art supply catalog that carries gyotaku supplies…minus the real fish!

Traditional Gyotaku Prints

For this project, we used black tempura paint, one sheet of 10.5" x 16" rice or handmade paper, and the student chose one rubber fish to paint on.  The objective of this mini project was to practice adding the paint to the fish to create the print.  Too much paint will not copy the details of the fish (fins, scales, etc.), and too little paint will only pick up brush strokes and empty spaces.  The student practiced adding the paint to the fish and pressing the paper down to print the fish.

I found a perfect video which explains the process here.  The video (from Sakura) also introduces another project that can be made with the fish molds!


Here is the final product we made from the traditional print!


For the last project, we stuck with the same process as above, but designed a more detailed background using crayons and heavy weight beige paper. Like the fish bowls, the student designed an underwater picture, but added more attention to details with highlights and shadows in the seaweed, shells, rocks, and coral.  Once the background was colored with the crayon, the student chose three colors to paint her rubber fish for printing.


After the student pressed the paper to the fish for the print, she then went back in to fill in additional details, such as the eye and areas the paint did not print over.


Here's her finished product!


One happy student leaving the class with three different projects!