
This week I entered new territory in my teaching career. For the first time since student teaching, I worked with high school age students, and it was a wonderful experience!
The project we created was a "cupcake collage." To take a quick step back, when the studio owner and I sat to plan our summer projects, she had the idea to create cupcakes with magazine paper. I immediately thought of Wayne Thiebaud's dessert creations and thought it was a good tie-in with artist-inspiration!
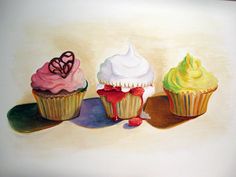
Wayne Thiebaud is currently 95 years old! Here's a few pictures of him and his artworks:


Materials
-16" x 16" illustration board
-A ton of magazine pages (it's best to separate the pages, and if you have time, the colors)
-Mod podge
-Brushes
-Pencils
-Scissors
-To water down the mod podge, add a hint of water to about a 1/4 cup of mod podge. It helps the glue spread and soak into the magazine paper.
Objectives
This project was designed for ages 14-16. Students will create their own cupcake collage using magazine paper. They will demonstrate value by showing highlights and shadows within their artwork.
Directions
The project was completed in a 2 day summer workshop (2 hours each class) through Pastiche Studio.
On day 1, we began by looking at images of Wayne Thiebaud's paintings and identifying how the artist created highlights and shadows within his dessert designs. We especially looked at the cupcake designs to see how Wayne had emphasized his colors to create the values. I also shared my finished example with the students and explained how the magazine photos can help in creating the highlights and shadows needed for their artworks.

Each students was given an illustration board as their canvas. We went over how to draw the cupcake wrapper and icing step by step and sized our drawings within the board. I especially loved how each students chose a decoration for the tops of their cupcakes! When they were ready to start gluing down the pieces, I explained how we needs to start with the background first and add the layers on top. I explained to first brush the glue onto the illustration board, place the paper on top of the glue, then spread another layer of mod podge on the paper to flatten down. Sometimes the magazine paper curls up and needs to be flattened!
Since this was my first time teaching this age group in a few years, I under-estimated the amount of time it would take to complete the background. I was observing the students and how they paced their time gluing around the cupcake and finding the exact colors needed for the table and the back color. During the second hour on the first day, I was tearing out pages with colors the students needed to save them time on searching for colors. So, if you decide to create this project with your students, a huge time saver is having the magazine pages ready in advance! Sometimes we learn the hard way!

This was the stage we were at after the first day of class. Table completed, background not as much, but we pushed harder on day 2!

On day 2, the students completed the background within 20 minutes (after I pulled out the colors needed from the magazines). We then started on the cupcake!
I demonstrated to the girls how to find a magazine image they liked for their wrapper. They placed the magazine paper on top of their cupcake wrappers and sketched an estimate of size around the space they needed. I mentioned to the students to trim out the shape larger than they needed in case they traced too small. Next they glued the entire shape down, as seen below:

For the next step, they found another image that would represent the highlight or shadow of the cupcake. The students were asked to cut the image into strips with points, then glued down spaced apart.

Now time for the icing! The students were asked to find a highlight, medium, and shadow of the same color hue. In most cases, white worked as the highlight. We trimmed out and glued down the shadow first along the bottom of each icing layer. Next, the students used the "estimation" trick I shared with the wrapper to cut out the icing medium color for the entire layer. Once the oval shapes were cup out, they were able to trim down to fit their space. Lastly, they drew and cut out a skim my teardrop shaw for the highlights of the icing.


For the last step, students filled in their cupcake topping decorations and viola! Finished cupcake collages! And they all finished right on time! I was SO proud of them!!!!


I can't wait to do it again! If you collect Art News magazines, they have tons of artworks and painting that can be used as textures in your collages!
I went through Pinterest and found that this process has been done before, and I'd love to share what pins I have found. I would love to try a similar project with the younger grade levels I teach. I also found a contemporary artist from Texas named Nancy Standlee, who creates cupcake collages too!


