Showing posts with label Portrait. Show all posts

Tuesday, June 23, 2015

Summer Workshop Series: Modigliani Self-Portraits


This week, I held a 2-day workshop teaching students (ages 10-13) how to create a self-portrait in the style of Amedeo Modigliani.  Amedeo Modigliani (1884-1920) was an Italian painter and sculptor who is known for his elongated portraits with almond-shaped faces.  When he moved to Paris in 1906, he came across Pablo Picasso and Constantin Brancusi!


Since the studio I taught at was up and coming, not many students had heard about our classes, and with this being our first project, we had one student.  One is better than none!

Materials
-12" x 18" canvas
-pencil
-acrylic paint
-water
-water cups
-brushes
-paper towels

Objectives
Inspired by the style of Amedeo Modigliani, students will create their own elongated self portrait.  Students will also be learning painting techniques throughout the process of creating the painting.

Directions
Day 1: Each class was 2 hours in length.  We began by talking about Modigliani and identified elements of his style that stood out in his artworks.  After viewing images of his portraits, students began drawing their portrait sketch onto the canvas.  We started with the background first, them moved our way up each layer (background, skin color, shirt, hair.  After the 2 hours were up, the first layer of colors were placed down.

Day 2: When the student returned the next day, we worked on the details.  We started with the hair, adding highlights and shadows with different shades of blonde.  We then moved onto the skin tine, adding shadows and highlights to the chin and eyes.  Next, we covered the eyes and mouth, finalizing with tracing the facial features with raw umber.  Once the face was done, we moved onto the shades in the shirt, then finished up with re-tracing the outline of the portrait from the background.  Two hours flew by fast and we had a finished product!

Here's the example I had made to show the student(s):


Here's my student's project in progress and finished!


And while my student worked on hers, I started another one!


During the two days, we had multiple phone calls for more students signing up for future classes, so stay tuned!

These classes are taking place at Pastiche Studio in Mokena, Illinois.  To view details about the studio, classes available, and paint parties, please visit their site!

Monday, April 29, 2013

Community Quilts with 4th Grade


Did I ever mention that Faith Ringgold is one of my favorite artists?  I love the messages in her story quilts: community, heritage, harmony...

Ever since I walked into the Chicago Cultural Center back in 2000 to view her quilt exhibit, I was hooked on her quilts.  I was even a great honor to shake her hand after receiving my bachelor's diploma at my commencement ceremony at the School of the Art Institute of Chicago back in 2001.  And yes, I've met her again since then.

My students think it's cool that I've met a famous artist.  When I show them the picture, they always say, "You met her?  That is so cool!"  or I'll even get, "She's real?"  Yes...I get that.

I like to introduce a project inspired by Faith Ringgold's community quilts around the end of February/beginning of March.  I tie in Black History Month and continue with Women's History Month since this project could take a few weeks.


Before the students know what the project is about, we spend time reading a story written by Faith Ringgold called "How the People Became Color Blind."  The link takes you directly to her website with a story you can print out and read to your class.  After we read the story, the students and I have a discussion about the story, asking questions about how we would feel if the world was all one color.

Here are the materials for the project:

-10.5" x 10.5" white paper, 60lb. (thin paper will rip from the paint)
-12" x 12" color paper (if you frame each picture)
-pencils
-paper plates (my palettes)
-multicultural tempura paints for skin and hair
-tempura paint
-brushes
-water and water bowls
-black markers

When I'm ready to start the project, I go over step by step how to draw the face.  This project is also my main portrait project with 4th grade, so many of them are starting to draw faces for the first time (my district has a high transient rate).  I start with the oval face, then show where to draw the guidelines for the eyes, nose, mouth, and hairline.  The students are always fascinated that their ears start and end on their nose lines too!

Here are two print-outs I found on Pinterest that can be used as guides for the students:


After showing the students how to draw the face and shoulders, I encourage students to draw other details that would define who they are (for example, flags that represent pride and heritage, or drawings that represent what the student likes and cares about).

The point is to have all the students create painting of their individual selves, then combine them together to show our school community.

Day 1 of painting is for the neutrals and flesh tones.  I put out a plate of different peaches, browns, and tans, along with black and white.  I tell the students to paint their face, leaving the eyes open (sometimes the students paint over the eyes!), and to not forget the ears and neck (yeah, that happens too!).  I also encourage students to paint their hair color, and if they have brown eyes.

Day 2 of painting is for the other colors of the rainbow, which can be used for clothing, background, eyes, and jewelry.

Day 3 is for touch ups.  It's a pain trying to carry ALL those colors on a cart or to pour ALL the colors for the students who were absent or behind, but it has to happen.  I normally have a bin for neutrals/flesh tone paints and a bin for the other colors, and I have students carry the bins for me back to the storage room.  Also, don't pour every single color out on the plates, it takes too much time and not every student needs all the colors!  Instead, I have the students at each table tell me what colors they need and I can pour it twice as fast as I would pouring all the colors out.  Many students may be done with painting on this day too, so I have them trace their pictures with black markers.  This helps bring the eyes, noses, and mouths back from painting over them.

Day 4 is for final tracing and display.  You can choose to have each picture framed themselves, or you can display the paintings together as a "quilt" by gluing each block onto a sheet of kraft paper from the big tools.  I also trim strips of colored paper to add a top frame to each project (which protects the paintings from students bumping into the displays on the walls in the hallway).

Here are some close-ups of student projects from past displays!


Wednesday, April 3, 2013

Self Portraits with 5th Grade


"Expressive Self-Portraits" is a project I like to visit with my 5th grade students in the Spring.  It's a nice projects to work with on the cart since the materials are light, and your students do a bit of self-reflection of themselves.

All you need for the project is:

-White paper ( size to your liking)
-Pencils
-Markers
-Black Marker to Trace

My students are very self-consious about doing self-portraits, even thought we've been drawing them since kindergarten.  Students at this age are always afraid of being laughed at, yet at the 5th grade level, students have demonstrated throwing a very high amount of creativity into their work.  I'm amazed as to how well the 5th graders take in their projects and create some amazing works!

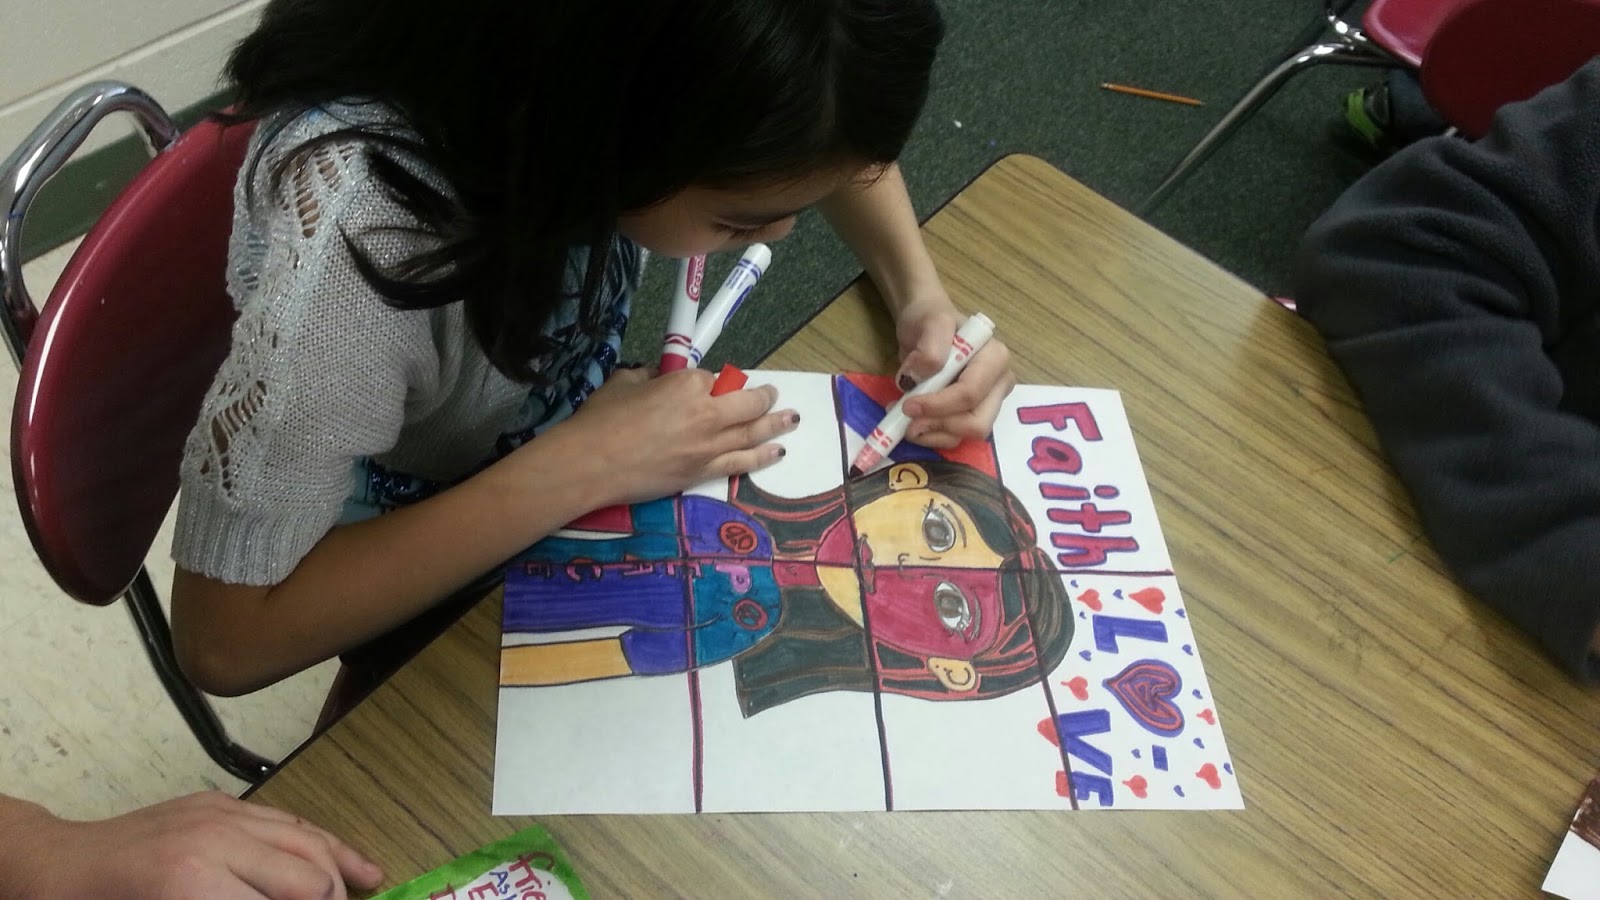
I start the students off by re-visiting the portrait; where parts of the face are placed, and especially the hair line.  I give the students the first day of art to draw their portraits, plus add drawn details to their backgrounds to make it more creative.  Since their classes with me are 40 minutes, I like to give them time to refine their drawings and add their details.  On day two, I go over color theory, and how colors can represent parts of their personality.  I write the colors on the board to help them with their decisions.  I also encourage them to use colors that could represent their favorite sports teams.

Here's the list of colors I list on the board with their meanings (although colors have many different meanings in other cultures, I stuck with the basic color psychology):

Yellow: Cheerful/Impatient
Orange: Cautionary/Outgoing
Red: Passion (reaching a goal), Anger
Pink: Compassion/Immature
Green: Growth/Greed
Blue: Sadness/Peacefulness
Purple: Creative/Immature
Brown: Lazy/Organized (I know...polar opposites!)
Gray: Neutral/Depressed
Black: Secretive

Besides going over colors, I also have students fold their paper into sections so they can color each section with a different part of their personality, like this:


Notice how the picture isn't colored realistically?  I didn't want the students to create their picture to look exactly like themselves, I wanted them to show their personality.  Each section is colored differently, and their face is also colored in.


I like how much students have been able to express their personalities in these drawings!  The tie it takes to complete can stretch depending on the details, but once finished, I'm amazed with how beautiful they look!