Showing posts with label Kindergarten. Show all posts

Sunday, February 11, 2018

Elementary Projects for Valentine's Day

Looking for projects inspired by Valentine's Day?  Check out the lessons I created with K-3!  Some projects were inspired by other lessons I have found over the years, so I tried to share the blog posts from other teachers who inspired my lessons.

Romero Britto Heart Paintings with Kindergarten


Materials: Pencil, Paper, Black Marker, Tempura Cake Paints

Duration: 1-40 minute class period

Directions: Start by sharing pictures of Britto's art with your kindergarteners!  Share how he created designs in each space of his art, such as dots, lines, colors, etc...now's the fun part!  Have your binders practice drawing hearts!  Some may struggle at first, but once they get the loop and points, they'll go crazy with their hearts!  Using pencils, have students create one or more hearts to fill their paper, then draw in lines and shapes.  Once done, use a black marker to trace, then tempura cakes to paint in the spaces!


Contour Hearts with 1st Grade

Materials: Heart Templates, Pencils, Paper, Oil Pastels, Tempura Cake Paints

Duration: 2-40 minute class periods

Directions: For Day 1, start by talking about how the hearts can overlap (one in front of the other).  Have the students use heart stencils to trace out about 10 hearts (overlapping to fit them in the paper).  Once traced, have students use oil pastels to trace, color in, or add patterns to each heart.  On day 2, have students finish filling in the hearts with oil pastels and fill in the rest of teh paper with tempura cake paint!


Symmetry Hearts with 2nd Grade

Materials: 9 x 12 colored paper, 12 x 18 colored paper, pencils, scissors, glue

Duration: 1-40 unite class period

Directions: As a one class project, the object is to have students achieve the illusion of symmetry with the heart design.  Using the 9 x 12 paper, draw half of a heart, cut the shape out, then glue the outer piece to the edge of the 12 x 18 paper.  Draw another heart inside of the already-cut heart, cut it out, and glue on the opposite side.  Draw, cut out, and glue down about 3 more heart shapes and you have a finished piece!


Positive/Negative Space Hearts with 3rd Grade

Materials: 9 x 12 colored paper, 12 x 18 colored paper, small baggies, pencils, scissors, glue

Duration: 2-40 minute class periods

Directions: On day 1, talk about positive/negative space in art.  Using the 9 x 12 colored paper, draw and cut out a heart shape.  On each side of the heart, draw and cut out shaped that will be reflected in the finished artwork.  Please Note:  Use the baggies to store the pieces once they are cut out.  This prevents any lost pieces, plus it's 100% easier with clean up.  Once all pieces are cut out, glue down the big heart.  On day 2, show the students how to glue the pieces down to reflect the empty space.  Not all students will finish right away, you will see that it may take the entire time for many students.

This project was also achieved by many other schools and can be found here for 5th grade and here for 6th grade.


Love Paintings (Inspired by Robert Indiana) with 3rd Grade
Image result for robert indiana love

Materials: LOVE Stencils, 10.5 x 10.5 white paper, Pencils, Black Markers, Tempura Paint

Duration: 2-40 minute class periods

Directions: On day 1, we discussed the artwork of Robert Indiana, then folded the white paper to make 4 squares.  We then began tracing stencils to spell out L-O-V-E in each square.  Students then began painting colors in the letters and in the backgrounds.  On Day 2, students finished up on painting.  If they finished on the first day, each letter was traced with marker to cover any loose paint lines.


Heart-Shaped Coil Pottery with 3rd Grade

Materials: Ceramic Clay (or air dry clay), Water, Canvas, Desired Paint (Glaze or Acrylic)

Duration: 2 40-minute class periods

Directions: On Day 1, discuss how to create a coil pot using ceramic clay.  Start with rolling a small amount of clay into a ball, flattening it down then rolling coils to wrap around the flat base.  Use the water for the slip process to make the coils stay together once dry.  Once the pot is completed, pinch the top and bottom of the top of the pot to form the heart shape.  On your own, fire the pottery for your next step.  On Day 2, (depending on your resources) paint the pots using either glaze (if kiln is easily accessible) or acrylic paint (if you can't fire again).  


SaveSave

Sunday, January 3, 2016

Mouse Paint with Kindergarten


It's time to start color mixing with the Kinders!  Painting with Kindergarten is scary, but with teaching responsible behaviors, it can be one the the best classes ever.  Kindergarten students always ask in the beginning, "When are we gonna paint?????"  After careful planning and explanation of care, it's finally time!

I like to introduce the project and activity by reading the book "Mouse Paint" by Ellen Stoll Walsh.  In the book 3 white mice find the primary colors in paint jars and dance around, discovering different colors mixed on their feet.

After reading the book, I go over how yellow, red, and blue can make the secondary colors.  Before I get ahead of myself, here's the list to set up:

Materials
-Mouse Paint by Ellen Stoll Walsh
-This amazing activity sheet that I found within Pinterest, and a huge thanks to whoever designed it!


-Yellow, Red and Blue Tempura Paint
-Styrofoam plates
-Black marker
-Pencils
-Medium brushes
-Water containers and water
-Pre-cut paper towels
-Tablecloths

-white paper
-pink paper
-scissors
-glue

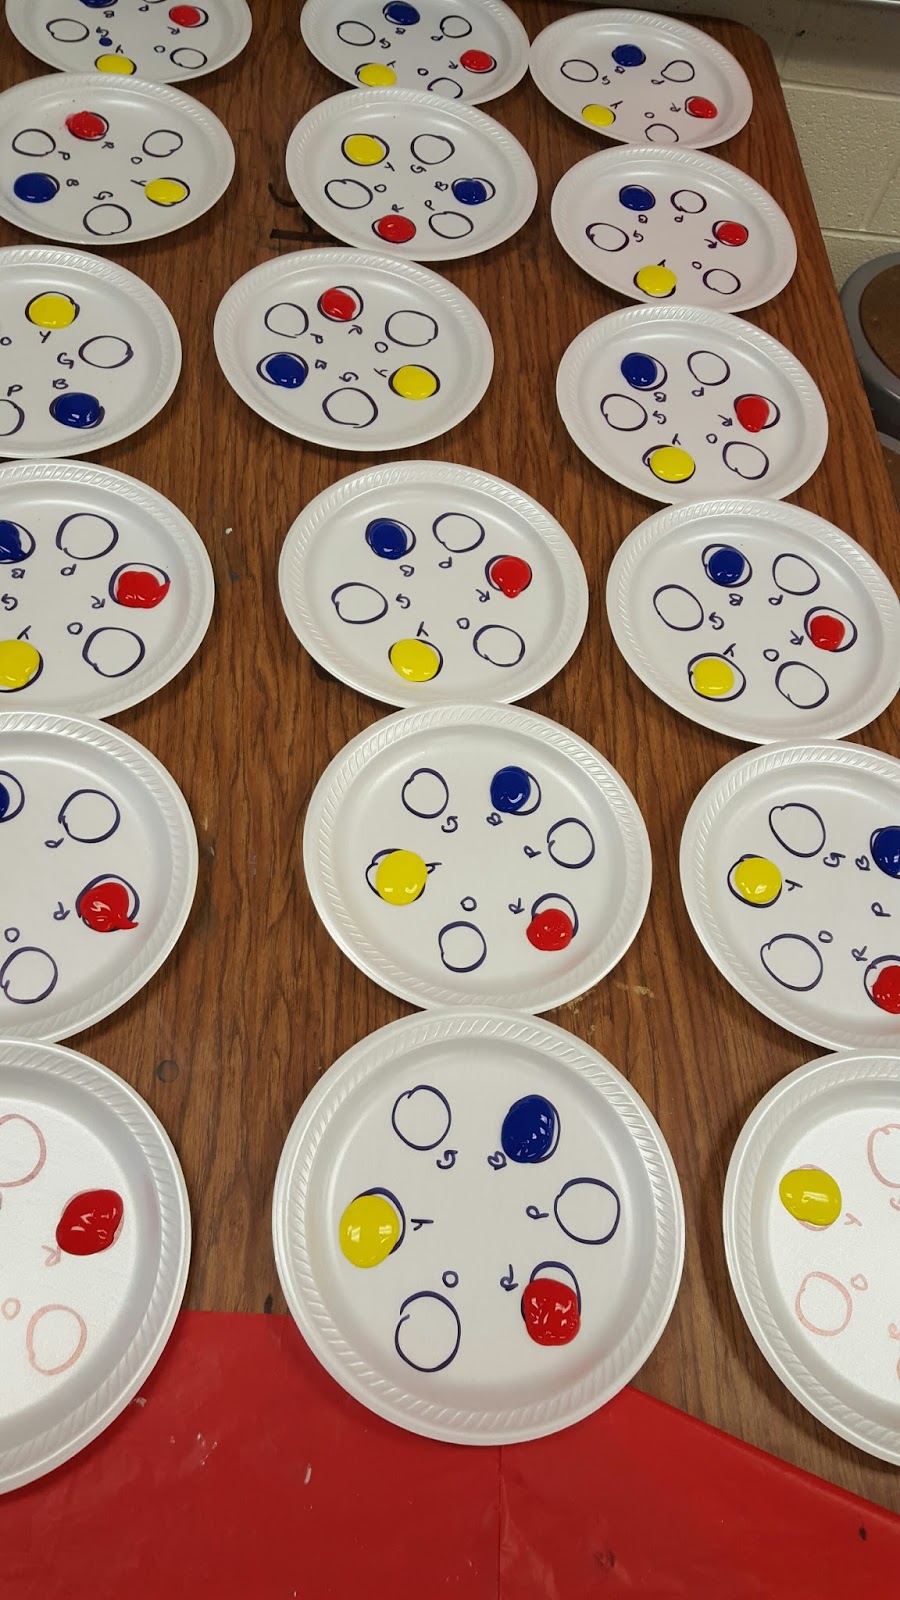
Here's how I set up the plates in advance.  I do not have much room to store in advance, so I started setting this up in the previous class.  I also drew circles and added the first letter of the color word on the plates to help the Kinders with their color identification.


Objectives
Students will not only learn how to be responsible with painting materials, but also explore how to mix colors to create other colors.

Directions
This project took approximately 2 40-minute class periods to complete.

Day 1: Start off by reading Mouse Paint to the students.  Once finished, go over the colors that were mixed by the mice in the story.  Show the students the activity sheet to help in mixing colors.  Demonstrate how to properly take a small amount of paint to mix the secondary colors between the primaries (if you don't, students will mix the entire plate).  Have students complete the activity sheet.  Once activity sheet is complete, collect sheet and place a white paper in front of the students.  Inform students to create their own painting with the colors they mixed.

Day 2:  Since the paintings are now dry, today they'll start making their mice!  I created a template of 3 ovals (ran through the copy machine for the amount of students) and had students cut out the ovals.  Using pink construction paper scraps, students drew and cut out the ears, and cut a thin strip for the tails.  Using a black marker, they drew in the eyes.  As easy as this step seemed, you will having students finishing in 10 minutes and others finishing last minute.  Have students glue their mice wherever they want on their painting, as if the mice are making the painting!

The one step I would still like to add on is a paintbrush.  Since this was my first time with the lesson, I wanted to see the length of time it took to create the mice alone.  If I were to add on paintbrushes for each mouse, I plan on having the brown strips pre-cut to save on time with construction.


 Here's some finished example by the Kindergarten students!  


(This is one of my special needs students.  He doesn't normally like cutting, drawing, or gluing, but he LOVED painting!!)

(This student remembered that at the end of the book, the mice left a spot white because of the cat!)


Friday, July 25, 2014

Rousseau Jungles with Kindergarten


Henri Rousseau was a French painter, who’s jungle pictures are an combination of memory images of his Mexican trip, visual experiences from visits to botanical gardens and zoos, and depictions of plants and wild animals he had seen on postcards and in photographs. 


Materials
-10.5" x 16" light blue paper
-12" x 18" colored paper for frame
-cut strips of brown paper
-pre-cut triangles of different shades of green paper (cut strips of 3" paper, then use paper cutter or scissors to slice diagonally for quick triangles)
-pre-cut squares (approx.  3" x 3") of greens, yellow, and/or orange paper
-pencils
-glue
-scissors
-white paper
-black marker
-colored pencils or markers


Objectives
(Science Connection) Students will identify animals that live in the jungle, as well as the plant life that grows in the jungle environment.  Inspired by the paintings of Henri Rousseau, students will create their own jungle scene and hide animals within their environment.

Directions
This project can take about 3-40 minute class periods to make.  

On the first day, the students and I look at paintings by Henri Rousseau and identify the plants and animals in the jungle.  We then discuss how to create the jungle scene, starting with the plants and trees.  For the remainder of the class, students trim and glue down trees, branches, tree tops, tall grasses, and if time allows, a sun and fruit in the trees.

On the second day, I share ways to draw the animals using simple shapes.  Students choose at least 3 different animals for their picture, draw them on white paper, trace, then color.  I do not have students cut out on this day because clean-up is a mess with many little loose un-glued animals all over the ground.  

I've learned that leaving the cutting and pasting is best for day three, which also gives room for finishing touches (like the students who wanted to add a sun or finish a tree).  Have students trace a thin circle around the animals before cutting out.  This saves the trouble of having heads and tails accidentally cut off since students will have a line to follow instead.  Students can then glue down their animals wherever they wish in the jungle, as long as it's within where the animal should be (no turtles in the sky!).  When students have finished their jungle landscapes, glue a 12" x 18" paper to the back for a frame


Saturday, July 5, 2014

Spring Science + Art Projects for K-2

At the end of the school year, I was packing up the classroom like everyone else, except I had to pack for a cart next year.  With so many materials to put away, I was brainstorming on what project I could make with the primary grades with minimal materials, exciting for the students, and tied into their curriculum.  I decided upon two projects that could adapt for grades K-2, integrating science and literature, with a Spring theme.

Kindergarten Grouchy Ladybugs
Inspired by the story "The Grouchy Ladybug" by Eric Carle


Kindergarten students are very familiar with the work of Eric Carle, especially since I like to create lessons inspired by many of his books.  For this project, I only used white paper, pencils, crayons, and tempura cakes (with paintbrushes and water, of course).

We started by reading the book together, then identifying the many insects and animals the ladybug encountered throughout the book.  We also talked about where the ladybug lived and what insects would live in the same patch of grass and leaves.  I demonstrated to the students how to draw the grass, some of the insects, the ladybug, and left the other animals to the kids' imaginations.  Some students chose to work with just ladybugs, while others added different insects to their pictures.  Once the students were done drawing, the colored with crayon and painted with the tempura.  Easy clean up!


1st Grade Insects Studies
Exploring insects in nature


Did you know that if you googled "bugs in a jar," you'll get more art project images that pictures of jars?  This is one popular project with students because they not only love drawing the insects, but their studying the insects in nature.  Through art, they're also learning science by identifying the parts of the insect, what they eat, and where they live.  Having the tempura cakes out from kindergarten made it easy to share materials between grade levels.  To prepare the project, I created a packet with pictures of insects for the students to draw from.

The additional materials are:

-10.5" x 16" white paper trimmed into a jar
-pencils
-black markers
-colored paper scraps for lids
-hole puncher
-tempura paint
-paintbrushes and water
-12" x 18" colored paper
-glue

We discussed together what insects we have in our own backyards and how we safely collect them.  Students like to take the time to identify the parts of the insect and what shapes are used to draw them.  Students had to draw at least 7 insects to fill their jar, watching their space and size of the insects.  Once drawn, they traced with black marker and painted in with tempura paint.  For finishing ouches, students glued their jars to colored paper, trimmed a lid, and punched holes in the lid before gluing down.


2nd Grade Insect Studies
The 2nd grade students were also introduced to the same project, but they were given a few extra responsibilities.  First, they were shown how to cut the jar shape themselves.  The 2nd grade students had previous knowledge of creating symmetrical designs with paper folding, so the task should not have been daunting.  The students also had to cut out their lids themselves to fit the top.

I don't always use one project for different grade levels, but since this one was introduced this past school year, the project will only be used for first grade in the future (so the next batch of 2nd graders will not have to do the project twice).