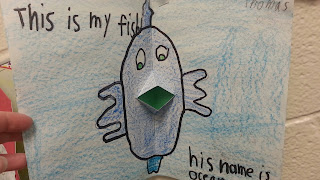
Toward the end of the year, I like to have my 1st graders create their own books. The teachers love the idea, and with little space to hang projects when traveling or on a cart, the teachers have offered to hand the books in their own space to show off the cross-curricular artworks.
(inside)
This is a 2-day (40 minute period) project. I start by introducing the book "Tuesday" by David Wiesner.
I explain to the students that books do not always need words to tell the story; the artwork can do the same exact thing. Together, we describe the story as we see it. The students always crack up at this page (when the frog is changing the channel using his tongue):
When we finish with the book, I start to explain how the students will create their own storybook. Here are the materials we use for the project:
-9" x 12" white paper (folded in half, cut a small slit in the middle of the fold to create a talking pop-up mouth, and with over 100 of these to make, I have student helpers)
-9" x 12" colored paper (for book cover)
-4" x 5" white paper (for front cover illustration)
-Pencils
-Black Markers (for tracing art and words)
-Crayons
-Colored Pencils
-Glue
My objectives are to create a pop-up drawing of their favorite animal, create a book cover illustration, and write at least two sentences about their animal that describe what the animal, if it's a boy/girl, and what it's name is.
After reading the book, I show the students how to start the inside drawing of their animal. I have posters of animals on the board (with the spelling of the words when they write their sentences). I show the students how to start the animal drawing around the cut-out mouth by drawing a big circle, then adding the animal parts.
When the students finish the animal drawing, they are told to write the two sentences. I assist their spelling by writing the names of the animals on the board, as well as the two main sentences:
This is my _____________. (fill in blank with animal word)
His/Her name is _____________. (fill in the blank with animal's name)
I encourage students to write an extra sentence or two if they want to describe what the animal does. With the variety of students learning styles in the classes, I adapt for gifted, ELL, and tiered students.
Once the sentences are written and the animal is drawn, I encourage students to trace in black marker and color in with crayon.
On day two, students finish up with the inside of the book, them bring it to me for a front cover glued on. If you have students glue the cover on themselves, have them glue an "X" on each side of the fold like this:
After handing me their books, I give them the small 4" x 5" white paper and instruct them to draw a picture of their animal again for the front cover. Be sure to describe what you want them to draw..if you just say "draw the animal," you will get a stick figure colored in dog with no background.
When the students complete their little cover drawings, they glue it to the cover of the book. I also instruct them to write the name of their animal as the book title on top, and "By (insert student name) at the bottom because they were the authors and illustrators of their own book.
Yeah, that's right...we talk about the parts of the book they should know about!
1. How the book is opened (you will get students who glue it backwards Eastern style)
2. Who the Author and Illustrator are
3. What a "Title" is
4. Where to put the author's name
5. How drawings and words describe the story
Here are a few finished books!
(front cover)
(inside)
(front cover)
(inside)
(front cover)
(inside)
(front cover)
(inside)
(inside)
(front cover)
(inside)


I love pop up cards and yours is gorgeous.. Have you ever see the Pop Up Books . I found them on google, their website : http://popupcard.net. This company make pop-up cards really by hands.
ReplyDelete