Wednesday, August 22, 2012

The Room is Finished! Art Room Show and Tell!

Alright, it's art room show and tell!  Today was the first day the students came in to meet their teachers and I was in my room in the evening hours doing finishing touches.  I wanted to share a few pictures of what I have done differently (thanks to the world of Pinterest) and why I chose to make the changes.


Here's the entrance to my room.  I share it with the music teachers, hence the shelf filled with instruments.  When I first walked in, I said,"The kids are going to head straight for the instruments!"  There will be a covering during the day to prevent the distraction.  I have four tables to the left, and three tables to the right that are behind the shelf.  All students can easily see me in front and down the middle of the room.  The center table is for demonstrations and materials to be distributed.  The middle cart is my "creation station" for common supplies, like pencils, glue, and scissors.


                                                          Here's the station label!


                                                  Here's the cart with the materials...


                                            Look familiar? Covering the coloring sheets!


                                                           Labeling the Tables
And next comes the table numbers!  Since there were 7 tables, I labeled them with the elements of art!  Can you name each one?


                               Visuals and Displays, aka "Eye Candy for the Art Room"
I just can't have a blank wall, it drives me crazy!  With all the space available, I cover it with more visual learning.  The wall below is Art History with examples of each art period:


                                                  Here's another view of the same wall.


                                           My elements of art and principals of design wall


I still haven't figured out this wall.  I hang my favorites, the I need the rest of the space for storage.  Art projects are filed by colors for each day, paper rack is organized!


My desk area with the national board certification plaque to remind me of the hard work it took to get where I am.  I have a technology cart and a cart for taking clay to the kiln room in the Jr. High section of our school.


I love this idea!  I needed some visual examples of what habits I'm trying to get my students to change (like rushing their coloring!)


                                                                     Resources
My resource library is a growing collection, and I'm about maxed out!  The top shelves are books to read, such as children's books about artists, stories about art (like Olivia Paints a Mural), and Visual Literacy.  The second shelf is filled with drawing books, separated by categories and always mixed up at the end of the day.  The bottom shelf is for the younger students: shapes and pattern games and dry-erase boards with markers.


                                                              Personal Touches
   I can't forget to show the doors!  To see each one, please visit my previously written blog posts.


                                                              Welcome Messages
                                                     Yeah, I got this from Pinterest. :)


And this was just the first school!  I still have another school classroom to finish up, but I can give you a sneak peak of what I'm working on!


Sunday, August 19, 2012

Revisiting "Juggling the Schedule"


I'm published!  Having your work published in a magazine for the first time is an exciting feeling.  I hope I can help many others who struggle with traveling/cart situations, and I'd love to hear from any of you that have advice yourselves to share.

When I started this blog a year ago, I wanted to help others in similar situations.  I could not find any research on how to manage traveling with materials or pushing a cart from room to room.  Many times I heard from "art cart" teachers that they were just too busy to document or write about it.

It is hard, I must admit.  Over the past few years, I've adapted and pushed through my challenges, and I am proud to work with my fellow co-workers.  And to all the art educators out there, cart pushers, art roomers, and travelers alike:  I'm proud of what you do.

To view the article, click the following link:

Stepping Stones: Juggling the Schedule

Tuesday, August 14, 2012

How Does P.B.I.S. Work With the Art Class?

PBIS (positive behavior interventions and support) was implemented in my home base school two years ago.  At the time when it was introduced, we were having an extremely difficult time managing the students' behavior as a team.  If students entered my art class, they felt their behavior had no effect on the rest of their days, even if I called home or gave a detention!


Here's a link to the PBIS website with more information: http://www.pbis.org

 As one of our first steps, we introduced "cool tools," which are simple phrases the students can remember throughout the day.  We also held assemblies to go over the tools and help the students remember the phrases.  Some of the phrases we use are:

Watch While Walking
Stash your Trash
Zip your Lip
Quick, Quiet, Clean
Leave your Attitude at the Door
Kindness is Contagious


                                                       Cool Tools for the Art Class

When I watched the assembly to introduce these tools, the speakers were listing off where these tools could be used...the lunchroom, bathroom, classroom...and I never heard art room.  I stopped and said to myself, "Wait!  We can use these anywhere in the school!  Just because I didn't hear the assembly speaker list it off as an example doesn't mean I can't use them myself!!!"  So, I started using them!

Watch While Walking:  Students enter the art room and they may bump or trip over artwork!  Or...when you push your cart into the room, the students need to watch and not bump into your materials!

Stash your Trash: I repeat this all the time to my students, especially when they leave paper towels in the sink!  I remedied that by posting a friendly reminder in front of the sink.


Quick, Quiet, Clean: I give the last five minutes of class for students to clean up their materials.  If the sink is needed for washing hands, the students say"Quick, Quiet, Clean" while washing their hands to limit their time.  When I'm on the cart, they have to go one at a time to the bathroom to wash their hands.  Sometimes, the students forget a word...they clean, but their loud.  Or they're quiet and cleaning, but they're not quick.  That's when I have to remind them of their points system (will be discussed below)!

Zip your Lip:  If a student talks while I'm demonstrating a project, the other students say, "Zip your lip!"  It's funny when kids tattle on each other.

Leave your Attitude at the Door:  I admit one of my biggest pet peeves is when students bring outside drama into my room.  I see them for 40 minutes.  It's not that I don't care about them, but their worries and attitudes slow them down...especially when they're in 6th grade!  If your students have legitimate problems, then you need to be there for them.  But, if little Susie took Becky's apple at lunch, that can stay outside the door.

Kindness is Contagious:  I love this one!  When students hear "contagious" they think of colds and sneezing, so when I talk about this with kindergarten, I love to pretend to sneeze out "Thank you!" or "Please!" which makes them giggle!  When a good deed is seen, make it known how awesome it is.  The students feel more confident when they see their positive behavior being recognized.


                                                          Student Accountability

After our first year, we did notice an improvement, but we still were not quite there.  A system was in place to reward positive behavior, but we still needed accountability for negative behaviors in school.  Every teacher had their own systems in place, but when the students transitioned into a specials class, lunch, or recess, the students basically acted as if their actions didn't matter.  In our second year, we introduced a "check" system.  I discussed this in a previous post, but I wanted to re-visit it because this system was so effective, other schools in our district started using it.

The homeroom teachers were given a clipboard that was to be used in the classroom and taken to every specials class and in the lunchroom.  Attached to the clipboard was the class roster, which was set up as a chart for the week.  Teachers made multiple copies for the next few weeks.  This way, a check was added to the board and the behavior mark was carried throughout the day.  If a student misbehaved, they got a check.  If a student didn't follow a cool tool, check.  Fighting or physical contact was automatically an office visit, but name-calling went on the board.

One check: Warning
Two checks: Half of recess (walking or time out)
Three checks: All of recess
Four checks: Detention, note and/or phone call home

If a students received a check in the morning, many times they tried their best to not get another one by the end of the day!

If a student had three checks before art class and received a fourth with me, the teacher and I worked out who who write the detention and call home.  It worked well, and I leave my happy face :)

Our school also had incentives for positive behavior.  If a student lasted an entire quarter without a check, they were invited to special events at school, like pizza parties, pancake breakfasts, or special assemblies.  At the end of the school year, the students who received no check marks all year were given trophies!

To answer the main question above, PBIS works very well for the art class, in classroom and on a cart. The system helps the entire staff work together to share the positive behavior and to make students accountable for their actions, positive or negative.  If your school does not have PBIS is place and you're having management issues throughout the school, recommend this program to your administrators.

Sunday, August 5, 2012

Little Screamers in 1st Grade

At the end of the 11-12 school year, I found this project and used it as the last art project of the year with the 1st graders.  This coming school year, I want to use is at the first project of the year since they can be hung up during open house!

This project is also inspired by the painting The Scream by Edward Munch.


The project is very fun, but you will need extra time for prepping.  The materials you need are:

-Digital Camera (photographing students posing for the scream face)
-Printer (make sure your colored ink is full!)
-Printer paper (size your printed pictures as 5" x 7")
-White Paper (cut to 5" x 7")
-Black Markers
-Crayons
-Glue

The week before you do the project, take pictures of your students posing like this:


(I would show you the actual photograph, but the originals are stuck in my computer at work, and I'm at home for summer!)

Prepping for the Lesson: Take the entire class's picture while they are finishing their previous project.  Do this for every 1st grade class you have during the week.

Also, during the week, print out a class at a time (and store the photos in a large envelope!).  When you have a 6th grade class, you can ask them to trim the 1st graders out of the pictures, or if you're sitting in a meeting, trim the kids out while you're paying attention to the notes (I'm a multi-tasker...I can't help it).

The Lesson:  Ready with their pre-cut photos, you can introduce the project!  I start by showing the students the photo of The Scream by Edward Munch.  We have fun posing like the screamer, and asking why we think the man in the picture is screaming.  We also look at the lines in the background and discuss the movement in the picture.

When we're done with the discussion, I show the students how to create a background with lines that show movement.  Since we're limited to 40 minutes of time, I tell the students to just use black markers to draw their lines.

1. Start with the diagonal lines that show the path and the rails of the fence:


2. Add the vertical lines for the posts of the fence (I tell the students to use rectangles):


3. Next, add the horizontal line (I call it the ground line)


4. Lastly, add wavy lines that show motion.  Describe how the lines show cloudy skies or a pond if you'd like!


Once the students are done coloring the entire picture, have them glue their pictures onto their background like this:


I giggled at every picture that finished!  I can't wait to see what this year's pictures will look like!

Friday, August 3, 2012

SImple Art Room Fixer-Uppers Part 2

Funny story...

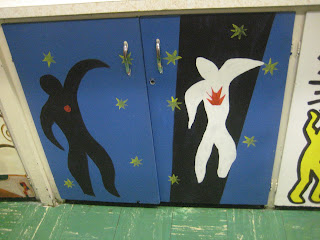
I went to install my cabinets, and found that two sets were mismatched.  I guess I should have labelled them right when I took them down to bring home!  Lesson learned, I brought the two doors home and repainted them.

As I was installing the cabinet doors and setting up the classroom, I was looking at another set of doors that were driving me nuts.  So, I brought the next set home and before midnight I had Klimt's "Tree of Life" painted!

Here are the finished, installed doors in the room!


Set #1: Piet Mondrian!


Set #2: Henri Matisse


Set #3: Keith Haring


Set #4: Vincent Van Gogh


Set #5: Gustav Klimt

Now that my home base school is set up, I can tackle my next classroom at my second school next week!  My next challenge:  Starting a classroom from scratch (I'm used to teaching from a cart at my second school!)

Thursday, August 2, 2012

Preparing for the New School Year: Visual Positive Behavior Plans

This year, I will be teaching at two schools instead of three.  I was also told that I will have two classrooms!  With everyone asking me how excited I am, I admit I'm nervous.  I was used to teaching from a cart, plus I am sharing the room with another art teacher.

So this week was setting up school #1, my home base school.  I share the room with two music teachers (who travel by cart during the day).  With my home base school also being the only school that takes on summer school classes, the boxes that are ordered every year are sent to my room first before being dispersed.  Basically, my room looks like this right now:


I'm pretty used to it and I learned to work around it!  Within a week, these boxes will be dispersed and the room will be ready for my creative thinkers.

One of the many activities I accomplished during the summer was researching all the sites I pinned on Pinterest.  Before I unpacked my classroom, I reviewed some ideas I found and utilized them in this year's room.

Our school also will be implementing a theme this year, which you may have heard of:  How full is your bucket?  While I'm still stewing on some ideas about lessons to share, I wanted to increase my visuals on positive behavior and responsibility in the art room.  Here are some signs I created (or re-created thanks to the many wonders of Pinterest and sharing among art teachers):


Whoever invented this...thank you!  It's above my desk where all my students can see it!


Our school uses P.B.I.S. (positive behavior intervention system) throughout entire school, even in the specials classes and lunchroom.  We use a variety of "cool tools" for the students to remember, plus we have the students held accountable for their actions the entire day with the use of a check system.  Teachers have clip boards with the class list, and a new page every week.  If a student receives one check for misbehavior, it's a warning.  Two checks, half their recess.  Three checks, all their recess.  Four checks and it's a detention.  This system worked really well last year since it was used for the student's entire day.


Thank you to the teacher who put this on their own wall!  I changed the wording to match our school setting, but the display is beautiful!  Here are the close-ups of the messages next to the words:


The fabric is so bright, the students can't help but look at it every time they walk in!


Enough said!  This hangs right above the sink.  No excuses!!!

Here's my new and improved coloring sheet stack, with plain drawing paper on the bottom (for those who finish early, they have the choice of  books, drawing, or coloring sheets related to art).


My biggest pet peeve is when I allow the students to take a coloring sheet...and they take a stack.  Or, when it's clean up time, they sneak to the box and take some under the "no" sign.  Grrrr!!!!!  Here's the scenario I had last year with this:

Students (sneaks a coloring sheet during clean up when the "no" sign is up)

Teacher:  What are you doing?

Student: Taking a coloring sheet.

Teacher: And what does the sign say?

Student: No means no.

Teacher: So what does that mean?

Student (puts the coloring sheet back)

This happened at least once a week.  Some classes had to have coloring sheets taken away because they were distracting them from their project...AND they would sneak a stack out of the room!  In the case of ESL students, they're learning by watching others, and when the others ignore the rules, it makes it harder for the ESL students to know what's right and wrong.

Enough of my grumpy behavior!  WIth my new set up, I can monitor the sheets much easier on my new"Creation Station" cart (seen in the next post)!