Just to give a heads up for anyone following, I will be taking a break from posting for just a few weeks because I will be taking care of my newborn girl!
Our daughter was born this past Thursday morning!
Please do not disappear because I will be back soon with tips, rants, and lesson ideas!

Saturday, July 27, 2013
Tuesday, July 23, 2013
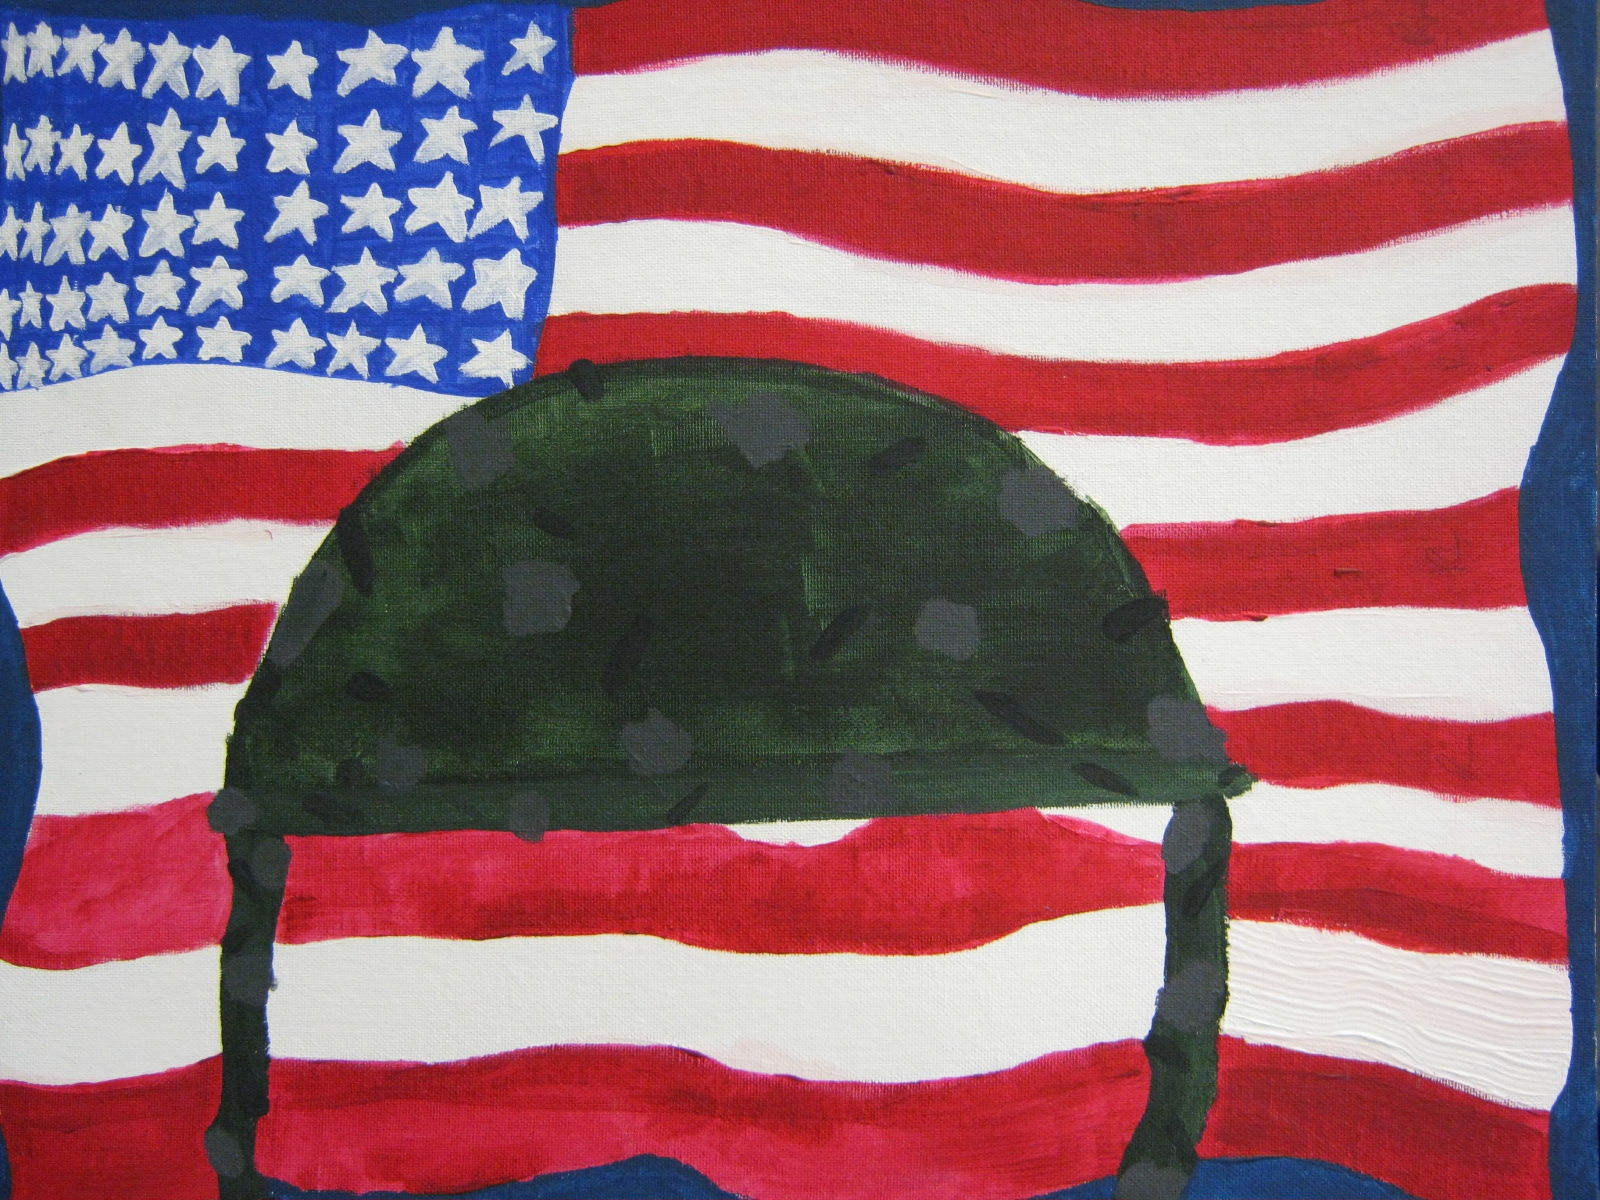
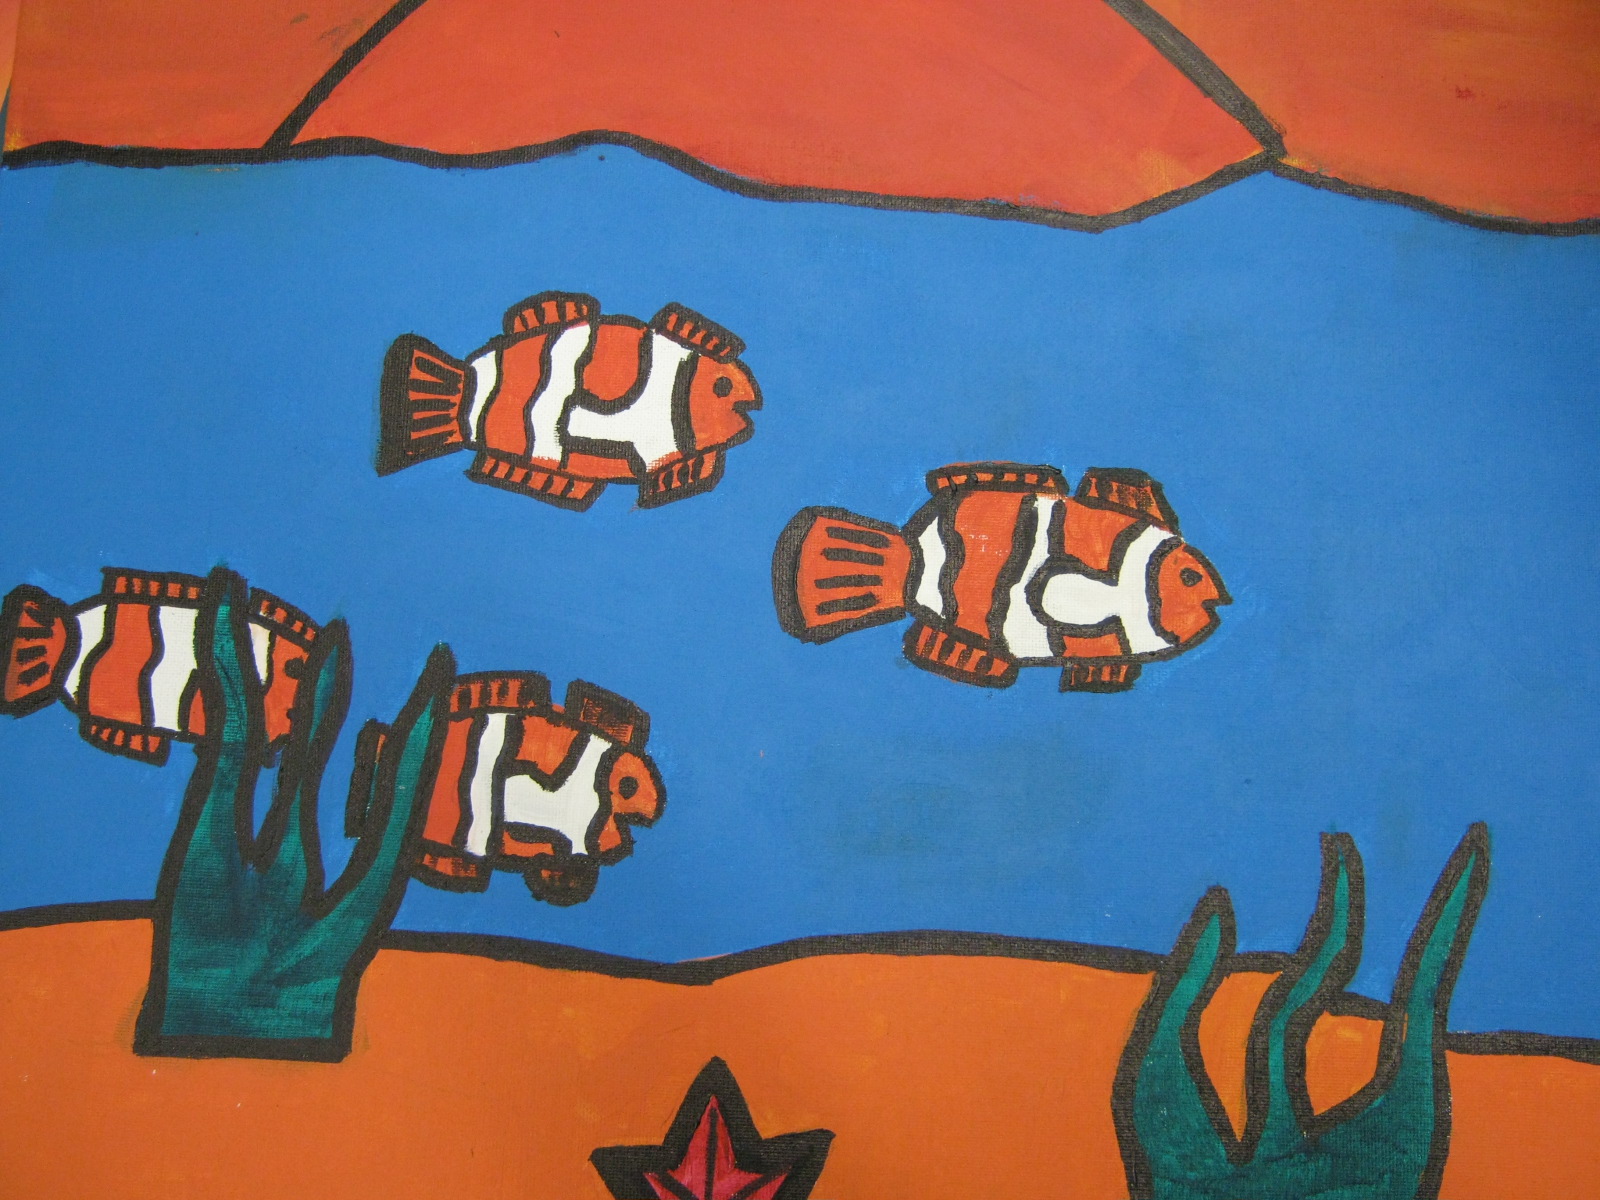
Landscapes with 5th Grade: Acrylic Painting Techniques

Acrylic painting is fun, but tricky to use at the elementary level. As stated in my previous post, I offered an after school art class each fall on acrylic painting techniques for 5th and 6th grade students, with an annual mini art show after the class finished their canvas paintings. With so many students enjoying the acrylic painting class each year, I decided to have my entire 5th grade create their own acrylic painting.
Unfortunately, I have not taught this project for an entire 5th grade on a cart. The paint takes longer to wash out of the brushes, so I need a sink with a strong current close by. The paint is also tricky to wash off tables, and with working on desks in classrooms, it was challenging to manage 20+ students during acrylic painting clean up. So...in the past, I've only taught this project from a cart after school with fewer students.
Since I now have two classrooms I share (with a sink in both), I took on the challenge of handling the set-up and clean-up of acrylic painting with an entire class.
Let's start with the basics first. Here are the materials I used for my project, but you can adapt your own painting surfaces to what you prefer:
Materials
-8" x 10" canvas boards (I ordered mine from nasco in bulk, around 80-100 at a time.
-Different size nasco brand brushes (with having students who do not fully wash brushes all the way and my lack of time to check, I don't use expensive acrylic paint brushes.
-Acrylic paint (I use the crayola basic color set, but prang also has some nice colors and is easier to pour. For advanced painting techniques, I love liquitex tubes)
-Water bowls
-Newspaper (can be used for mixing palette too)
-Pencils
-Black markers (if needed)
-Paper Towels
-Paper plates (easy to toss palettes)
Objectives
One of my main purposes for using acrylic painting for the entire 5th grade was to introduce a new material they would learn to be responsible with. To view my tips to manage set-up, clean-up, and materials, click here to view the post.
For acrylic painting techniques I share with each class, please click here to view that particular post. With the limited time I have with the classes, the main techniques I teach are with layers.
The main element of art I use with this lesson is space: using three ground to create a landscape (foreground, middle ground, background). Since I focus on showing students how to paint the background first and add each layer on top, I felt it was the best way to understand how to create perspective with painting.
Day 1 is focused on introducing the perspective and how to choose landscapes that would appeal to the students (cityscapes, football fields, etc...). I show Van Gogh's "Starry Night" as the main example.


On day 2, I show how to start with the background and blend multiple colors to create the sky. Students always want to start with clouds and stars, but I tell them to wait. One layer at a time!


Day 4 is for the foreground. The cypress tree in Van Gogh's painting is the closest to the viewer, therefor the largest object in the painting. I ask students to draw one object in the foreground that ties the picture together.
On day 5, If students complete their painting, I show how to add expressive details to make their paintings pop a little more.
Here are some finished examples!


Thursday, July 18, 2013
Acrylic Painting with Elementary: Tricks and Techniques to Keep it Simple

Before teaching acrylic painting to an entire grade level, I started with an after school class, limited attendance to 15, and offered it to 5th and 6th graders. Starting out, I wanted to work more individually with students so I could focus on technique and focused instruction.
My after school painting classes are given 5 days to complete their painting. Day one is background, day two is middle ground, and day 3 is foreground, leaving 4 and 5 for details and fix-ups. With the smaller class size, I can individually show students random techniques of blending, fixing mistakes, and brush techniques.
Materials
-16" x 20" canvas boards, and limited my class to 15 students)
-Acrylic paint brushes (different sizes)
-Acrylic paint (I use the crayola basic color set, but prang also has some nice colors and is easier to pour. For advanced painting techniques, I love liquitex tubes)
-Water bowls
-Newspaper (can be used for mixing palette too)
-Pencils
-Black markers (if needed)
-Paper Towels
-Paper plates (easy to toss palettes)
Technique #1: Paint in Layers
Acrylic paint can be thin, and it may take a few painted layers before your picture looks stunning. I tell the students to start with a base coat color first, and with each additional layer, add more details and color until they're happy with the picture. In this example, the lion's mane took some time, but once built up, the picture looks more complete and texturized.

Technique #2: Start with the Background
I always tell my students to start with the background first. It's best to get that back color down and even push the color a little into the objects in the foreground. When students start with their front object first, I always see a space around the object not completely painted in (when you see the little white specs not completely painted in on a canvas).


When a student uses mixed colors for a sky, it's always best to start with that layer so you can get a smooth blend of colors.
Trick #1: Enhance the Details
I always have students show me a finished piece, and I get the urge to enhance it. At the elementary level, I want students to see how to make their artwork pop. The way I enhance the pictures is my using white paint mixed with the object's color to add highlights. In the following painting, I had the student add light lines to the water, waterfall.

Trick #2: Made a Mistake? Let it Dry and Try Again.
The never-ending battle with acrylic paint is when a student makes a mistake, they feel it's automatically ruined. I always tell them not to fret, let it dry, and paint over it. They are amazed with how well mistakes hide when they have patience.
Trick #3: When in Doubt, Trace.
Many times, when a painting is complete, it appears choppy. Using a black permanent marker, I ask students to trace their objects to help them stand out better. I do not always ask them to do this, especially if they refined their edges, and I don't want students to use the marker as a crutch the older they get.

Here are a few examples from previous years!


One last tip...offer a mini art show for teachers and parents to attend and view the artworks. It's not hard to set up, even in a cart situation, and the students are proud!
Sunday, July 14, 2013
Acrylic Painting with Elementary: How to Be Responsible and Avoid Catastrophe
I teach in a district with a wide variety of needs, and with traveling, I see how those needs change from school to school. For example, at my home base school, 80% of my students are from low income homes and the transient rate is high. We can have up to 100 students transfer in or out of our school each year, which can disrupt steady learning. At my second school I travel to, there is a low transient rate as well as a lower percentage of low SES students. I can see a difference in learning styles.
For years, I was afraid to touch acrylic painting with elementary students. I did not feel they were responsible enough to handle a paint the was tougher to wash off. Yet, the material always loomed at the top of my mind because I personally love acrylic painting.
I decided to slowly introduce acrylic painting as an after school class to my 5th and 6th grade students. I limited the class size to 15 so I could have time to individually work with them. I offered the after school class at both my schools (one school was classroom and one school was on a cart, so I asked permission to use a classroom to teach the class). After a few successful years, I felt it was time to finally introduce acrylic painting as a project to the 5th grade.
You know how they say you learn the hard way before you get it right? Here's what I discovered:
I knew acrylic paint does not wash out of clothing...unless you know what you're doing. I should have informed parents and students in advance. As a result, I had many parent phone calls. I also discovered that my students forget to have proper protection from getting acrylic paint on the tables half the time, and it's a challenge to wash off. Clean-up is also an issue. If you just give a class a countdown, they will bump into each other, drop their paintings, get into arguments over who got red paint in their cute sweater, and cause more chaos than you need. Lastly, with extra care needed with washing the brushes, I learned very quickly that if I didn't have a plan, I would lose half my brushes in the first week of the project.
Material Tips and Responsibility (for you and the students)
Here are some tips I use for material responsibility, which totally improved the lesson flow:
1. Send a note home to parents informing them about the materials and how to properly wash it out of clothes. Thank you, Pinterest, for offering additional techniques.
2. Tell the students about the paint in advance. Inform them not to wear their best clothes on art day for the next few weeks. You will be amazed with how quickly a student can turn and blame another if they get one red paint dot on their brand new white sparkly hoodie...now you can say you told them so.
3. Collect a ton of newspaper. Leave a pile on each table, and once projects are passed out, remind students who forgot to put paper under their projects within the first 5 minutes. This will save you a clean-up headache at the end of the class.

4. Use disposable paper plates for your palette. This will save you so much extra time with clean up, and it's much easier to set-up and clean-up when teaching from a cart.

5. Choose your acrylic paint wisely. Crayola bottles are good, but when you get to the middle of the bottle, you need to do the shake and squeeze to get the paint out. Prang bottles are also nice, they poor out faster, but the consistency is thinner. My favorite acrylic paint is Liquitex. I use the tubes for my own personal painting and for after school projects, but for an entire grade, you need more than tubes.
6. Control the paint yourself. If you let students squeeze paint out of the bottles, they will pour too much, which will waste the paint since you can't really put it back in the bottle! When a student runs out of a color, have them bring the palette to you so you can control the amount of paint given.
6. Organize your clean-up techniques. If you have a table set-up in your class, choose one table of students each week to collect water, brushes, and newspaper, as well as washing of the brushes (one table of students is better than an entire class getting up and cleaning) Since I have 5 students at each table, two students collect newspaper from each table, one collects each bowl of water and brushes from each table, and two students to scrub and wash brushes at the sink. I also informed the teachers that two students each week would be staying behind an extra 5 minutes to carefully wash out brushes. This also gives all your students a chance to be responsible throughout the project with clean-up, while preventing everyone from moving around the room. With project collection, the table asked to clean up puts their projects on the drying rack first, then I call a table at a time, saving students from dropping canvases or bumping into classmates.
Everyone has their own techniques in handling different types of paint. I knew in the beginning of my teaching career that I could not handle acrylics with elementary, but after knowing their learning styles and behaviors after a few years, I took on the challenge. Many of you have probably used acrylics with their students in the past, and if you have your own tips to handle responsibility with the paint, I'm all ears!
My next post will be on acrylic painting techniques. Stay tuned!
Thursday, July 11, 2013
I and the Village: Marc Chagall with 2nd Grade

I and the Village is a 1911 painting by the Russian-French artist Marc Chagall, which is shown at the Museum of Modern Art in New York City. I like to share this image to my 2nd graders to introduce the idea of surrealism. Although Salvador Dali is the name we recognize with "surrealism," I felt that Chagall's "dream-like" imagery was more appropriate for this grade level.
The work contains dreamlike images overlapping in the space, appearing as if gravity or size does not matter. I and the Village is about the memories of the artist's place of birth. When I talk with students about "dream-like" images, I ask them to think about what objects would be represented in a dream they have had.
In creating this artwork, I like to focus not only on representing the artwork, but also to encourage students to create a profile drawing of a face (like a self portrait). I also encourage students to create objects that can represent a specific dream, like a visit to Disney World or a good memory.
The materials used:
-tissue paper squares
-glue/water mixture
-paintbrushes
-white paper
-markers/crayons
-pencil
-scissors
-glue
On day 1, I start by showing students a Powerpoint I created with Chagall's artwork and explain about his dream-like images. We discuss how size and space can be altered since dreams are not real. After the discussion, I have the students cover a white paper with squares of colored tissue paper, using a glue/water mix to keep the squares flat down on the paper.
On day 2, I show the students how to create a profile face that can be traced, colored, cut out, and glued onto the paper. I then ask students to draw objects that would represent or help illustrate the dream they are trying to share for their project. If unfinished, a 3rd day can be used for finishing.
Here are a few finished projects from the end of the school year!


For any spare time you may have for students to catch up, you can use a coloring picture of the inspired painting for students to color on their own!

Tuesday, July 2, 2013
Do Your Part! Help Review the New National Visual Arts Standards!

On June 30th, The National Coalition for Core Arts Standards publicly released the new in-progress standards for 5 areas: Visual Arts, Media Arts, Music, Dance, and Theater, all Pre-K-8th grade. This will give the general public a chance to view the updated national standards that teachers of the arts have been anticipating. The high school standards will be released at a later date due to the fact that the standards will not be focused by grade level, rather by accomplished goals and settings.
With the release of the math and language arts common core standards, many teachers are being asked to switch from their current state standards to the national common core...including the arts. With the core arts standards and the science standards still in progress, many teachers are waiting patiently for these standards to be complete, as to not confuse their current curriculums.
Reasons why its important to review the standards
Since the standards are currently released to the public for review, the writing team wanted the general public and all teachers involved to read and respond with their thoughts. The standards are meant to be public-friendly, with an understanding of WHY the arts are important in a child's development, as well as HOW the students should be introduced to the concept within each grade level.
Even if you are a general classroom teacher, you should look over these standards. Why? There are elements in each standard that can still be connected to what you do within your classroom. For example, the three visual arts standards in focus are creating, presenting, and responding. While many schools are focusing on "project-based learning," you are using all three elements in the process.
The creation of the standards
There were 10-12 writing team members selected from each content area back in December of 2011. Since then, the teams reviewed many state standards, gathered input from many teachers across the country, and worked with many national groups that promote the importance of these specific areas of the arts in a student's education. On top of having a writing team, there were many reviewers selected to look over the standards even before being released to the public.
Your deadline
Since the core arts standards are set to be released to the public in the fall, the writing team is in need of the public review by July 15th, 2013. And since I am writing this in my blog, I am begging you to share your opinion.
How to participate
Please visit http://nccas.wikispaces.com/NCCAS+June+30th+Public+Review for a list of the standards in the 5 content areas. You can visit any content area you wish, or just the ones you want to focus on. The links on the page will direct you to the draft of the standards, which are broken down by discipline, anchor standard, enduring understanding, and essential question(s). Like the math and language arts common core standards, these break down by grade level as well.
The link also contains the surveys for each content area for you to fill out. The surveys are in depth and give you a chance to review each component of the standards provided. It will take you some time, but if you are unable to complete it in one sitting, there is a way for you to save and come back later.
Why I love this
I'm still working on the survey, but I was so excited to review the standards, I just had to share with you why I felt it was important to be a part of this process.
First, you are offering your voice in the development. The writing team is listening to the general public on what you feel is important for a child's creative development.
Second, the standards are focusing more on WHY this development is important and WHY these components need to be included in a child's education.
Third, as an example from the visual arts standards, there are components you many be lacking in your own curriculum (like presenting) that you may need refinement in, and the standards may help ease the process of introducing how to display works of art for a more engaging purpose than hanging a work on a wall.
Lastly, these standards help to anchor the arts in the well-rounded curriculum. Goodbye STEM, hello STEAM!!!!!
For an orientation into the review process, please click here for the video. The video is around 25 minutes in length, but a good watch into the process of how the standards were created and how to break down the review and surveys.
Lend your voice into this process! It may be summer, but you can make the time!
If you have participated in reviewing already, I was wondering...what was your take? How do you feel about the standards? After patiently waiting for the standards to come to completion, I am craving a conversation!
Subscribe to:
Posts (Atom)