Thursday, June 27, 2013

Watercolor Still Life Flowers with 1st Grade


Whether you're pushing a cart or teaching in a room, the 1st graders love working with this easy materials: watercolor crayons.  They are fascinated with the fact that crayons can turn into paint just with the use of water.  I normally like to create this project as my own Mother's Day gift for students to give, but with curriculum and timing, it doesn't always work that way.  One thing's for sure...it makes a good spring project.

For this watercolor project, I introduce still life: creating a picture of objects that are not alive.  A popular choice is the flower pot, and with spring and summer, flowers are a good option.  When students first see my example, they comment that they can't draw it until I show them how simple it can be.

All you need is: white paper (50# weight or more to handle water), pencil, black permanent marker, water color crayons, paintbrushes, and water.

First, I start by drawing the flower pot.  I draw a rectangle for the top of the pot, and a square for the bottom of the pot.  I explain that the rectangle should not be higher than the middle of the paper so students have room for their flowers.

After the pot is drawn, students draw the ground line, starting from the middle of the square to the edge of the paper of both sides.  I give the students the option to draw squares for tablecloth or leave it looking like grass.

Next is the flowers.  I show the students a flower at a time, drawing anywhere around the top of the paper, as long as the stems they draw after reach the flower pot.  Some simple flowers to draw are the tulips (a "w" with a "u" underneath), a rose (a spiral with a "u" underneath), a tiger lily (three hearts, three stems, three circles), the morning glory (small circle, 5 sticks from the circle, and close it at the ends), and the typical pansies and sunflowers (circle center, circle or pointed petals around the circle).  Once all the flowers are drawn, students are asked to create two sticks for a stem that connect to the flower pot, and some added football-shaped leaves for decoration.  If the students still have empty space at the top of the paper, I ask for full circle suns, clouds, or birds in the sky.

After their picture is drawn with pencil, I ask them to trace with black permanent makers.  Not every teacher uses this step, but I feel at this age, student projects are crisper and neater when using the tracing method.

After the pictures are traced, I hand the students the watercolor crayons.  I have the students color in the entire picture first, including the full blue sky reaching the ground.  This step is mostly done on day 1.

For day 2, I remind the students on how they need to finish their coloring, then I show them how to use water and paintbrushes to change the crayon coloring into a painting.  I instruct how to paint one color at a time, then wash the brush before switching to another color to paint.  Once a students' entire picture is colored during class time, I place a bowl of water and paintbrush in front of them, and they go to town.

Here are some of the results from this year!


What's nice about this project (and another reason why I save it for the end of the year) is that it's not that messy.  Water is easy to clean up, and you don't have to worry about a heavy mess!

Friday, June 21, 2013

Project Preparation: An Article from Arts & Activities Magazine


In March 2013, I created an article featured in Arts & Activities Magazine titled "Project Preparation."  Even in the middle of the school year, teachers who push carts and have little storage space to work with struggle in setting up their lessons and pushing all the materials from room to room.

I decided to focus on drawing materials (what students already have and what you should supply), storage tips, painting tips (for rooms without a sink), recruiting helpers, and clean-up allotment of time.

The magazine was featured during the NAEA convention in Ft. Worth!  If you would like to view the article, please click here.

The advice I gave was inspired by previous posts I had written for NAEA's monthly mentor section and in this blog from 2011 called "Painting and Drawing and Sculpture, Oh My!"

We all have our own ways of prepping our projects and utilizing our storage, but with limited space, many of us come across frustrating moments throughout the school year.  I remember those moments!  Instead of venting my frustrations to the staff, I searched for ways to work with what I had, and over time, it got easier.  Find you way to work with what you have, and if you have tips (especially since most of us have our feet up this summer researching for next year's curriculum or browsing lesson ideas), feel free to share in the comments!


Wednesday, June 12, 2013

Summertime! Ways to Stay Active in the Arts While Enjoying Your Break.

Many teachers have closed their classroom doors and have said goodbye to their lesson plan books until August.  I bet many of you have planned vacations with your own families.  But with so many weeks away from work, what do you do to stay motivated with your career?  There are so many opportunities available over the summer to keep you on your toes, and you can relax at the same time.

Once my classrooms are closed, I like to take at least a few days after checking out of the schools to put my feet up and enjoy time with my daughter...especially since she will be a big sister in another few weeks.  I may be relaxing, but with my multi-tasking brain, I like to gather a list of things to do over the summer that are fun, but still educational for my family ad for my own personal P.D.

Here are a few things I have one so far to stay on top of my art curriculum, educate my family, and have fun!


Visit a local museum.  This year, the Field Museum of Natural History in Chicago has the Lascaux Cave exhibit, which features the cave structure, paintings, preservation, and artist renderings of the cave paintings discovered by 4 teenage boys in Lascaux, France.  The museum re-created areas of the caves to show the paintings, who the prehistoric people looked like, and how the paintings are preserved.  And how does this fit into my curriculum?  I teach prehistoric cave paintings in 6th grade, plus I instruct on how art documented history, and how the preservation of such artifacts are crucial in keeping history alive.  My daughter asked so many questions about the caves and the paintings, which made it a fun experience all around.  With living in close proximity to the city, I have access to many world-known museums, like the Art Institute of Chicago, The Museum of Science and Industry, The Museum of Contemporary Art, Shedd Aquarium, Adler Planetarium, plus many cultural museums within the city limits and ethnic neighborhoods.  Just because a museum is not "art-based" does not mean it has nothing to do with your curriculum or professional development.  As art teachers, we thrive on project-based learning, and cross-curricular ideas come into our classroom all the time.


Go to a gallery.  Art galleries feature many local and national artists, and are great ways to discover local artists in your area that you may want to invite into your classroom as a visitor.  In my experience, when students meet artists who are currently working in the field, they are more excited and can see how art can be a potential future job.  Also, local galleries can offer classes in painting, drawing, sculpture, or any artistic medium that you may with to work with, or sign your kids up for as a summer program.  It keeps you and your kids busy on those hot, summer days, and you're practicing your skills as well.  Attending a gallery opening is one of my most favorite things to do.  You meet the artists and see new works on their opening day!


Visit an art studio.  Just like galleries, there are plenty of artist studios that have classes available for you and/or your little ones.  The experience is similar to visiting a gallery, but more of a behind-the-scenes into the art-making process kind of fun.  Look into your local community for artist studios and research to see if there are classes offered during the summer.  Many ceramic studios offer classes and a hands-on look at how clay can be used for many types of artworks, and how a kiln is run!

Going on vacation?  Take lots of pictures or bring a sketchbook.  Every summer, we visit the lake.  I've been so inspired by the lake that I take too many pictures, sketch too many drawings, and paint too many watercolors.  You know...there's no such thing as too much of anything with what we love to do!  I find the best inspiration from the place I am the most comfortable.

I love how I can catch up with my own personal techniques over the summer.  What better way than to utilize some talent while on a family trip?  You can even have your own kids taking pictures or drawing in their own sketchbooks!


Speaking of working on your own personal artworks, I posted about working on your own art last year around this time, and if you wish to visit that page instead of searching through my archives, just visit my article called Plan Time for Your Own Art.

Visit a local faire.  My family and I are Renaissance Faire goers.  There is so much to take in and learn at the faire, and we make it a fun and educational experience.  There are glass blowers, blacksmiths, art demonstrations, chalk drawing, face painting, hair braiding, dancing...too much to list.  On top of that, it's FUN!!!!!!!  If you live near a local Renaissance festival, please visit and you may see what I'm talking about!  Local festivals are also a fun experience.  You're not only visiting your local community, but there are also arts and craft shows advertising local artists (which may be yourself if you choose to enter).  Fairs and festivals are great opportunities to promote your work, and you can even have that time to showcase what you teach in your classroom to parents who come to the fairs and festivals.


There are also plenty of professional opportunities you can do over the summer, especially since you may have the time to squeeze in those extra CPDU's and college credits required by your district.  For ways you can boost your professional growth, visit my previous article called The Power of Professional Development.  The article discusses this summer's online art education conference and ways to find opportunities to stay active social media and state organizations.

If you are off school for the summer, enjoy your time off and find ways to stay active while you're out having fun!

Monday, June 10, 2013

Superheroes to the Rescue! Perspective with 4th Grade


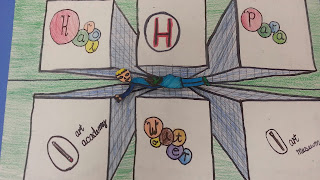
After attending a few conferences on Social Justice in the art room, I was inspired to attempt a new way of introducing 1 point perspective to my 4th grade students.  In the past, the students drew railroads and streets, which were easy, but the students were bored easily.

When I saw how students could add a little element of themselves into their own work (more than just creating a road into any landscape they chose), I was intrigued.  Students respond more to their art when adding in elements about themselves: things they like to do, places they wish to visit, or making themselves into something more than what they think they are...like superheroes!

The materials I used (which was perfect during the end of school year pack up):

-white paper
-pencils
-black markers for tracing
-rulers
-scraps of white paper for the superheroes
-3-DO's (little pop up stickers found in Nasco)

When I introduced the project, I did not show the final product.  I was too worried about students drawing bodies over the buildings first, so I took a step at a time.  As their were finishing their previous project, I gave them a scrap of white paper and drew an example on the board of what a superhero should look like.  So, instead of giving them free time after completing a project, I had them start their superheroes right away.

Day 1
On the first full day of the project, I went over the 1 point perspective.  A dot in the middle of the paper, and 6 square: 2 squares placed above and below the dot, and one square in each corner of the paper.  Students who wished to add more squares were encouraged once they understood what they were doing.

Next, I demonstrated to the students how to make each square reach the point in the middle.  I did not show the horizon line since this image was to be a bird's eye view:


After explaining how each square was a rooftop and the lines drawn to the vanishing point were the sides of the building, I let the students go to town on windows and rooftop designs.

Day 2
At this point, I felt that the students were taking off on their own once they figured out the perspective.  The only element I demonstrated was the street going across town.  I also explained on this day that the superhero drawings created previously were to be placed above the finished cities, as if they were protectors of their own city, like Superman!

Day 3-4
Students completed their drawings by coloring with colored pencils, tracing with black markers, coloring their superheroes, cutting them out, and placing on top of their cities with the 3-DO's.  Pop up superheroes!

Here are some finished projects!


Sunday, June 2, 2013

Mona Lisa Parodies with 6th Grade


This is a project I like to do at the end of the year with my 6th grade students.  In the end, the major materials are packed away, paint is tricky, and students are squirl-y.  What better way to end the year than with a humorous project?

I follow an art history curriculum with my 6th grade.  We start with Prehistoric art, then end with the Renaissance.  For the Renaissance unit, I focus on Leonardo DaVinci and his famous painting, the Mona Lisa.  After spending so much time on Pinterest, I found a vast number of Mona Lisa parodies, which inspired me to change my project this year into the parody project.  In the past, it was "The Mona Lisa I Know," which didn't excite the students as much.

The materials for this project are easy.  White paper, pencils, colored pencils/crayons/markers to color, black markers to trace.  In our schools, we have laptop carts for rooms to check out, so I reserved time in advance for my classes with the homeroom teacher.

After showing a Powerpoint about the Mona Lisa and parodies (I attached a few images I used in the Powerpoint), I explained to the students to find an image of a character, cartoon, or person they wanted to use for their parody.  I explained the biggest objective was that the image used had to be drawn into the pose of the Mona Lisa.  The drawing then had to be colored and include a background.

The fact that the students had a chance to 1. use a laptop and 2. choose their on image was the popular part of the project.  I do have a line of students that attempt to line up in front of me and ask me to draw the image for them, but I purposely put a slide in the Powerpoint that stated how the drawing what the major part of the grade and that I do not expect an exact replica of their chosen image.


After the students finished their projects, I loved so many of them that I couldn't help taking pictures of everything.  Here are a few finished examples that crack me up!


Grumpy Cat


V for Vendetta


Luigi


Finn from Adventure Time!


Psy...Gangnam Style


Taylor Lautner as Jacob from Twilight


Daffy Duck


Homer Simpson


One of the millions of Pokemon characters


Judge Judy (this one makes me laugh!!!)


Angry Birds...I mean pigs


Mona Spongebob


Patrick Starfish


Boo Boo


Minnie Lisa


I didn't catch the name of this rapper, but my student decided not to print an image and drew this from memory.


Chucky