Showing posts with label Acrylic Painting. Show all posts

Wednesday, September 20, 2017

There's Only One You: Tips to Create a Rock Garden Project


Back in May, one of my co-workers shared a school-wide project idea that went viral on social media from Scarymommy.com.  The project was a rock garden inspired by the book "Only One You" by Linda Kranz, and decorated the landscaping of Sharon Elementary School in Newburgh, Indiana.  The garden was the idea of Jessica Moyes, who is the art teacher at Sharon Elementary.  Jessica, your design has inspired multiple schools to create their own rock gardens within their own schools.  Our school's parents were even sending links of this project to the principal requesting the garden!


There's few posts from other bloggers and teachers talking about their rock garden installations at their schools.  I'd love to share our story, along with the methods used in gathering materials, containing painting with K-6, incorporating all staff, and how to complete the installation.

The Materials

Thanks to Streamline Landscaping in Willow Springs, IL, we receive a few buckets of smooth rocks to use for our rock garden!  The landscapers even came by to see how we were doing with creation, and donated even more larger stones for each class and department in the school.


We also received a donation of acrylic paint and markers from Oriental Tradings!  The donated materials really helped with supply management!


Here's the materials you need to complete this project:

1. Lots and lots of rocks.  Consider calling a local landscaping company and ask for a donation.  The rock size can be your choice.

2. Table clothes.  This was a life saver for all 31 of my classes who painted (700+ students).

3. Paper towels and paper plates. Tear up sections of paper towels for students to keep under their rocks while painting.  Paper plates make it 100% easier to manage the paint messes and clean-ups.

4. A copy of "Only One You" by Linda Kranz.  Easily found on Amazon, or other book sellers.

5. Acrylic paint.  As much as it's scary working with acrylic at K-1 ages, it's the only paint that will stay on the rocks over time.  Some acrylics paint on a little transparent, while others will be more opaque.  Again, your choice.  Here's the link to the acrylic paint used from Oriental Trading.

6. Paint brushes, cups, and water.

7. Permanent markers.  If you photograph all artworks for Artsonia, or need to know who made what rock for grading, use permanent markers for students to write their names.  Oh...and add room numbers too.  It really helps with organizing.  If you use markers for details, keep in mind that markers do fade over time.  Here's the link to the sharpie marker set from Oriental Trading.

8. Acrylic clear coat.  In order for the paint to stay as long as it can on the rocks in outdoor weather, you need to spray all the finished rocks with a clear coat for protection.  For a safety note, make sure you spray outdoors and after school hours, because this smell can draft down the hallways.

9. Bins for storage.  This is going to be heavy!  For transporting from classroom to garden set-up, make sure you have plastic, durable bins to use for organization and transportation.

10.  Aprons or old shirts.  If you're doing this project with young students, you need clothing protection.

The Objective

The purpose of creating a community project was to have student leave a "footprint" in the school.  The positive message in the final pages of the book is "There is only one you in this great, big world...make it a better place."  All the students from grades K-6 were read the book and took in the words of wisdom shared.  Each student painted their own "fish" rock with their own colors and patterns.

The Project

I allotted two full weeks for all classes to complete their rocks.  Each of my classes are 40 minutes in length, and visit once a week.

Prior to starting the painting, I sent a note home to each student explaining the project and materials being used.  Since we had so many younger grade levels, I made a huge recommendation to parents to have their children bring an art shirt to school or an apron to protect their clothing.  One parent donated a box of plastic aprons, which really helped with the younger grade levels!  The teachers even helped with mentioning the extra art shirt in their weekend newsletters, which really helped!!!

For prepping, I set up a plate of colors for each table.  If I made the plates last longer than two classes, I called it a success.

Kindergarten classes only received 5 colors (red, blue, yellow, green, white) because no matter what you do, the plates only last about 10 minutes of pure colors.  Once the students see that colors mix, the plate very quickly turned to brown.


On the first day of class, the book was read and we had a small discussion about the wisdom shared and how they can help in creating a garden for the school.  For the rest of the class, the students painted their rocks.  I organized drying areas for each class by placing colored paper and a painted large rock with the class name on it.


When students finished painting, they placed their rocks on a paper labeled with their class.  Students were also asked to sign a class rock that their fish will swim around.


Since Kindergarten and 1st grade finished quickly, they were only given one day to work on the rocks.  Afterwards, I glued a google eye to the fish.  (The google eyes will not stay on for more than a few weeks.  It's good for the beginning pictures, but it will not last forever with a glue gun.)


On the second day of the project, grades 2-6 used permanent markers to trace out eyes, mouth, patterns, fins, and details in their rocks.  Since this step only takes about 5-10 minutes to complete, I found worksheets on Linda Kranz's website that students colored and filled out.  The worksheets can be found here.

Remember when I said that departments also receive a rock?  I painted fish rocks for the front office (administrators, nurses, secretaries), lunchroom, custodians, Title 1, ELL, Special Education, and Specials!  They're mixed in with the class rocks below ready for installation!


Now the fun part...getting over 7 bins of rocks and large river rock into the courtyard!  With lots of helping hands, we transported all the pebbles to the courtyard so I could spray them with the acrylic clear coat.


The custodians were also very helping in clearing out an area in our courtyard before installation!


And the sign has been made...


On the day of installation, students and staff were invited to participate in the installation process.

ALMOST DONE!!!!


And here's the finished project!


Our school has been passing around the golden pineapple award for teachers sharing positive events in our school, and on the day the garden was being installed, a student dropped this award off in my classroom!  Totally excited and honored to have this award for this project!  It's for the entire school for their participation!!!


SaveSave

Wednesday, December 16, 2015

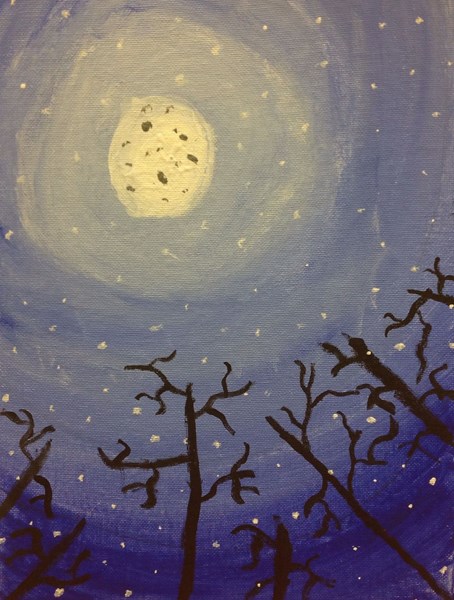
Monochromatic Trees with 5th Grade


Have you seen this project floating around in the Pinterest pages, or have you been to a paint party/wine and canvas?  I've pinned the project for awhile and started trying it out with my 5th grade students last school year.

At the 5th grade level, I feel that students are "responsible" enough to work with acrylic paint.  I explain to students that the paint does not wash out of clothes (even though it does to an extent, I want students to understand the responsibility with the paint).  My classroom is also tight with no sink, so I use fewer colors for a smoother pass-out/clean-up.

With paint parties being all the rage, I want students to have the experience of working with canvas! Since I have over 100+ 5th graders, I work with canvas boards.

This can be a winter project, so you have a range of time to work with!

Materials
9" x 12" canvas boards
Acrylic paint (blue, white, and black)
pencil
paint cups (with a table of 4 students, I pass out 2 cups of each color to share)
water containers
water
flat edge and fine point paint brushes

Objectives
The students will be introduced to monochromatic colors.  They will practice mixing the blue and white paint to create tints and shades of blue for the nighttime sky.

Directions
This project takes approximately 3 40-minute class periods.

Day 1: Explain the element of value and how colors can be created with white/black to make tints/shades.  I recommend finding your way of introducing the class.  Maybe to want to warm them up with a value activity sheet?  The canvas is passed out and students are asked to draw 5 circles total, which expand to the edge of the canvas.  Students are only given blue and white paint to fill in the inner moon and outer edge.  If you have time, explain how to mix the blue and white in each space to paint.

Day 2: Depending on how far you have made it with the blue and white painting, explain the color mixing technique again.  If students finish the sky, have them use black paint to draw in the tree branches.

Day 3: All students should be done with the sky at this point.  Re-explain the tree branches, as well as the moon craters and snow drops.  I have students use a fine small brush to dot the snow instead of splattering...especially in my small art space!  Students also write in their artist statements, which include their thoughts on the project and what they had learned.

Here's a few finished projects!


Monday, June 29, 2015

Summer Workshop Series: George Rodrigue-Inspired Blue Dog Paintings


George Rodrigue was a Louisiana-based artist known for his trademark "Blue Dog" characters in all his paintings.  Sadly, George was diagnosed with stage 4 lung cancer in October 2013 and passed away in December 2013. He is known for his creation of the Blue Dog series of paintings, featuring a blue-hued dog. 

Wikipedia states that George used the shape and stance of his deceased dog named Tiffany and was primarily influenced by the loup-garou legend (the first painting in the series), which holds the title "Watch Dog," painted for Bayou, a book of Louisiana ghost stories.  The blue-hued, ghostly spaniel/terrier is often featured with a white nose and yellow eyes.

"The yellow eyes are really the soul of the dog.  He has this piercing stare.  People say the dog keeps talking to them with the eyes, always saying something different.  People who have seen a Blue Dog painting always remember it.  They are really about life, about mankind searching for answers.  The dog never changes position.  He just stares at you.  And you're looking at him, looking for some answers.  "Why are we here?," and he's just looking back at you, wondering the same.  The dog doesn't know.  You can see this longing in his eyes, the longing for love, answers."

-George Rodrigue on the Blue Dog


Materials
-Pencil
-11" x 14" canvas
-Acrylic Paint
-Brushes
-Water
-Water Container
-Paper Towels
-Images of George Rodrigue's Blue Dogs
-The book "Why is Blue Dog Blue?"

Objectives
The students will create their own paintings similar to the style of George Rodrigue's "Blue Dogs."  Students can choose their own background and their own color for the dogs.  The students will learn the term "monochromatic" while painting the dogs.

Directions
This project was created during one class which was 2 hours in length.  We began the project by reading the story "Why is Blue Dog Blue?" written by George Rodrigue, and went over the different colors the artist changed for his trademark dog image.  After reading the book, we started drawing the dog step by step.  Here are the steps I took in creating the dog:

Step 1: Draw the nose
Step 2: Draw the white spot
Step 3: Draw the eyes
Step 4: Draw the head
Step 5: Draw the ears
Step 6: Draw the front and back legs
Step 7: Add the details

The details consisted of adding fur to the ears, points in the eyes, and marking the different colors within the dog (where it would be light, dark, or the base color).  This step, with reading the book, took about 30 minutes.

After drawing the dog design, the students began painting the background color.  The students were encouraged to choose their own background, and all three wanted the blue sky and green grass.  Once the background was painted, they were asked to fill in their dog with the color they chose.  The only areas they were asked not to paint were the eyes, inside of the ears, white spot, and the nose.  After applying their base color, we mixed the colors with a touch of black or brown to create the darker tone and added patches of the shadows.  Once finished, we added a touch of white to the base color for the lighter tones.  We then filled in the white spot on the face.  These steps took around an hour to complete

For the last half hour, students were asked to trace their dog with black paint, using a thin brush.  We filled in the eyebrows, cheeks, shadows, and ears, while tracing the entire dog's outline.  Once completed, students had time to touch up any areas needed!


Here's the finished example I made for students to follow along:


Here are my students' finished projects!


Tuesday, June 23, 2015

Summer Workshop Series: Modigliani Self-Portraits


This week, I held a 2-day workshop teaching students (ages 10-13) how to create a self-portrait in the style of Amedeo Modigliani.  Amedeo Modigliani (1884-1920) was an Italian painter and sculptor who is known for his elongated portraits with almond-shaped faces.  When he moved to Paris in 1906, he came across Pablo Picasso and Constantin Brancusi!


Since the studio I taught at was up and coming, not many students had heard about our classes, and with this being our first project, we had one student.  One is better than none!

Materials
-12" x 18" canvas
-pencil
-acrylic paint
-water
-water cups
-brushes
-paper towels

Objectives
Inspired by the style of Amedeo Modigliani, students will create their own elongated self portrait.  Students will also be learning painting techniques throughout the process of creating the painting.

Directions
Day 1: Each class was 2 hours in length.  We began by talking about Modigliani and identified elements of his style that stood out in his artworks.  After viewing images of his portraits, students began drawing their portrait sketch onto the canvas.  We started with the background first, them moved our way up each layer (background, skin color, shirt, hair.  After the 2 hours were up, the first layer of colors were placed down.

Day 2: When the student returned the next day, we worked on the details.  We started with the hair, adding highlights and shadows with different shades of blonde.  We then moved onto the skin tine, adding shadows and highlights to the chin and eyes.  Next, we covered the eyes and mouth, finalizing with tracing the facial features with raw umber.  Once the face was done, we moved onto the shades in the shirt, then finished up with re-tracing the outline of the portrait from the background.  Two hours flew by fast and we had a finished product!

Here's the example I had made to show the student(s):


Here's my student's project in progress and finished!


And while my student worked on hers, I started another one!


During the two days, we had multiple phone calls for more students signing up for future classes, so stay tuned!

These classes are taking place at Pastiche Studio in Mokena, Illinois.  To view details about the studio, classes available, and paint parties, please visit their site!