Wednesday, March 20, 2013
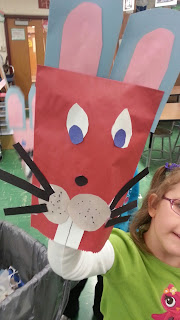
Attack of the Bunny Puppets! A Kindergarten Spring Project
It's that time of year! Now that Spring has arrived, students start itching for projects that remind them of warm weather and Spring traditions! What better way than to have your students create their own bunny puppet!
Here are the materials for the project:
-colored paper bags (I order mine from Nasco or Triarco)
-3" x 12" light blue paper for ears
-2" x 10" pink paper for ears
-Markers
-Scissors
-Glue
The following colored papers I cut in bulk so I don't worry about it for the next few years. These items are good for art helpers to cut ahead of time and fill up ziploc bags full of squares and strips. Hint...good for traveling or on a cart!)
-2" x 2" white squares for eyes and teeth
-1" x 1" black squares for nose
-1.5" x 1.5" blue squares for eyes
-4" x 4" grey or light brown squares for bunny cheeks
-thin strips of black for whiskers
I start by showing the students how to make the bunny ears. Fold a piece of blue strip and a piece of pink strip in half. Show the students how to cut off the folded side, not the talking side! When they cut off the fold, they get two bunny ears! Glue the pink strip onto the blue strip. I also show students how to glue the ears on the back of the bag, not the front, which makes it messy!
Sometimes, I get students who glue their ears on the wrong side, which is easy to fix (even after you remind them to watch for the bag opening!). Just tape the opening shut, and cute the bottom strip off the bunny for a new opening (see below for example).
After the ears are glued on, you now have an option: if you have students in your classes who are still challenged with cutting out shapes, special needs, or still struggle with scissors, the colored squares are perfect for students to finish on time. The only shape I make ALL students cut out are the cheeks...you don't want the bunnies to look like robots!
I place a bowl filled with the white, blue, black and grey/brown squares on each table and have the students complete the assenblage themselves. I encourage students to cut out the eyes, cheeks, and nose from the squares to challenge them, and most students do!
In the last 10 minutes of class, I walk around with the whiskers for the students to place three on each side of the bunny cheeks. When the students finish, they can leave the art room with their bunnies on their hands, or have their bunnies placed in their mailboxes to go how if you're in their room.
Labels:
Art,
Assemblage,
Kindergarten,
Spring Projects
Subscribe to:
Post Comments (Atom)


No comments:
Post a Comment