For this month's Arts and Activities Stepping Stones, I focused on 10 creative art teacher tricks that really work.
When browsing social media, we always see the lists of tips
and tricks that work for some, but fail for others. Sometimes you never know what will work until
you’ve tried it yourself. I’ve gathered
a list of ten tricks that have worked for me after a few years of working out
the kinks. Many ideas were found in
random places , and as weird as they sound, they’ve actually made material
management much easier.
1. The trick to keeping your displays from falling
off the walls: For years, I was always trying to find that perfect adhesive to
help posters and displays stay up on the walls.
I’ve tried everything from rubber cement, blue sticky tack, masking, and
packing tape. When I saw that painter’s
tape and hot glue was the key, I was skeptical, but it truly worked. The posters stay up no matter how hot or cold
it gets in the room or in the hallways!
Just place the tape on the walls, run the hot glue gun across the tape,
and place the poster on top!
2. Saving on dry-erase erasers: Pompoms really work
when glued to the cap of the markers! I was worried at first because I have a
daughter at home that likes to pick stuff off of everything. You hot glue a pompom on the cap of a
dry-erase marker, and you have an instant eraser! Surprisingly my students never attempted to
take the pompom off the cap!
3. Dry-erase boards will save you on paper! If you have coloring sheets or paper for
students to use once finished with a project, students do attempt to take more
than they need. By the end of the school
year, you’ve run out of paper.
Whiteboards are very inexpensive, especially when you buy a large
melamine panel at a home improvement store and have it cut down to 12 x 12
pieces!
4. No access to a sink? Try using a water jug with a spout! This
year, I do not have a sink in my room, and the idea of not having instant water
flow did make me nervous. I was also anxious
about using water buckets or jugs to pour into cups, which would spill all over
and use up time. I was trying to come up
with a way to dispense water into cups, and the idea of the portable water jug
came to mind. Since the water jug has a
spout at the bottom, it makes it easier to dispense water into cups for the
younger grade levels, and prevents spills when pushing a cart from room to
room.
5. Tired of managing paint and water cups with
primary grades? Try mixing the paint and
water together. I discovered that
creating a “paint wash” makes it easier for the young ones to paint without
splashing water all over the table!
(Image borrowed from the blog Fine Lines. I love to see art teachers thinking alike!)
(Image borrowed from the blog Fine Lines. I love to see art teachers thinking alike!)
6. The paint storage trick: Many times I’ve seen teachers using plastic
cups with lids to store paint, which saves on waste. I again was unconvinced because as much as I
told students not to mix paint, I always had the select few that forgot to wash
the brush and mixed the paints anyway.
After being in a smaller space and limiting my budget, I finally tried
it an loved how much paint I was saving!
7. You can make your paintbrushes last longer with
conditioner! I didn’t believe it, but it
truly worked! I have not needed to
purchase new paintbrushes in quite some time!
When washing brushes, use a little dot of conditioner to scrub the
brushes.
8. Tired of clogged glue bottles? In the past, I
would soak my glue caps in warm water to remove the glue clogged inside. After a few years of fighting the clogs, I found that soaking bottle caps in vegetable
oil prevents glue from clogging inside!
9. Even though it takes some time to prepare, creating caddies or bins of basic materials saves on a lot of hassle with dispersing supplies. My stress with handing out materials lowered since I started using caddies. Also, keep the scissors all the same color in each caddy. It saves you a few arguments over which color they get!
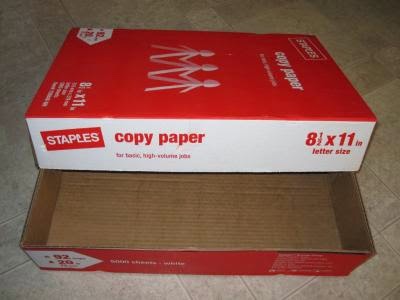
10. Save
box lids to store pre-cut materials for future projects. Since my first year teaching, I’ve saved
materials for projects in box lids and labeled them for future use. This made prepping much easier when I prepare
the project again. If you have the
storage space, I recommend it. I had
little storage space at my previous schools, but I still managed to stack the
pre-cut material box lids for re-use! If you have a pop/soda machine in your teacher's lounge, you can also ask if they can save the boxes the cans are saved in! They're just a little smaller than the copy paper box lids, but work just as well!
No matter what trick you discover, find what works best for
you in your teaching environment!
Here's the link to the site that inspired me to try these hacks: 31 Genius Hacks for Your Elementary School Art Class
Here's the link to the site that inspired me to try these hacks: 31 Genius Hacks for Your Elementary School Art Class


No comments:
Post a Comment