With traveling to three schools, I was extremely lucky to have one art room at one of the schools. I do share it with the music department, but the storage is packed with supplies. With this being my sixth year in the room, I asked permission to re-paint the cabinet doors since they were due. After permission was granted, I took the doors off the hinges and brought them home (after covering up the cabinets with plastic) and handed in my key for the summer. Here's a before picture, so you can see how badly this was needed:
I discovered something quite helpful: Latex paint peels off really good in 100+ degree heat. After going stir crazy in my house and planning my pictures, I went into the garage, set up a sanding space, and went to town. After peeling the top layer and sanding down the others, my cabinets were clean slates and ready for painting!
In case you're curious, I apologize, but I do not have pictures of the original cabinets being sanded. It was hot, I was ambitious, and I forgot the camera to take before/after pictures. When I re-install the cabinet doors back on, I will show you the before pictures from the cabinets still in the classroom!
Here is the end result!
Cabinet Set #1: Piet Mondrian. I introduce Piet as my kindergarteners first project, teaching lines that go up/down and sideways, as well as primary colors. What better way than to have it painted in the classroom to remind them!
Cabinet Set #2: Henri Matisse. I introduce Henri to my 2nd graders, then re-visit in 6th grade. I enjoyed "The Fall of Icarus" for it's simplicity and use of organic shapes.
Cabinet Set #3: Keith Haring. I love Keith's style and messages he shares in many of his artworks. As the first project with my 5th graders, I show them how to draw in Keith's cartoon style while trying to convey a positive message for their community.
Cabinet Set #4: Vincent Van Gogh. Can you tell I saved the best for last? I had so much fun painting this one! I put both doors together to create one whole image! I introduce this image in 4th grade, but re-visit in 5th grade as well. There's so many projects that can be made due to this painting's inspiration. I also can't wait to hear the students say "Whoah!!!" when they enter the room!
In August, I will be making my way back toe room to set up and organize materials for the next school year. Please stay tuned for viewing the cabinets in their spots next month!
If you are blessed with a room to use, have some fun with it, but make sure you have permission first. Expect that your work may not last forever, but enjoy it while you can.
And here's a set installed!
Stay tuned for Part 2 in August!
Thursday, July 19, 2012
Tuesday, July 17, 2012
Gyotaku Fishbowls for Kindergarten!
One of my favorite projects to do with kindergarten is my gyotaku fish bowls. The word "gyotaku" is Japanese, and refers to the process of creating fish prints.
Here's a link to a short video by the artist Naoki: http://youtu.be/vkaK48urU8o
While searching through the Nasco catalog, I found a set of simple rubber fish used for "gyotaku" stamping for kids. The were the same size and shape, which saved on students fighting over which fish was better, and even though they're different colors, I tell the students that the color of the fish doesn't matter, it's the color ink you use to make your print.
The materials you need:
-10.5" x 16" white paper, cut to form a fish bowl shape (see finished example for shape)
-12" x 18" colored paper for frame
-Markers (I choose crayola washable, the students will get their hands covered in marker ink, there's no way around that!)
-Gyotaku fishies (I ordered mine through Nasco, order enough to be sure each student receives one)
(Hint: You can order in a set of seven and get a package of markers with it to start you off)
-Crayons
-Glue
The Lesson:
I start off the project by showing my students pictures of Gyotaku fish prints,a nd explain how fisherman would use this process to record their catch out at sea (since they didn't have cameras back then!) After explaining about the process, I show students how to decorate their fish bowl with crayons.
Shapes: Show the students how to repeat circle for stones at the bottom, or how a rectangle and a rainbow connect together to make a treasure chest. I teach this project to the kindergarteners in the beginning f the school year, about three weeks in (I see them once a week), so they're excited to make a bowl, but still learning their shapes.
Lines: I show students how to use wavy lines for water and for water plants, like seaweed. Again, since it's a beginning of the year project for me, the students are still learning their lines.
Color: I tell the students that before I give them their fish for stamping, They need to color their fishbowl...nicely! In my district, many students have not had preschool or early childhood experience, so they're still learning to color in the lines. Most of my projects reinforce the practice of coloring in the lines to improve craftsmanship, as well as patience.
Once the students finish their coloring, I give them a fish. I tell them to color the side without the letters, since Nasco fish have "nasco" printed on one side. I do have students that forget, so I get a bunch of "nasco" fish in their bowls.
I tell the students to print as many fish as they can in many different colors. The students are shown how to use markers to color the textured part of the fish, then how to turn the fish over to create the stamp. The end result looks like this:
Not every fish bowl will look like this, but the students will have tons of fun stamping! If you travel, remember to bring your fish with you from school to school, or make sure you order some to keep at every school. It's an easy project for traveling, and the students have a ton of fun making it!
Here's a link to a short video by the artist Naoki: http://youtu.be/vkaK48urU8o
While searching through the Nasco catalog, I found a set of simple rubber fish used for "gyotaku" stamping for kids. The were the same size and shape, which saved on students fighting over which fish was better, and even though they're different colors, I tell the students that the color of the fish doesn't matter, it's the color ink you use to make your print.
The materials you need:
-10.5" x 16" white paper, cut to form a fish bowl shape (see finished example for shape)
-12" x 18" colored paper for frame
-Markers (I choose crayola washable, the students will get their hands covered in marker ink, there's no way around that!)
-Gyotaku fishies (I ordered mine through Nasco, order enough to be sure each student receives one)
(Hint: You can order in a set of seven and get a package of markers with it to start you off)
-Crayons
-Glue
The Lesson:
I start off the project by showing my students pictures of Gyotaku fish prints,a nd explain how fisherman would use this process to record their catch out at sea (since they didn't have cameras back then!) After explaining about the process, I show students how to decorate their fish bowl with crayons.
Shapes: Show the students how to repeat circle for stones at the bottom, or how a rectangle and a rainbow connect together to make a treasure chest. I teach this project to the kindergarteners in the beginning f the school year, about three weeks in (I see them once a week), so they're excited to make a bowl, but still learning their shapes.
Lines: I show students how to use wavy lines for water and for water plants, like seaweed. Again, since it's a beginning of the year project for me, the students are still learning their lines.
Color: I tell the students that before I give them their fish for stamping, They need to color their fishbowl...nicely! In my district, many students have not had preschool or early childhood experience, so they're still learning to color in the lines. Most of my projects reinforce the practice of coloring in the lines to improve craftsmanship, as well as patience.
Once the students finish their coloring, I give them a fish. I tell them to color the side without the letters, since Nasco fish have "nasco" printed on one side. I do have students that forget, so I get a bunch of "nasco" fish in their bowls.
I tell the students to print as many fish as they can in many different colors. The students are shown how to use markers to color the textured part of the fish, then how to turn the fish over to create the stamp. The end result looks like this:
Not every fish bowl will look like this, but the students will have tons of fun stamping! If you travel, remember to bring your fish with you from school to school, or make sure you order some to keep at every school. It's an easy project for traveling, and the students have a ton of fun making it!
Wednesday, July 11, 2012
Klee Kastles
This blog was developed after I had been NAEA's "monthly mentor." After I completed my month of posts, I still had more to say! I told myself all school year that I would start to share my project ideas that work well with traveling and cart, and now that it's summertime, I have the time to do it!
The first project I would like to introduce is one I use with my second grade students. I consider this an easy-going project, which means I don't cart around loads of supplies for one project.
The reason I love this project is that I'm not only introducing an artist (Paul Klee), but I'm having students design their own castles using shapes, which goes along with a state fine art standard!
(Castle and Sun by Paul Klee)
The materials I use:
-Black Paper cut to 10.5" x 16"
-12" x 18" Colored Construction Paper for frame
-Oil Pastels
-Posterboard (spend time cutting shapes out of poster board that you can re-use for years)
-Containers for the shape stencils (depending on your method of dispersement, I use plastic ziploc bags filled with shapes for teaching from a cart, and plastic bowls in my classroom)
Shapes to cut out: Squares, circles, rectangles, triangles, archways..whichever shape you wish!
Introduction:
Have you ever watched Nick Jr? They used to have a "trip to the museum" with Moose and Zee, where they visited different paintings. That short is what inspired me to create this particular project. The sad part is that I can't find the link to the video, so if you find it, please share it!!!
Moose and Zee visited Paul Klee's Castle and Sun and shared with the kids how the painting was made with beautiful shapes and colors. After watching my daughter stare at the painting on tv, I not only thought about taking her to the art museum, but I wanted to have my own students create their own castles!
I first shared the image of Castle and Sun to the students. I asked what shapes they saw, and what they thought the painting was about. It's fun hearing what the students say!
After sharing some information about the painting, I then show the students how to start their picture. I hand each student a black paper, their shape stencils, and ask them to use white oil pastels to trace their shapes.
I first start by showing how to trace a shape, but also how to use different shapes to build the castle. After the demonstration, I have the students get to work. It should take about two class periods to complete stenciling, coloring, and framing. I choose to use simple 12" x 18" colored paper for a basic frame for an easy finish.
The first project I would like to introduce is one I use with my second grade students. I consider this an easy-going project, which means I don't cart around loads of supplies for one project.
The reason I love this project is that I'm not only introducing an artist (Paul Klee), but I'm having students design their own castles using shapes, which goes along with a state fine art standard!
(Castle and Sun by Paul Klee)
The materials I use:
-Black Paper cut to 10.5" x 16"
-12" x 18" Colored Construction Paper for frame
-Oil Pastels
-Posterboard (spend time cutting shapes out of poster board that you can re-use for years)
-Containers for the shape stencils (depending on your method of dispersement, I use plastic ziploc bags filled with shapes for teaching from a cart, and plastic bowls in my classroom)
Shapes to cut out: Squares, circles, rectangles, triangles, archways..whichever shape you wish!
Introduction:
Have you ever watched Nick Jr? They used to have a "trip to the museum" with Moose and Zee, where they visited different paintings. That short is what inspired me to create this particular project. The sad part is that I can't find the link to the video, so if you find it, please share it!!!
Moose and Zee visited Paul Klee's Castle and Sun and shared with the kids how the painting was made with beautiful shapes and colors. After watching my daughter stare at the painting on tv, I not only thought about taking her to the art museum, but I wanted to have my own students create their own castles!
I first shared the image of Castle and Sun to the students. I asked what shapes they saw, and what they thought the painting was about. It's fun hearing what the students say!
After sharing some information about the painting, I then show the students how to start their picture. I hand each student a black paper, their shape stencils, and ask them to use white oil pastels to trace their shapes.
I first start by showing how to trace a shape, but also how to use different shapes to build the castle. After the demonstration, I have the students get to work. It should take about two class periods to complete stenciling, coloring, and framing. I choose to use simple 12" x 18" colored paper for a basic frame for an easy finish.
Wednesday, July 4, 2012
Make Time for Your Own Art!
It's summertime!
I know everyone's heard the phrase, "It must be good being a teacher, you have summer's off!"
I like to keep my comments to myself when I hear that, but everyone has different plans for their summer. Some schools are year round, so educators still continue to lesson plan. Many of my co-workers still spend the summer collecting materials for the next school year, create Power Points for future lessons, and research for their curriculum. I'm no different!
Creative Multitasking! While I'm browsing on the laptop, I have a habit of making my way to Pinterest, which is a great place for finding ideas for home and work. If you have not heard of Pinterest before, I recommend it. You create "boards" that save links to other sites and blogs that are useful, such as art teacher blogs, lesson plans, and even recipes for the home. There have been moments this summer where I was creating a recipe from Pinterest while organizing my sites for 4th grade lesson ideas! Go to www.pinterest.com to start!
Create your own work. Between the lesson planning and house chores, I like to use summertime for creating my personal artworks. Creating your own personal work helps to refine your techniques while expressing your own creativity. If you choose to work with a specific medium (such as acrylics or oils), use your time to create your own work.
(Relief: My Response to Passing National Board Certification, 2011)
Professional Development. Summer is also a good time to take classes for yourself. Many districts require professional development time, and what better way than to refine your own skills! Look at what's available in your area...would it be the park district, a local university? A zoo? There are many opportunities available to help you gathers those professional development hours while you're refining your own techniques.
Join a Group! I'd like to recommend joining an artist group online. You can meet other wonderful artist around the world, discuss works of art, and critique each others pieces. I have been a member of the artist group World Artist Network for a number of years, and we've grown into a wonderful artist community. With the help of the artist group, I have been able to post my own works of art for suggestions before the finished state. I noticed a change in my art style with the guidance of my artist friends. There are many art groups available online, through Facebook, Google +, Twitter, and other sites.
Participate in a Challenge! In the artist groups, many times challenges are posted to help exercise your creative skills and techniques. In the World Artist Network, we had weekly challenges called "Digital Animal Drawings" that gave artists a chance to play with digital images or creating drawings. Many times, we found humor in the works created, but it was wonderful to see so much work posted within the week.
(Ostrich, Digital Drawing, 2011)
International Drawing Day! At the end of the school year, there is always a day dedicated to creating drawings from around the world. Drawing Day 2012 was on June 4th, but for next year, recommend to your students to create a drawing on 2013's date. There are many sites available to post your drawings from that day, but for more information, please go to www.drawingday.org.
(Chloe Shells from Coldwater Lake, Graphite on Paper, June 4th, 2012)
Enter a Show! When you have a good portfolio of work, you may consider entering your work into a gallery or an art show. Participating in public shows is a positive way of showing your school and students that you are active in the art community. Many times, your school may even promote your shows to the community so parents, faculty, and students can see what work you can do! (an FYI...be aware that if you teach elementary, your parents may not want students to see questionable images. Know your professional responsibilities).
(Featured in the Southtown Star from Mokena's Annual Quilt Show, 2009)
Offer to Teach a Class in your Local Community. If you don't want to take a class, maybe you want to teach one! Even if you teach elementary, you may want to take a turn at instructing adults by instructing beginner's painting or sculpture classes at local places, such as galleries or park districts. It's a change of pace, and you may gain more ideas for your own lessons in the classroom.
Plenty of ideas, and only three months to use them all! I can't help but take time to create in the summertime, especially when my daughter wants to paint next to me when I'm working with watercolors. I love having the time to work with my own child most of all. Have a Good Summer!
I know everyone's heard the phrase, "It must be good being a teacher, you have summer's off!"
I like to keep my comments to myself when I hear that, but everyone has different plans for their summer. Some schools are year round, so educators still continue to lesson plan. Many of my co-workers still spend the summer collecting materials for the next school year, create Power Points for future lessons, and research for their curriculum. I'm no different!
Creative Multitasking! While I'm browsing on the laptop, I have a habit of making my way to Pinterest, which is a great place for finding ideas for home and work. If you have not heard of Pinterest before, I recommend it. You create "boards" that save links to other sites and blogs that are useful, such as art teacher blogs, lesson plans, and even recipes for the home. There have been moments this summer where I was creating a recipe from Pinterest while organizing my sites for 4th grade lesson ideas! Go to www.pinterest.com to start!
Create your own work. Between the lesson planning and house chores, I like to use summertime for creating my personal artworks. Creating your own personal work helps to refine your techniques while expressing your own creativity. If you choose to work with a specific medium (such as acrylics or oils), use your time to create your own work.
(Relief: My Response to Passing National Board Certification, 2011)
Professional Development. Summer is also a good time to take classes for yourself. Many districts require professional development time, and what better way than to refine your own skills! Look at what's available in your area...would it be the park district, a local university? A zoo? There are many opportunities available to help you gathers those professional development hours while you're refining your own techniques.
Join a Group! I'd like to recommend joining an artist group online. You can meet other wonderful artist around the world, discuss works of art, and critique each others pieces. I have been a member of the artist group World Artist Network for a number of years, and we've grown into a wonderful artist community. With the help of the artist group, I have been able to post my own works of art for suggestions before the finished state. I noticed a change in my art style with the guidance of my artist friends. There are many art groups available online, through Facebook, Google +, Twitter, and other sites.
Participate in a Challenge! In the artist groups, many times challenges are posted to help exercise your creative skills and techniques. In the World Artist Network, we had weekly challenges called "Digital Animal Drawings" that gave artists a chance to play with digital images or creating drawings. Many times, we found humor in the works created, but it was wonderful to see so much work posted within the week.
(Ostrich, Digital Drawing, 2011)
International Drawing Day! At the end of the school year, there is always a day dedicated to creating drawings from around the world. Drawing Day 2012 was on June 4th, but for next year, recommend to your students to create a drawing on 2013's date. There are many sites available to post your drawings from that day, but for more information, please go to www.drawingday.org.
(Chloe Shells from Coldwater Lake, Graphite on Paper, June 4th, 2012)
Enter a Show! When you have a good portfolio of work, you may consider entering your work into a gallery or an art show. Participating in public shows is a positive way of showing your school and students that you are active in the art community. Many times, your school may even promote your shows to the community so parents, faculty, and students can see what work you can do! (an FYI...be aware that if you teach elementary, your parents may not want students to see questionable images. Know your professional responsibilities).
(Featured in the Southtown Star from Mokena's Annual Quilt Show, 2009)
Offer to Teach a Class in your Local Community. If you don't want to take a class, maybe you want to teach one! Even if you teach elementary, you may want to take a turn at instructing adults by instructing beginner's painting or sculpture classes at local places, such as galleries or park districts. It's a change of pace, and you may gain more ideas for your own lessons in the classroom.
Plenty of ideas, and only three months to use them all! I can't help but take time to create in the summertime, especially when my daughter wants to paint next to me when I'm working with watercolors. I love having the time to work with my own child most of all. Have a Good Summer!
Saturday, April 21, 2012
Keeping up with the Kaos: Creative Ideas to Prevent the Burn-Out.
Yes, it’s been a few months since I put up a post, and I’ve felt extremely guilty about it. It just goes to show that a busy year can burn you out! A lot has happened since I last posted…a trip to New York for NAEA, school-wide art projects, and not to mention the fun we’re having at home with a 3 ½ year old!
Every year, I notice my busiest time is from January to April. Since I travel, the bulk of my displays, shows, and kiln loading take up most of the time. So yes, I apologize. As a result of my collection of recent challenges, I would like to share with you some suggestions for making it through those times you don’t even feel like getting out of bed. I would like to ask the question out there if you have your own ways of working through the challenging times, and what you would recommend for readers as well. We’re all collaborating!
Follow your calendar. In the beginning of the school year, I write everything down in my calendar. I collect dates for displays, musicals, contests, and anything else that would be extra on top of my teaching. Having it on paper and knowing how long I have when events come up have been a wonderful tool, and over time, I’ve been perfecting it. I can’t deny that items pop up without me knowing, and as much as I want to gripe, if it’s in your job description, it must get done!
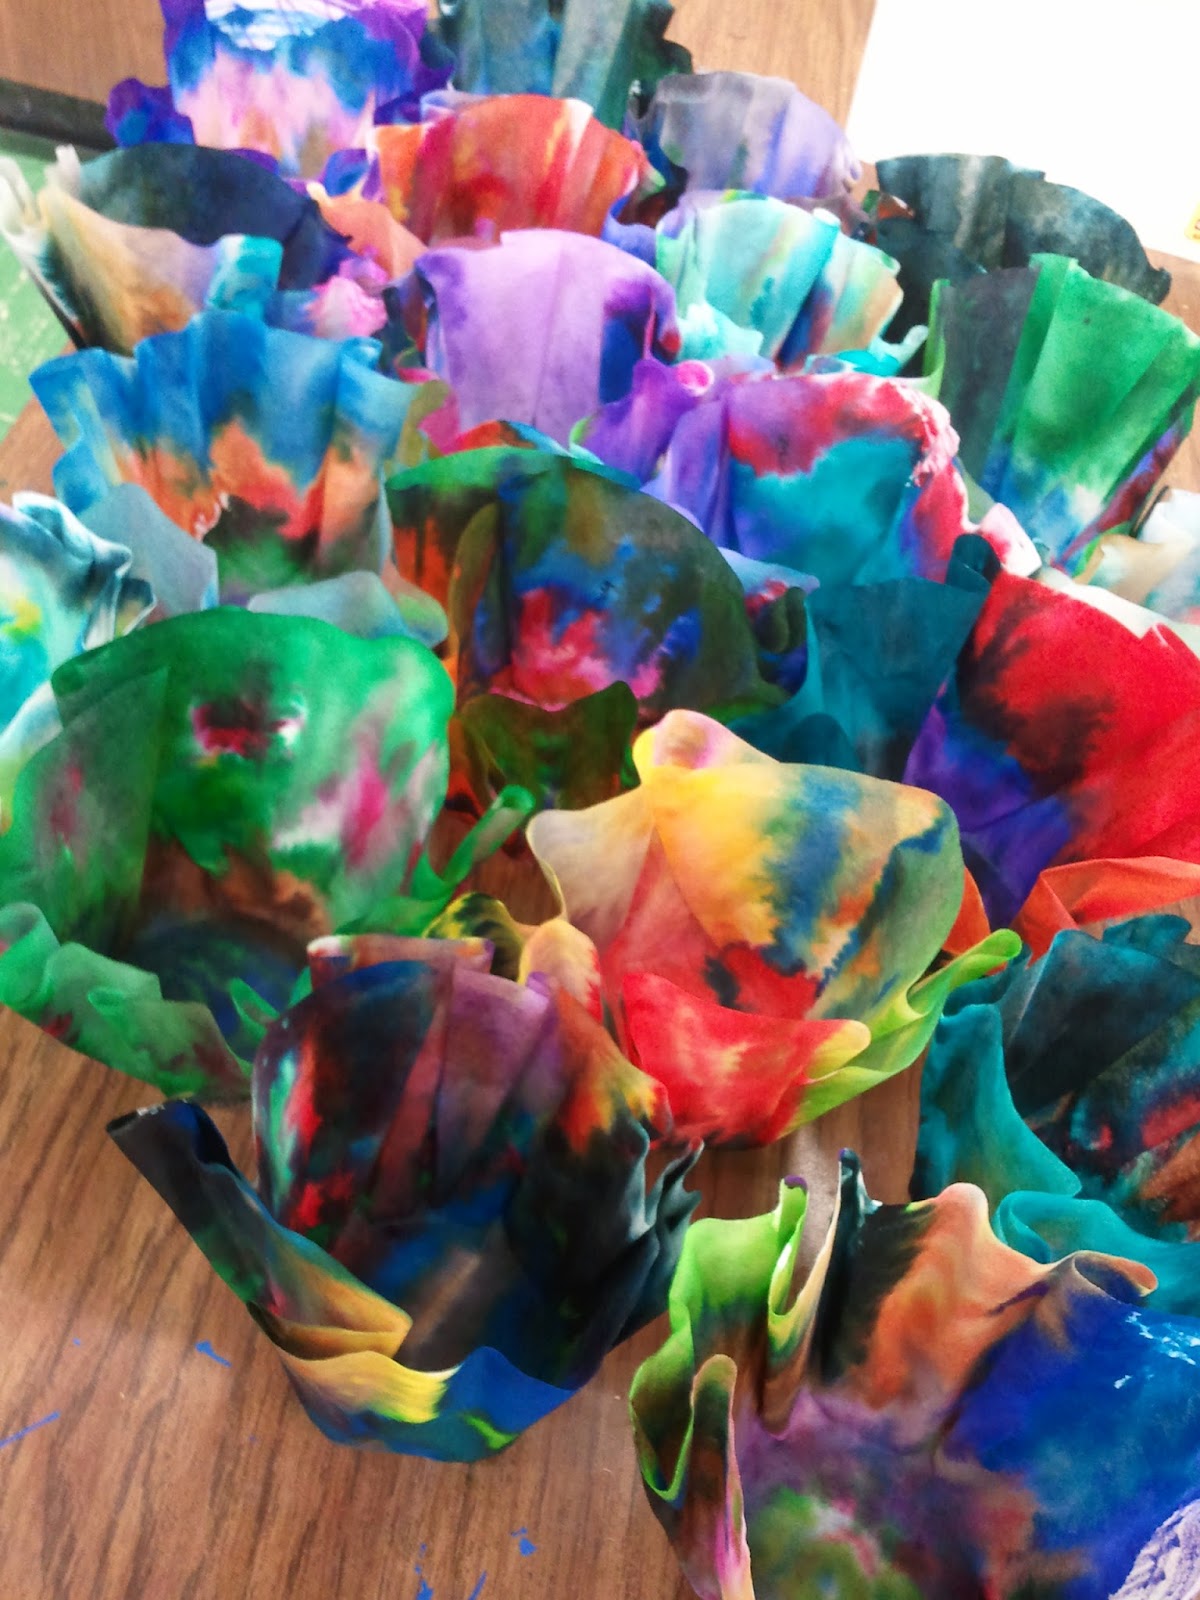
If the workload gets heavy , find a lesson that lightens the load. One example of a lesson I’d like to share is the “Chihuly Flowers” I use with kindergarten (I give my friend Anne full credit for introducing me to this!). All you need is coffee filters, markers, spray starch, tape, and plastic cups. I printed out pictures of Dale Chihuly’s glass flower sculptures, talked about how glass is fragile, and explained how the students will make their own sculptures with paper. Have a coffee filter already colored to show them how much the filter should be colored, and spray the filter over a plastic cup to have students watch the colors blend together (the tape is to mark the students names on the cup so they can be re-used for other classes). It’s a neat, one day/40 minute lesson that the kids love, and the kids take them home the next day. It’s easy because it is affordable, takes up less space, and the teachers love it. It’s easy because you’re pulling out fewer materials on a cart, and teachers can let the cups dry in their own classrooms. There are plenty other lessons that are quick, and still have good objectives that fit a well-rounded curriculum.
Learn how to say no. I consider this a double-edged sword. You are the go-to person for visuals in the school, but you also have your own curriculum to worry about. If another colleague asks you for a display, or a prop, or visuals for their own program, think about what you have to do first. I have a hard time saying no myself, but that’s also because I have a lot of pride in my work. Over time, I thought of how I could accommodate many of the favors, and it goes back to my first main point with travelling: communication. If a co-worker asks for help, ask what it is they need, when they need it, and if the students are capable of doing it. I am a huge fan of student involvement, which leads to my next point…
Get the students involved. Students have a lot of pride in their own work and are more than willing to help out. When school props are needed, I try to see what the students can do. When students have ownership over their own work and work well with others, they gain more pride in themselves and in their school. I encourage students to do more because I want them to see that they can make a difference. It’s not that I don’t want to do the work…I’m still there guiding them. I help them start the ideas and plan to framework of their designs. Once the main shapes are started, the students take off with their own creativity. I would like to share a recent idea in my next topic that was a great success.
Collaborate! This past week, I collaborated with the school social worker for this month’s theme “Integrity.” We worked together to pan a project around Earth Day, which gave many ideas for themes related to integrity, like caring for the environment, taking responsibility, and working together to keep the community clean. My co-worker and I collaborated to plan the day, classes participating, and where to work. At the end of the day, 22 classes created 8 foot wide paper murals that were hung around our school gym, and we ended with a gallery walk! There were so many bonuses from this event: the students got to collaborate and work together on a theme, teachers worked together to plan meeting times and materials, it was a nice break from normal routines, and everyone included had so much pride in their work, not to mention an opportunity for a school-wide press release!
At the end of the school year, we’re tired and burnt. Don’t lie, we all get that way even when we’re super motivated. The key is to never give up, and always try new things. You need to find ways to prevent the burn out, and spicing up the curriculum is a key motivator. Don’t get tired of your job, even with travelling. It’s a rewarding experience and I wouldn’t give it up for the world. I hope my daughter has amazing creative experiences when she goes to elementary school!
Friday, March 9, 2012
Calling All Art Educators...Travelling, Classroom, and Cart Alike!
I've come across a study in art education that I feel is greatly important on the impact of student learning.
Heidi Lung is an art educator who is currently researching the practice of art on a cart. She has developed a webpage to gather research and insight from fellow educators.
Trading Classrooms for Carts: Investigations into the Practice of Art-on-a-Cart is a research study with the goal to better understand the challenges faced by art-on-a-cart educators and to identify successful strategies used in art-on-a-cart practice.
This study aims to add to the body of art education research by providing insight for practitioners, school administrators, and policy makers by 1) accurately describing the art-on-a-cart phenomenon; 2) providing a better understanding of the applications of art-on-a-cart and its place in the field of arts education; and 3) identifying best practices
This research study seeks to describe the art-on-a-cart practice through the voices of practitioners. Your experiences and stories of the elementary art-on-a cart practice is her focus. If you are an elementary art educator on a cart, she needs to hear from YOU!
If you are an art teacher in a traditional classroom and have practiced art-art-on-a-cart in the past, please feel free to contact Heidi Lung on her website. If you yourself have never practiced art-on-a-cart before, perhaps you know of someone currently teaching art-from-a-cart? Please feel free to direct them to the website. Your participation is most appreciated!
Please visit http://artonacartresearch.com for more details and to sign up for the newsletter.
Thursday, January 19, 2012
Becoming a "Master"
I’m now a master certified teacher! Well…I don’t truly believe one can be a master of anything, especially when the world of art education is constantly evolving. I’m still very eager to learn everything that’s offered for my students to enjoy their time in art.
The trick is to keep up with the new ideas, innovations, and never give up.
So…I get to finally say I am now a National Board Certified Teacher! After waiting a grueling weekend with the website down, I woke up early on a Sunday morning, hoping for internet on my smart phone, and voila! The page says Congratulations!!!! I’m extremely thankful for my co-workers, family, friends, and mentor who assisted me in the process.
It’s a unique feeling knowing I achieved a master level certification in Elementary Art, but there was quite a bit of hardship in the process. I will never discourage anyone from going through the process of becoming an NBCT, but I will not hesitate to tell you it’s a lot of work. It has changed my view on teaching quite a bit, and even when I’m giving a lesson, I cannot give a project without sharing with the students why it’s important for them to know what they’re doing but how it affects their skills in all that they do.
So what’s next? My classes are still the most important priority in my career. Fine tuning of projects, constant communication with parents and co-workers, and always finding ways to promote the arts with the community.
Are you willing to take the master challenge?
Subscribe to:
Posts (Atom)