At the end of the 11-12 school year, I found this project and used it as the last art project of the year with the 1st graders. This coming school year, I want to use is at the first project of the year since they can be hung up during open house!
This project is also inspired by the painting The Scream by Edward Munch.
The project is very fun, but you will need extra time for prepping. The materials you need are:
-Digital Camera (photographing students posing for the scream face)
-Printer (make sure your colored ink is full!)
-Printer paper (size your printed pictures as 5" x 7")
-White Paper (cut to 5" x 7")
-Black Markers
-Crayons
-Glue
The week before you do the project, take pictures of your students posing like this:
(I would show you the actual photograph, but the originals are stuck in my computer at work, and I'm at home for summer!)
Prepping for the Lesson: Take the entire class's picture while they are finishing their previous project. Do this for every 1st grade class you have during the week.
Also, during the week, print out a class at a time (and store the photos in a large envelope!). When you have a 6th grade class, you can ask them to trim the 1st graders out of the pictures, or if you're sitting in a meeting, trim the kids out while you're paying attention to the notes (I'm a multi-tasker...I can't help it).
The Lesson: Ready with their pre-cut photos, you can introduce the project! I start by showing the students the photo of The Scream by Edward Munch. We have fun posing like the screamer, and asking why we think the man in the picture is screaming. We also look at the lines in the background and discuss the movement in the picture.
When we're done with the discussion, I show the students how to create a background with lines that show movement. Since we're limited to 40 minutes of time, I tell the students to just use black markers to draw their lines.
1. Start with the diagonal lines that show the path and the rails of the fence:
2. Add the vertical lines for the posts of the fence (I tell the students to use rectangles):
3. Next, add the horizontal line (I call it the ground line)
4. Lastly, add wavy lines that show motion. Describe how the lines show cloudy skies or a pond if you'd like!
Once the students are done coloring the entire picture, have them glue their pictures onto their background like this:
I giggled at every picture that finished! I can't wait to see what this year's pictures will look like!
I went to install my cabinets, and found that two sets were mismatched. I guess I should have labelled them right when I took them down to bring home! Lesson learned, I brought the two doors home and repainted them.
As I was installing the cabinet doors and setting up the classroom, I was looking at another set of doors that were driving me nuts. So, I brought the next set home and before midnight I had Klimt's "Tree of Life" painted!
Here are the finished, installed doors in the room!
Set #1: Piet Mondrian!
Set #2: Henri Matisse
Set #3: Keith Haring
Set #4: Vincent Van Gogh
Set #5: Gustav Klimt
Now that my home base school is set up, I can tackle my next classroom at my second school next week! My next challenge: Starting a classroom from scratch (I'm used to teaching from a cart at my second school!)
This year, I will be teaching at two schools instead of three. I was also told that I will have two classrooms! With everyone asking me how excited I am, I admit I'm nervous. I was used to teaching from a cart, plus I am sharing the room with another art teacher.
So this week was setting up school #1, my home base school. I share the room with two music teachers (who travel by cart during the day). With my home base school also being the only school that takes on summer school classes, the boxes that are ordered every year are sent to my room first before being dispersed. Basically, my room looks like this right now:
I'm pretty used to it and I learned to work around it! Within a week, these boxes will be dispersed and the room will be ready for my creative thinkers.
One of the many activities I accomplished during the summer was researching all the sites I pinned on Pinterest. Before I unpacked my classroom, I reviewed some ideas I found and utilized them in this year's room.
Our school also will be implementing a theme this year, which you may have heard of: How full is your bucket? While I'm still stewing on some ideas about lessons to share, I wanted to increase my visuals on positive behavior and responsibility in the art room. Here are some signs I created (or re-created thanks to the many wonders of Pinterest and sharing among art teachers):
Whoever invented this...thank you! It's above my desk where all my students can see it!
Our school uses P.B.I.S. (positive behavior intervention system) throughout entire school, even in the specials classes and lunchroom. We use a variety of "cool tools" for the students to remember, plus we have the students held accountable for their actions the entire day with the use of a check system. Teachers have clip boards with the class list, and a new page every week. If a student receives one check for misbehavior, it's a warning. Two checks, half their recess. Three checks, all their recess. Four checks and it's a detention. This system worked really well last year since it was used for the student's entire day.
Thank you to the teacher who put this on their own wall! I changed the wording to match our school setting, but the display is beautiful! Here are the close-ups of the messages next to the words:
The fabric is so bright, the students can't help but look at it every time they walk in!
Enough said! This hangs right above the sink. No excuses!!!
Here's my new and improved coloring sheet stack, with plain drawing paper on the bottom (for those who finish early, they have the choice of books, drawing, or coloring sheets related to art).
My biggest pet peeve is when I allow the students to take a coloring sheet...and they take a stack. Or, when it's clean up time, they sneak to the box and take some under the "no" sign. Grrrr!!!!! Here's the scenario I had last year with this:
Students (sneaks a coloring sheet during clean up when the "no" sign is up)
Teacher: What are you doing?
Student: Taking a coloring sheet.
Teacher: And what does the sign say?
Student: No means no.
Teacher: So what does that mean?
Student (puts the coloring sheet back)
This happened at least once a week. Some classes had to have coloring sheets taken away because they were distracting them from their project...AND they would sneak a stack out of the room! In the case of ESL students, they're learning by watching others, and when the others ignore the rules, it makes it harder for the ESL students to know what's right and wrong.
Enough of my grumpy behavior! WIth my new set up, I can monitor the sheets much easier on my new"Creation Station" cart (seen in the next post)!
In my curriculum, I introduce clay in kindergarten. I start with Play-doh, forming shapes, and showing how to make 2-dimensional shapes into 3-dimensional forms. In first grade, we advance to paper (using strips of paper to form shapes). In second grade, we use Crayola model magic to make simple forms, bug in third grade, the ceramic clay is introduced. Third grade is the year the students become really excited to use this special clay, and learning responsibility with the materials. I start with making coil pots, and the students covet their creations.
In fourth grade, we start to get into more challenging methods with the clay, such as the slab technique. I will go over the previous projects with the younger grades another time, but the focus of this post is with the fourth grade level. I thought of the idea while trying to plan my "Art Over Time" entry for national board certification, and it was a joy seeing the projects come to life.
The materials you need are:
-Ceramic Clay (your choice for your kiln)
-Air dry clay (for teaching from a cart or no kiln available)
-Glazes (I use low fire)
-Clay Tools
-Tablecloth (I use canvas material for easier clean up)
-small cup for water and clay (slip)
-Tempura or acrylic paint
-Paper box template
-Glue
Due to lack of space, I do not use rolling pins or slab stick. I instead teach the students how to use the palm of their hands to flatten the clay (without pounding the clay).
This is also a six week project (40 minutes for a class once a week). With a high transient rate at out school, I provide materials for students to adapt or "catch up" if absent or transfer in late.
Day 1: Introduction to the Project
I start by sharing a Power Point I created about Pandora's Box. I explain the history, the myth, and share the cutest video I found created by a student. When my kids see that someone their own age created an animation of a Greek Myth, they love it even more:
(This is found on YouTube, and I thank the student and teacher who created this animation!!!)
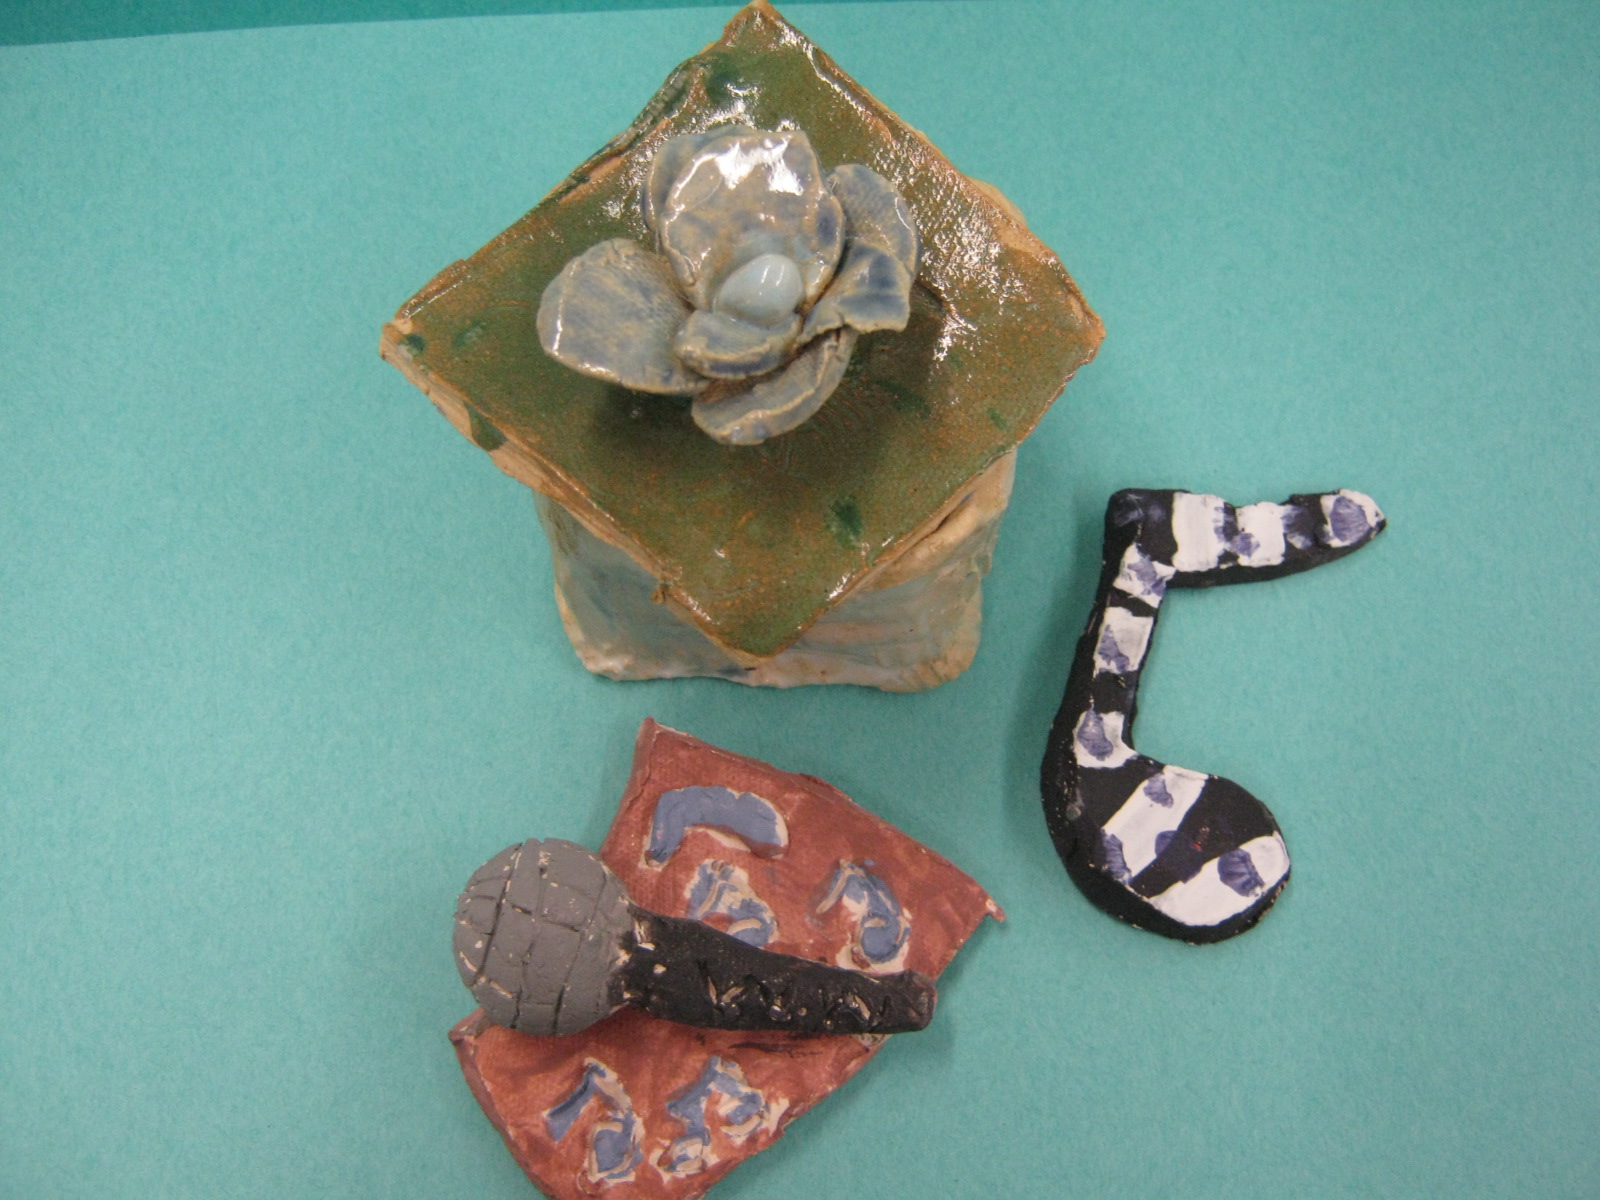
After the PowerPoint, share why the students learned about Pandora's Box: the students will create a slab box from clay that will contain an object of "hope." The "hope" object can be a symbol of something they love or enjoy, such as a pencil for drawing or a music note for music.
With the remainder of the class, I have students practice making a 3-dimensional shape using a square box template. I found a template from Google images, but you can search for your own:
(This image is from another source, you can create your own or borrow this one as I had)
I show the students how to cut the box shape out, then how to fold up the sides and glue together. You will be amazed with how many of your students ace the directions and how many struggle with the challenge. Make sure you help those who need assistance, and offer to those who finish early to help their classmates. When class is over and clean up is finished, I have the students take the boxes with them, even if they didn't finish gluing the sides.
Day 2-4: Creation of the Box and "Hope" Object
The next time I see the students, I review the project objectives. I then demonstrate to the students how to create the slab box design using the slip/score process. After years of teaching this project, I learned that the fastest way to get the box finished is to draw a "tic-tac-toe" design in the clay, which gives you your center base and four sides. I also show how to create a lid the same size as the base of the box by placing a finished box on top of the rest of the flattened clay they have, trace, and cut.
Some students finish the box in one day, and if they're ahead, I ask them to take toothpicks and draw designs in their boxes to add additional details. Overall, it usually takes two days to complete.
After the third day, I take the boxes to the kiln room. In my school I share the kiln with the jr. high, so we plan projects according to when the kiln is available. If a student has not finished the box or was absent, the project is put in the kiln with the objects below after the fourth class.
On the fourth day of project, I share with the students how they can sculpt their little "hopes" out of clay. Since they've had previous experience creating shapes out of clay, I show them how they can make little sculptures or flat shapes with the clay.
Now at this point, if a student has not made a clay object, they use air-dry clay so they will not need to wait another week or two for the clay to come out of the kiln (confusing, but that's how we manage our lessons!)
On the cart, I use air-dry clay for all steps. Instead of glaze, I use tempura or acrylic, depending on the space I have with the materials on the cart.
Day 5: Glazing the Boxes
When the slab boxes and lids come out of the kiln, it's time to glaze. I set up my glazing tables by sets: Warm, Cool, Neutrals, and Stone Colors (rust, peacock, etc.). Students can move from table to table to work on colors, but they cannot move the colors from that table. It's teamwork and responsibility, and knock on wood, I haven't had a broken project yet. (Hint: Make sure you remind the students not to paint the bottoms of the box and lid!!! Especially if you have students that transferred in or were absent.)
When students finish, they go to a table with no glazes and use the resource library I provide with books, how-to-draw designs, and art games.
Day 6: Painting the Hopes
When the little objects are out of the kiln, I always have casualties. Students forget to use slip to join pieces together, or something was made too thin. After hot gluing the breaks, I use tempura or acrylic to paint the hopes. The students know the project is almost done, so once they are finished, I have them write a paragraph about the choices they made about the project. The main questions are: WHat is your "hope?" and "Why did you choose that object to represent your hope?"
Once finished, you can display their work with their paragraphs, which works as an artist statement!
I've been pondering how I can try and offer advice on what works the best in managing an art class with both classroom and cart. The truth is that not one single trick works for everyone. Every single art class is different with unique students, behaviors, and enthusiasm. I have explored ways to create rules for the class, standards for behavior, routines and procedures, and much more. Throughout the year, it can change depending on the climate of the class.
I would like to offer tips and suggestions for what worked best with me, and throughout fall I will be posting visuals of my classroom(s) that display reminders, rules, etc.
Create your Rules. In the beginning of every year, create your list of rules. As king or queen of your classroom (or cart), you must set the rules straight from day one. Your rules also set your routine throughout the year. How should the students enter the room? How should they be ready when you push that cart into the room? Should they be listening while you're talking? What are the consequences for disrespect? I notice that even after 6 years, I am adding new rules or refining ones in place. I do notice that students I have had throughout the years are now familiar with my routines, and they have been making great improvements in their behavior, artwork, and following directions.
Create Your Time Schedule. Make time for your lesson, and be sure to create time for passing out materials and cleaning up. I've heard some art teachers have worked out with their co-workers to clean up after their allotted art time, but our schedule's too tight in our district. Within 40 minutes, I take attendance, discuss, instruct, demonstrate, guide students during project, and clean up. I allot the last five minutes for clean up, and they must be done before I even look at any positive rewards. Yes, the students also create some awesome work in that time.
Create a Mantra. Does your school have a universal message that can be used in your class? In my district, we use the three R's: Respect Yourself, Respect Others, Respect Your School (then we sing R-E-S-P-E-C-T). This theme is repeated many times throughout the school year to help promote self-respect and pride in one's manners. I always start with a discussion of how the three R's can be used in the art room. There are so many mantras that can be used within the art room that are more art-related, and if you're on Pinterest, I have them saved in a board!
Control Your Noise. This is the area I struggle the most with because I believe students should be allowed to interact while they are working on their projects. I also have difficulties creating my own work without background noise, like music. The students know their noise level must be kept down, but many times, they forget or ignore the rules. I'll be the first to admit I become embarrassed when the principal walks in because a student shouted out loud and it was heard in the hallway. There are some ways I keep the noise down. First, I use a "Yacker Tracker," a handy noise detector that looks like a stoplight. When the detector reaches red, I give only one warning. If it reaches red again, they lose their star for the day.
This video also shares a great trick for controlling noise in the classroom without verbal reminders. It's from www.theorganizedclassroomblog.com (I found this on Pinterest...see how awesome that site can be!)
Reward Systems. Recently, I switched to star rewards for each day. If a class reaches four stars, every student receives a token prize, which can be candy, or pencils, art samples, or stickers. For some teachers, I've heard they give free art time. My students get some free time when they finish projects, but with all the fun projects to make, I run out of time to do all my lessons by the end of the year! I kept track of my stars on a chart large enough to keep all 21 classes and site all the weeks of the year. Gosh, I wish I took a picture of that covered at the end of the school year. I'll have my new picture added in a few weeks!
Prior to the star system, I used a game called "Picasso Pic." The object of the game was to start a class with 5 numbers on the board, representing 5 students that could get picked. Each student sat at a seat with a number. The numbers were then written on poker chips and placed n a box. If a class became too loud, they lost a number. If a multiple students were misbehaving, another number. At the end of clean up, the numbers on the board represented the number of students picked. You pick a number out of the box, that student received a prize. I found many flaws with this game and decided not to use it anymore. First, students were getting picked over and over, while others waiting weeks and weeks. I tried to keep track of who was picked and who wasn't, and it became a hassle. Second, since some students didn't get picked for weeks, it wasn't fair. Third, I got tired of students taking too much time to pick out of the box. Lastly, I had prizes stolen. This game does work in other schools, but not in mine.
With my grades K-3, I use Class Dojo, which is an online point-based classroom management system that has worked wonders. You enter each students name in a class, and while you have that class, you can add or subtract points depending on the student's behavior. I like to give rewards for most points earned every three classes. Students want to earn their points, and when I randomly announce a point given, I love seeing the room give a silent cheer!
Understand That You Are Not Perfect. After 5 full years, I still change strategies for managing behavior. The reward system is nice, but then you may have one or two students that continue with their behavior. This is where you have to keep on your game. Is the student teasing others? Notify the parent. Is the parent difficult to reach on the phone? Write a letter. Are there issues with a group of students? Separate them! Still issues? Repeat the previous statement. Sound like I'm complaining? Well, it happens! Teaching what you love is awesome, but you still need to manage your classes.
Seating Charts. If you're on a cart and move from room to room, you're golden. The chart's in place! Communicate with the classroom teacher on any changes or designated spaces for students in the room while you're giving your lesson. If you do have a classroom, create charts. I create 21 different charts, and they have to be done in pencil. I draw a floor plan, photocopy it, then write the class name and students in their table places. When I need to switch, an eraser will help you in modifying your seating arrangement. In my situation, if the chart is not in place, the students' behavior was different.
I have much more to share, but it is late. So many strategies to write about...
My students get totally excited when I tell them I know quite a few working artists. When I tell them that they know one already, they say, "who?" Then I show them the work that I do and they have that jaw-dropping look again. Moral of my story is, show your students you know more than what you teach! Since I create outside of the classroom, I've met many great artists in the field, and they always say they are more than willing to share their work with the students.
As a traveling art blog, I want to share that this is an idea that can promote your work in the schools. Students see that art is a valid career after school, and they can follow their dreams.
Invite an Artist in the Community. If you know someone personally that lives in the community or have heard of a local artist, invite them to the school to talk in your room (or room to room on a cart). Make sure to approve the visit with the administrator first...they may want to have an all school assembly!
Communicate by Mail! If you are unable to invite the artist to the school, consider sending letters or emails. For example, I communicated with a friend of mine, Terry Border, who is known for his Bent Objects (visit http://bentobjects.blogspot.com// for more information). You may not have heard of his name, but if you've seen this image in Target in the cards section, you've seen his work!
I contacted Terry and asked if I could do an after school art project inspired by his Bent Objects. After he gave permission, I shared his work with my students, and they went to work making their own little sculptures. Here are some of the results:
At the end of the project, I shared my students' work with the artist, and he was so happy to see that students created their own artworks inspired by his work! He then mailed an autographed poster that hangs in the art room still.
Create an Online Chat. I recently had the joy of having an artist friend of mine, Cliff Roth, communicate via Google+ hangout with my 5th grade students. I used this idea as an after school art project to introduce caricature art to my students. Cliff Roth is now a famous Google+ artist, known for his "Speedpaint Hangouts." Cliff arranges the hangouts to help him create portraits within a short span of time, helping him refine his digital drawing skills and sharing his work with others. You can view some articles and interviews here:
Cliff and I arranged a time to set up the live hangout on Google+ after the school day had ended. I set up my laptop, projector, and speakers, and made sure the technology department was aware of the arrangement (our tech guy even sat in on the interview!) I had the students ask questions to Cliff about caricature art and how to create a caricature, all while watching Cliff create a drawing of the school principal!
When we finished the interview, students were paired up to draw portraits of each other. In the end, we took a group picture with our work and mailed Cliff a huge thank you card for talking with the students!
Just remember know matter how you bring the artist to the room, make sure you and the students thank them!
If you have another way to bring the artist to the room, please share in the comments! You can also use Skype if it's available in your district!
Have you ever had your students tell you they just don't get Jackson Pollock's painting style? Do they tell you they can do that at home "in five minutes?" I had to quote a famous book with that one since I read it to my kindergartners on their first day of school (Olivia by Ian Falconer)
If you ever get a chance to, spend some time reading Olivia to your kindergarteners. It's a cute book that shows imagination, and even work of artists, such as Jackson Pollock and Edgar Degas.
At the end of the year for the 3rd graders, I like to bring back the idea of action painting. I feel that at this stage, 3rd can handle expressing themselves with action painting without going overboard with a paint mess. Also, to saw on a big mess, I just stick with watercolors for faster drying and quicker clean up. Here are the materials I use:
-Action Jackson by Jan Greenberg and Sandra Jordan
-Watercolor paints
-Brushes
-Watercups with water
-Newspaper to cover the table (or tablecloths if you prefer)
-9" x 12" white paper, preferably 60 lb. weight
I use this lesson within one day since I see the students for 40 minutes. At the end of the year, kids are want to get outside and play. This project is good for giving them a little movement with their bodies and their artwork.
Start the class by reading Action Jackson. Once finished, ask questions to the students on what action painting is and how Jackson created his artwork in that style.
Once finished with the discussion, show the students how to create an action painting by demonstrating different ways to drip or flick the paint off the brush onto the paper. Make sure you take the time to explain about containing their excitement, or you may have extra clean up around the room!
Have the students make their paintings! Since watercolor paint dries quickly, students can take their paintings out of the room that day, or drop them off later once dry. You can even use this as your last project of the year to display around your art room or hallways.
I like this project because it's another simple one for traveling from school to school. I have watercolor paints and paper at each school, I just carry the book with me. SInce I have a bad habit of forgetting materials, I took the time to order a copy of Action Jackson for each school library (so if I forget, it's already there).
Are you wondering what elements or principles are used, or even the standards? Movement is the number one principle of design. Through paint splatters, students are demonstrating movement in their work. Space is another one since I ask the students to fill their space with their artwork. Empty areas means more room for creativity. Responsibility with materials and using them safely and effectively is a state standard and one I push in each paint project, even through 6th grade.


.JPG)