Showing posts sorted by date for query dot day. Sort by relevance Show all posts

Tuesday, July 10, 2018

Starting Off the School Year on the Right Foot


It's July, and the last thing many of us want to think about is going back to school.  But, summer is for planning out our next year ahead of time, and even I've been chilling on the couch gathering my plans for the first week of August.

For this month's Art Ed Blogger's Network theme, we're all discussing how to plan the first week of school.  For September's Arts & Activities Stepping Stones column, I will also be sharing a few more tidbits of advice for starting fresh.

So let's say your first day back at work is mid-August.  When is a good time to start setting up?

I personally like to give myself the entire week before.  After 12 years of teaching, I learned that giving myself more time to plan works better in my favor, especially with having young kids at home.


See the above photo?  That was a nightmare.  Always be prepared in case your space looks like this!


I spend the first two days taking down the board coverings, unpacking the supply boxes, rearranging furniture, and setting up my floor plan.


The next set of days is for designing bulletin boards and displays, setting up the centers and supply bins, and organizing resources.  Decorating can take up quite a bit of time, especially when you walk in without a game plan.


The last set of days are set up for paperwork, seating charts, and first few weeks of lessons...and every year, there is something I still need to copy right before the students come in.

For the first week of school, I meet my classes for the first time.  I start off with giving each child an assigned seat.  Not everyone does this right away (which is okay), but in my case, I find it demonstrates to my students that I start off orderly and planned, and in return, my students are more receptive to learning.


Students are also introduced to our class "Art Jobs" board, which changes each week.  Each table is given a specific job to accomplish for that day.


I also spend some time discussing expectations with the students.  One of the examples I go over is the "No-No" and Yes-Yes" board.  It makes the students laugh every year when I talk about the floating houses and blue sky lines.


After each class discussion, I give each student a blank paper and give them time to work on their first drawing, which is a self portrait.  It's my beginning "pre-test" for my SLOs, which demonstrates growth over time.  For each grade level throughout the year, I design a "post-test" portrait drawing to measure growth over a few months.  All portrait drawings are saved each year until the end of the students' 6th grade year.  As a farewell gift, I hand back their portrait drawings collected since kindergarten, and they giggle and cry over their artworks created since first attending the school!


After completing all the beginning portrait drawings, we spend the next week of classes working on our International Dot Day projects!

When I was on a cart, I needed to plan my classes in many other ways.  In the past, Ive written about how to set-up when you're expected to teach from room to room.  Here are a few articles I'd like to share for my cart peeps:

The Pros and Cons of Teaching from a Cart

Choosing Your Cart and Finding Space


 This post is a part of The Art Ed Blogger's Network: Monthly Tips and Inspiration from Art Teacher Blogs. On the second Tuesday each month, each of these art teacher blogs will post their best ideas on the same topic.

Participating Art Teacher Blogs:

Tuesday, March 13, 2018

STEAM & Art Integration


A few years back, I wrote an article about STEAM for Arts and Activities magazine. I would like to revisit a few points from the article and share some awesome things our school has done that reflects the STEAM approach. I'm also very excited that our school is in the process of creating a maker's space connected to our new STEAM supply room, which we've been using quite a bit!
Many educators have been pushing for changing STEM to STEAM (including the A for arts) to truly meet the standards of 21st century skills. According to Susan Riley from Education Closet*, “STEM alone misses several key components that many employers, educators, and parents have voiced as critical for our children to thrive in the present and rapidly approaching future.”

To implement the STEAM approach, be sure to include standards from different disciplines, which create interdisciplinary connections.
S We teach science in art. When introducing lessons about landscapes, living forms, or the human body, we identify and describe elements in artworks reflecting these subjects. My students can tell you what fins are for on a fish when creating an ocean-themed project, or what animals can camouflage to hide from predators in a pattern project. Every Spring, we hatch eggs in my art room so students can document the process in drawing, with a final quick sketch of baby chicks chirping in the room!  
We are also tapping into science standards when working with materials. Through the use of artistic materials, we are performing experiments and manipulating the ingredients to create something new. Clay is a prime example. When you first work with ceramic clay, it is soft and damp, but once dried after your project is created, the clay is hardened and ready for firing or painting.


T We teach technology in art. Even if your school has little to no resources for hands-on technology in the classroom, you still have some form of modern day conveniences within your room. Currently chrome books and iPads are the next wave in digital arts. Our school now has 1+1 chrome books for the students.  At the end of every project, students bring their chrome books for writing artist statements in Artsonia and learning new art games I gathered together using Symbaloo.  February also featured a Digital Learning Day, which students used technology throughout the day.


E We teach engineering in art. We know of engineering as a branch of science and technology that focuses on the design, construction, and use of machines and structures, but it is also the action of working artfully to bring something about. It does sound like the arts can fit into this category, but when STEM is talked about in a curriculum, many times the “creating” part of engineering focuses on the mechanical aspect. In art, we design, construct and many times use our artworks from our imagination or from subjects that inspire us. We can be architects designing drawings of buildings, fabricators constructing mechanical artworks, or mini scientists designing robots.  I admit, I haven't gone as far as designing robots or Rube Goldburg performances as of yet, but I have some pretty awesome little architects in my classroom!


A We advocate for the arts in education. We are the glue that holds the bridge between subjects together. When advocating for the arts in your schools, share how you tap into core subjects in your lessons, reinforcing what students learn. This can be done while you show how you keep the integrity of the art standards. Display your students’ work around the school, share it in the community, and show your administration the importance of the arts in STEAM.


M We teach Math to the students. We use geometry, symmetry, perspective, measurements, and more, all while scaffolding these skills as the grade levels advance. Are you gridding to create larger scale projects? You’re including mathematic standards within your lessons!  While you are assessing student work that requires the use of shapes, symmetry, and measurements, we are also assessing on the math standards.  One of the first lessons I teach to kindergarten is identification of shapes and creating an image out of shapes, which is one of the kindergarten math standards!

In the beginning of the school year, our school designed a STEAM room for all the teachers to use with classroom lessons and projects. Even I shop the space for items to use for my lessons! Microscopes, magnifying glasses, spray bottles, styrofoam shapes, and so much more!


This month, The Art Ed Blogger's Network is writing about STEAM/Art Integration. Join us on the first Tuesday each month for new projects, ideas, and inspiration.

Participating Art Teacher Blogs:

SaveSave

Sunday, May 7, 2017

Collaborations in the Art Class: May's Stepping Stones


Some of the best opportunities we can use in art classes are collaborations.  A collaboration occurs when your students actively work with another student or set of students to produce or create something.  This can be done to complete individual projects, group murals, develop ideas, or share art experiences.

There are many ways to have a successful collaboration without worrying about the students who do all the hard work while other sit back.

Choosing partners to work together.  While in class, you can pair up students to work together on drawings, paintings, sculptures, or prints.  I pair students up to share materials, and I find that with the students working closer together, they bounce ideas off of each other.  The ideas shared help in many ways to enhance the products because they are self-critiquing each other’s artworks.

Group Projects.  Group projects work when there are big ideas to be made into reality.  Take care in working with groups to make sure that one student doesn’t take on the entire load.  It is also in the group setting where you’ll find students developing their teamwork abilities.  I enjoy walking down the school halls watching groups work together to design posters, create stories and research facts needed for reports and presentations.  If well organized, students can create amazing larger than average projects that can awe and inspire others.

Classroom “Buddies.”  This collaboration happens when you combine two grade levels to achieve a goal (for example, kindergarten students with 6th graders).  Buddies can be used throughout the school year or with specific projects you assign.  Our school promotes this because younger students look up to the older students, and the older students take pride in handling the responsibility.  I like to use this system to not only assist with craftsmanship practice, but to encourage ideas and inspiration. 

Art Pen Pals.  Writing buddies have been a popular collaboration since I was in elementary school.  It was always exciting on the day our letters from our pen pals would arrive and we were able to write back.  With having art class pen pals, you can create ways for students to combine their efforts in creating artworks for students to enjoy sending back and forth!  If you’re attempting to work with pen pals and you’re worried about which student would be able to keep their projects, try to have students create two artworks that can be shared and added to, which will alleviate the challenge of which student keeps the artwork.

Cross-School Project Collaborations.  This year, the Jr. High art teacher and I worked together to plan a joint project between my 3rd graders and her students.  My 3rd graders created a drawing of an alien creature inspired by the surreal artworks of Joan Miro.  Students had to create the alien, give it a name and special abilities, and create an environment for the alien.  One the students were finished, the drawing were sent to the Jr. High.  From there, the students create sculpture prototypes of the aliens in a box, as if they were making an actual toy.  The purpose was to learn how to market the aliens with the specifications given.  The completed sculptures were sent back to the 3rd grade students as gifts.  Our students were in love with the overall results!  If you have multiple schools within your district, or already have art pen pals, this would be a great way to combine artistic efforts to create amazing artworks.

All School Collaboration.  There have been some amazing murals created at our school.  Once you have a theme, every one of your classes can work together to create visual masterpieces.  My favorite collaboration is for International Dot Day.  Each student creates their own “dot” project that can decorate the walls of your school.  Another successful mural was using self-portraits to promote our diverse community. There was also a year where each of my classes created a large scale artwork representing Earth Day.  We had over twenty-five 6 foot artworks hanging around the school for students to view during an all-school exhibit.

Working with the Community.  There are many ways to work with your local community to create amazing artworks.  One popular idea is the Dale Chihuly-inspired plastic bottle sculptures that can decorate gardens and parks near the school.  Students and local residents can work together to build pubic artworks that share pride in their neighborhoods!  Students can also work together with the community to create interactive murals at their local village halls, public libraries, or local businesses and galleries!

Consider having your students collaborate to bounce ideas, share input, and grow in their imagination.  Opportunities like this help students develop their team building skills and provide experiences the students will never forget when they grow up! 


Monday, February 1, 2016

Children’s Book Series that Inspired Great Art Projects: February's Stepping Stones


Click here to view the entire article in Stepping Stones in the Arts and Activities magazine.

With the ELA common core standards, more art educators are attempting to incorporate literature within their curriculum.  From artist series to popular fictional characters, art teachers have tons of creative ways to promote visual literacy and help design lessons to include supplemental materials or project inspirations.  You can create a lesson from any book you pick up in your classroom, but since we’re visual artists, many of us like to focus on “art” specific topics.  You may find a story about “Uncle Andy’s Cats (inspired by Andy Warhol),” or read about artistic inspiration from “Bridget’s Beret.”  You could also use books to explain elements of art, such as “Mouse Paint” or “Lines That Wiggle.”  Among all the books I use, I like to refer to a few series I’ve collected for my art library in my classroom.


Getting to Know the World’s Greatest Artists:  This artist series (written and illustrated by Mike Venezia) is a wonderful one to use with the elementary level.  The pictures are bright and colorful, and the stories are very informative and to the point.  Students are able to learn about the artists’ place of origin, how they became artists, what famous works they made, and how the artist impacted the art world.  I like to use this book series when introducing an artist and his/her style of art.  There are currently over 30+ artists featured in the series.  If you go to the website www.gettingtoknow.com,  there is a list of artist books available, as well as teacher resources for specific artists!


Peter Reynold’s “Creatology” Series: Many schools celebrate “International Dot Day,” which is inspired by the book titled “The Dot,” which promotes students to “make their mark.”.  The 2nd and 3rd books, which are “Ish” and Sky Color,” explore more about keeping your eyes open to possibilities and having the freedom to express yourself.  When our school celebrated International Dot Day, I had each grade level (from K-6) create a “dot” to be displayed around the school.  There are numerous project ideas that you can find with a Google or Pinterest search, thanks to many art teachers who blogged their student creations.  Lesson ideas and resources can also be found at www.thedotclub.org, which is the site dedicated to International Dot Day.


Eric Carle’s Children’s Book Collection: Most children are familiar with the designed picture books written and illustrated by artist Eric Carle.  His most known work, “The Hungry Caterpillar,” has been translated into 62 languages and sold over 40+ million copies.  Eric Carle’s style of art is very recognizable. His style has inspired many Early Childhood and Kindergarten projects.  Eric’s themes of his stories revolve around his love for nature, which is an interest of most children at the primary grade level.  I’ve enjoyed working with “The Grouchy Ladybug” with my kindergarten students!  We’ve created paintings filled with ladybugs and different characters from the book, and it’s quite funny when a student attempts to draw the whale in the sky!


Scholastic’s stories written and illustrated by students: I love when we have Scholastic book fairs because I like to see what the next young author series may be.  It all started when I found the book “Van Gogh’s Cat” written by 2nd grade students from Muncie, Indiana.  Each page was an artwork created by each student in the class, while the story itself was written by the students!  The following year I picked up “September 12th,” which was written by 1st grade students after 9/11.  After reading these books over and over again to my students, I thought how interesting it would be to create artwork inspired by books written and illustrated by students at the same age!  In my second grade classes, I have students create their own masterpieces with a cat jumping, walking, or pouncing out of their paper, just like the 2nd grade students who wrote the book!  My students are always shocked to see that books made by other kids their age can make it in print.  And funny enough, there is another art-inspired Scholastic book in our fair this week called “Masterpiece” to add to my collection!


Artist Series by Laurence Anholt: While browsing through your school library, you may come across an artist story by the author Laurence Anholt.  There are currently 8 titles in the series with new stories being created.  Anholt’s stories are about real children who actually met great artists.  The material is based on actual research.  To learn more about this artist series, please visit www.anholt.co.uk.


Books can be a very essential part to your art curriculum, and this list is only a small handful of what you can use within your lessons.  I encourage you to explore what art-inspired books you can use within your classes!

Wednesday, December 16, 2015

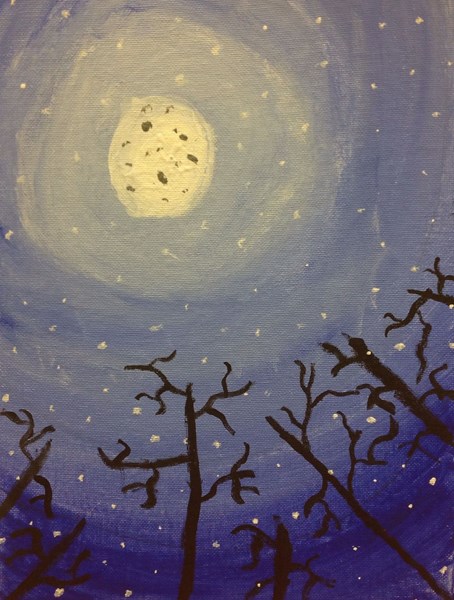
Monochromatic Trees with 5th Grade


Have you seen this project floating around in the Pinterest pages, or have you been to a paint party/wine and canvas?  I've pinned the project for awhile and started trying it out with my 5th grade students last school year.

At the 5th grade level, I feel that students are "responsible" enough to work with acrylic paint.  I explain to students that the paint does not wash out of clothes (even though it does to an extent, I want students to understand the responsibility with the paint).  My classroom is also tight with no sink, so I use fewer colors for a smoother pass-out/clean-up.

With paint parties being all the rage, I want students to have the experience of working with canvas! Since I have over 100+ 5th graders, I work with canvas boards.

This can be a winter project, so you have a range of time to work with!

Materials
9" x 12" canvas boards
Acrylic paint (blue, white, and black)
pencil
paint cups (with a table of 4 students, I pass out 2 cups of each color to share)
water containers
water
flat edge and fine point paint brushes

Objectives
The students will be introduced to monochromatic colors.  They will practice mixing the blue and white paint to create tints and shades of blue for the nighttime sky.

Directions
This project takes approximately 3 40-minute class periods.

Day 1: Explain the element of value and how colors can be created with white/black to make tints/shades.  I recommend finding your way of introducing the class.  Maybe to want to warm them up with a value activity sheet?  The canvas is passed out and students are asked to draw 5 circles total, which expand to the edge of the canvas.  Students are only given blue and white paint to fill in the inner moon and outer edge.  If you have time, explain how to mix the blue and white in each space to paint.

Day 2: Depending on how far you have made it with the blue and white painting, explain the color mixing technique again.  If students finish the sky, have them use black paint to draw in the tree branches.

Day 3: All students should be done with the sky at this point.  Re-explain the tree branches, as well as the moon craters and snow drops.  I have students use a fine small brush to dot the snow instead of splattering...especially in my small art space!  Students also write in their artist statements, which include their thoughts on the project and what they had learned.

Here's a few finished projects!


Friday, September 12, 2014

Celebrating International Dot Day!


"International Dot Day", a global celebration of creativity, courage and collaboration, began when teacher Terry Shay introduced his classroom to Peter H. Reynolds’ book The Dot on September 15, 2009.
"The Dot" is the story of a teacher who challenges a doubting student to trust in her abilities  to “make her mark”. What begins with a dot on a piece of paper becomes a breakthrough in confidence, which has gone on to inspire countless children and adults around the globe.

To celebrate, each grade level has created a project that is "dot-like."  Once projects are completed, they will be displayed in the halls of our school!

Some projects took at least 3 class periods to complete, but by the end of September, our school will be filled with dots galore!


This is just the start of the many dots to display!


Kindergarten Dot Paintings
Inspired by the artist George Seurat


Materials
-white paper (any size you wish to cut)
-paint dots (can be found in Nasco, Triarco, or Michael's Arts & Crafts in a hurry)

After showing the painting "Sunday Afternoon" by George Seurat to kindergarten students, I shared how pictures can be made just by using dots.  Using "paint dots," students filled their paper with colorful spots! 

Total time: 1-40 minute class period


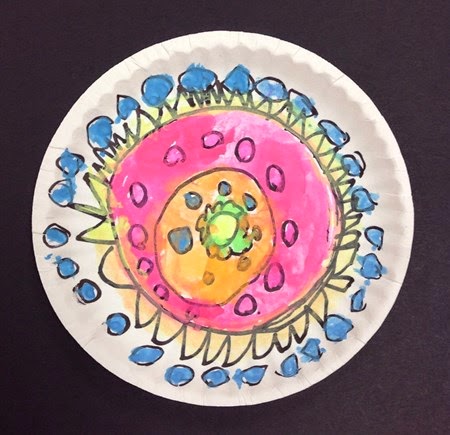
1st Grade Mandala Paintings
(Thank you, Cassie Stephens, for your project idea!)


Materials
-small paper plates
-black permanent marker
-neon tempura cakes
-paintbrushes
-water cups
-table clothes

After sharing mandala designs with 1st grade students, we created our own mandala-like designs within a plate and painted with bright colors!

Total project time: 1-40 minute class period


2nd Grade Abstract Drawings
Inspired by the art of Wassily Kandinsky


Materials
-pencils
-white paper (cut to square)
-black markers
-colored markers
-scissors
-glue
-a round container for center circle

Students were introduced to the art of Wassily Kandinsky.  Wassily used many geometric shapes and creative lines to fill his artwork.  2nd graders were asked to do the same, all while listening to music to inspire movement in their drawings!

Total project time: 2-40 minute class periods


3rd Grade Mandala Drawings
Inspired by sand-made mandalas


Materials
-white paper
-pencils
-a round container to trace circles
-black markers
-colored markers
-scissors
-glue
-square colored paper for frame

Students were introduced to sand mandalas.  As nice as it would have been to actually make one with sand, we stuck with drawing our designs and adding bright colors instead.

Total project time: 2-40 minute class periods


4th Grade Metal Relief Dots
(Cassie, I thank you for this idea too!  I had to try it!)


Yes, you can use coins as examples!

Materials
-cardboard or poster board circles
-foam shapes (when I order them now, they are stickers)
-aluminum foil
-spray glue
-permanent color markers

Students were shown examples of metal relief, like coins and jewelry.  Relief is when you have dimension within a flat piece, which creates texture.  When creating their relief, students used foam shapes for the dimension, then (once covered in foil) colored on top with patterns and designs.

Total project time: 1-40 minute class period


5th Grade Radial Symmetry
Inspired by Stained Glass Window Designs


Materials
-black paper (cut into a circle)
-foam shapes (with or without stickers)
-pencil
-colored paper for frame

Students were introduced to radial symmetry.  Examples were shown of many stained glass window designs, as well as kaleidoscope patterns.  Students created their own radial designs (split into four quadrants) using the foam shapes to demonstrate their understanding.

Total project time: 2-40 minute class periods


6th Grade Zentangle Patterns


While searching on Google, I came across tons of zentangle patterned circles.  This was not my image, but I'm using it as an example of what I wanted my students to create.  So to the original artist, you inspired us!  Thank you!

Materials
-white paper circle
-pencil
-skinny black marker
-zentangle pattern packet with examples
-colored markers
-colored paper for frame

Students were shown zentangle pattern examples and where they may find patterns in the commercials they watch or the clothing they wear.  Students create their own zentangle pattern circles, teaching them patience and care with overlapping patterns.

Total project time: 3-40 minute class periods.  The students LOVED their work!


What did you do for International Dot Day?